The On-Screen Burner Interface
Quickly and Easily Perform Disc/File Copy Operations
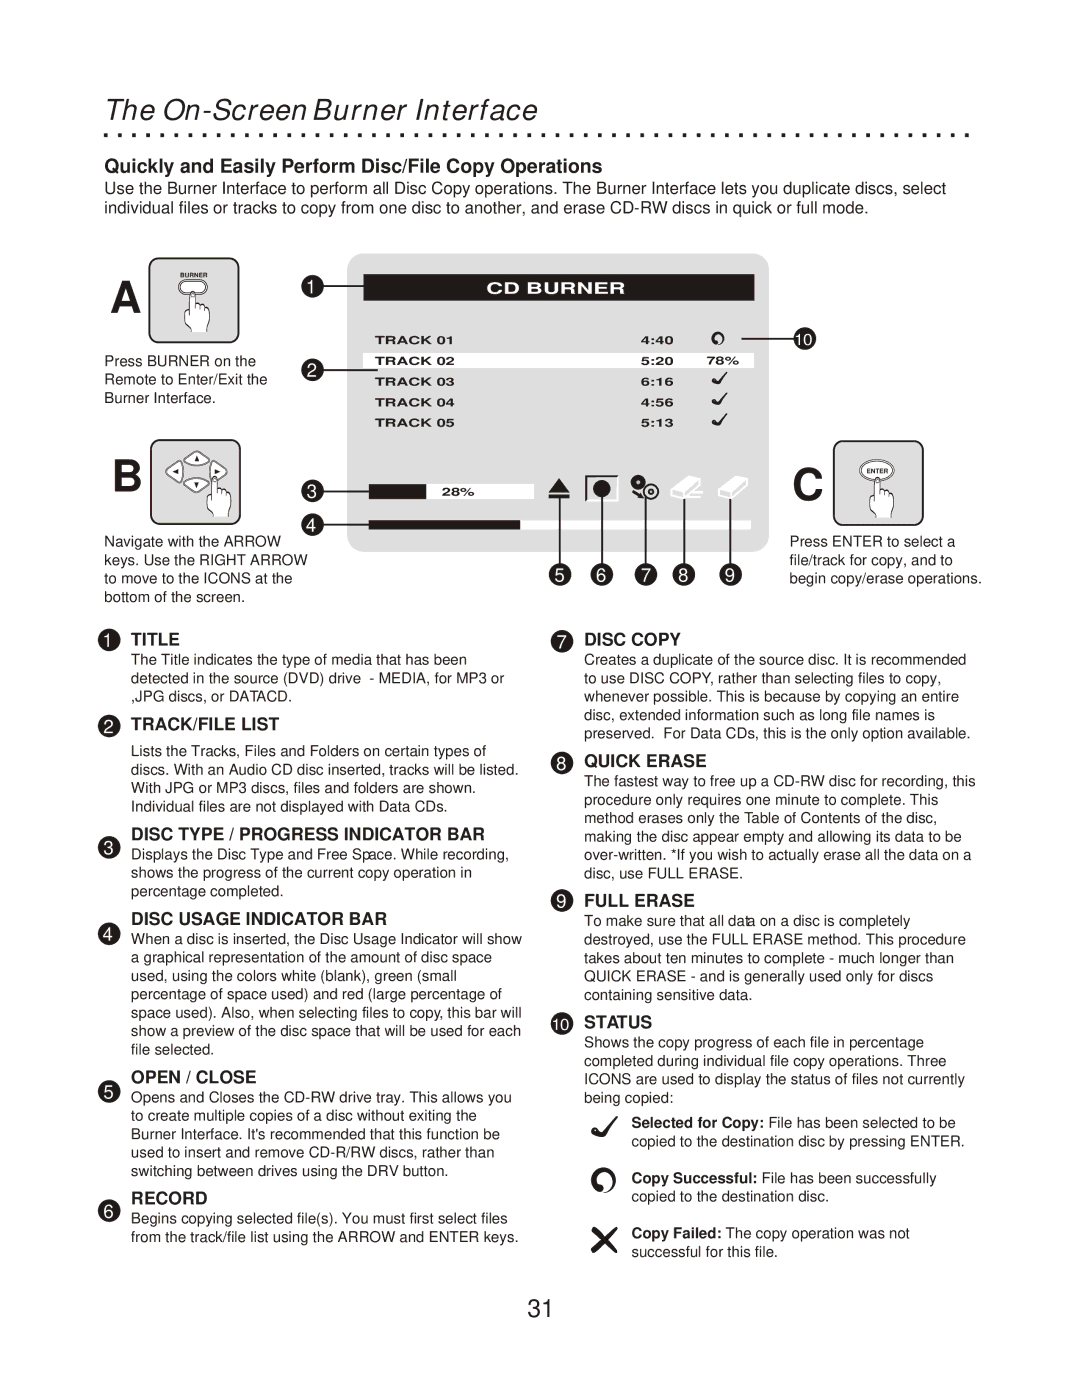
Use the Burner Interface to perform all Disc Copy operations. The Burner Interface lets you duplicate discs, select individual files or tracks to copy from one disc to another, and erase
BURNER
A
1
CD BURNER
TRACK 01 | 4:40 |
10
Press BURNER on the
Remote to Enter/Exit the Burner Interface.
2
TRACK 02 | 5:20 78% |
TRACK 03 | 6:16 |
TRACK 04 | 4:56 |
TRACK 05 | 5:13 |
B | 3 |
| 4 |
Navigate with the ARROW keys. Use the RIGHT ARROW to move to the ICONS at the bottom of the screen.
1TITLE
28% |
5 | 6 | 7 | 8 | 9 |
7 | DISC COPY |
| ||
ENTER
C
Press ENTER to select a file/track for copy, and to begin copy/erase operations.
The Title indicates the type of media that has been detected in the source (DVD) drive - MEDIA, for MP3 or ,JPG discs, or DATACD.
2TRACK/FILE LIST
Lists the Tracks, Files and Folders on certain types of discs. With an Audio CD disc inserted, tracks will be listed. With JPG or MP3 discs, files and folders are shown. Individual files are not displayed with Data CDs.
DISC TYPE / PROGRESS INDICATOR BAR
3Displays the Disc Type and Free Space. While recording, shows the progress of the current copy operation in percentage completed.
DISC USAGE INDICATOR BAR
4When a disc is inserted, the Disc Usage Indicator will show a graphical representation of the amount of disc space used, using the colors white (blank), green (small percentage of space used) and red (large percentage of space used). Also, when selecting files to copy, this bar will show a preview of the disc space that will be used for each file selected.
OPEN / CLOSE
5Opens and Closes the
RECORD
6Begins copying selected file(s). You must first select files from the track/file list using the ARROW and ENTER keys.
Creates a duplicate of the source disc. It is recommended to use DISC COPY, rather than selecting files to copy, whenever possible. This is because by copying an entire disc, extended information such as long file names is preserved. For Data CDs, this is the only option available.
8QUICK ERASE
The fastest way to free up a
9FULL ERASE
To make sure that all data on a disc is completely destroyed, use the FULL ERASE method. This procedure takes about ten minutes to complete - much longer than QUICK ERASE - and is generally used only for discs containing sensitive data.
10STATUS
Shows the copy progress of each file in percentage completed during individual file copy operations. Three ICONS are used to display the status of files not currently being copied:
Selected for Copy: File has been selected to be copied to the destination disc by pressing ENTER.
Copy Successful: File has been successfully copied to the destination disc.
Copy Failed: The copy operation was not successful for this file.
31