Dell Inspiron 1525/1526
W . d e l l . c o m s u p p o r t . d e l l . c o m
October NN491
Contents
Using the Keyboard and Touchpad
Connecting Your Computer to a TV or
Using the Optional Camera
Securing Your Computer
102
Adding and Replacing Parts
135
Traveling With Your Computer
Glossary
Finding Information
Drivers and Utilities Media
How to set up my computer
Go to support.dell.com, select your
Dell Support Utility
Operating System Media
Finding Information
About Your Computer
Front View
Analog microphone
D I O C O N N E C T O R S
V I C E S T a T U S L I G H T S
Information, see the documentation that came with your card
About Your Computer
Hdmi connector Ieee 1394a connector Hard drive
Left Side View
Connect USB devices, such as a mouse, keyboard, or printer
USB connectors About Your Computer
Right Side View
About Your Computer
Battery Air vents
Back View
Bottom View
Setting Up Your Computer
Connecting to the Internet
Setting Up Your Internet Connection
Windows Easy Transfer
Setting Up a Printer
Transferring Information to a New Computer
Connecting a USB Printer
Printer Cable
Power Protection Devices
Surge Protectors
Uninterruptible Power Supplies
Line Conditioners
Using the Display
Adjusting Brightness
Setting Display Resolution and Refresh Rate
Using the Keyboard and Touchpad
Numeric Keypad
Battery
Power Management
Key Combinations
System Functions
Dell QuickSet Key Combinations
Adjusting Keyboard Settings
Microsoft Windows Logo Key Functions
Touch Pad
Customizing the Touch Pad
Using the Keyboard and Touchpad
Using a Battery
Battery Performance
Checking the Battery Charge
Dell QuickSet Battery Meter
Conserving Battery Power
Microsoft Windows Battery Meter
Low-Battery Warning
Check the Battery Health
Configuring Power Management Settings
Using the Sleep Power State
Charging the Battery
Replacing the Battery
Storing a Battery
Using Multimedia
Playing Media
DVD player includes the following basic buttons
Playing Media Using Dell Travel Remote Optional
Copying CD, DVD, and Blu-ray Disc BD Media
How to Copy a CD, DVD or BD
Using Blank CD, DVD, and BD Media
Helpful Tips
DVD-Writable and Combo Drives
Adjusting the Volume
Adjusting the Picture
Using Dell MediaDirect
Connecting Your Computer to a TV or Audio Device
Connector
Video and Standard Audio
Video and S/PDIF Digital Audio
Pdif digital audio cable
Composite Video and Standard Audio
Standard audio cable
Composite Video and S/PDIF Digital Audio
Composite video adapter
Component Video and Standard Audio
Component video cable
Component video adapter Component video cable
Component Video and S/PDIF Digital Audio
Component video cable
Hdmi Optional
Enabling the Display Settings for a TV
Using the Optional Camera
Accessing the Camera’s Help File
Manually Adjusting the Camera Settings
Creating a Picture or a Video
Using Cards
ExpressCards
Installing an ExpressCard
ExpressCard Blanks
Removing an ExpressCard or Blank
Memory Card Reader
Memory Card Blanks
Secure Digital SD
Installing a Memory Card
Removing a Memory Card or Blank
Using Cards
Setting Up and Using Networks
Connecting a Network or Broadband Modem Cable
Setting Up a Network
Wireless Local Area Network
Checking Your Wireless Network Card
What You Need to Establish a Wlan Connection
Setting Up and Using Networks
Page
Connecting to a Wlan
Mobile Broadband or Wireless Wide Area Network
Checking Your Dell Mobile Broadband Card
Your order confirmation Microsoft Windows Help and Support
Connecting to a Mobile Broadband Network
Enabling/Disabling the Dell Mobile Broadband Card
Dell Wi-Fi Catcher Network Locator
Setting Up and Using Networks
Security Cable Lock
Passwords
Securing Your Computer
If Your Computer Is Lost or Stolen
Securing Your Computer
Securing Your Computer
Troubleshooting
Dell Technical Update Service
Dell Diagnostics
When to Use the Dell Diagnostics
During the assessment, answer any questions that appear
Starting the Dell Diagnostics From Your Hard Drive
Press and hold the Fn key while powering the computer on
Insert your Drivers and Utilities media
Dell Diagnostics Main Menu
Express Test
Configuration
Dell Support Utility
100
Dell Support
Click the Dell Support 3 icon in the notification area
DellConnect
Network Assistant
PC TuneUp
101
Drive Problems
PC CheckUp
Click Start →Computer
102
103
Optical drive problems
Problems writing to a CD-RW, DVD+/-RW, or BD-RE drive
Mail, Modem, and Internet Problems
Hard drive problems
105
Error Messages
106
107
108
109
110
111
ExpressCard Problems
Ieee 1394 Device Problems
Keyboard Problems
External Keyboard problems
Lockups and Software Problems
Unexpected characters
Computer does not start
Computer stops responding
Dell MediaDirect problems
Program stops responding or crashes repeatedly
Solid blue screen appears
114
Other software problems
115
Memory Problems
Network Problems
Run the Dell Diagnostics see Dell Diagnostics on
116
Mobile Broadband Wireless Wide Area Network Wwan
117
Power Problems
118
Printer Problems
119
Scanner Problems
Sound and Speaker Problems
No sound from integrated speakers
120
Touch Pad or Mouse Problems
No sound from headphones
No sound from external speakers
121
122
Video and Display Problems
If the display is blank
If the display is difficult to read
123
If only part of the display is readable
What Is a Driver?
Drivers
Reinstalling Drivers and Utilities
Using Windows Device Driver Rollback
Identifying Drivers
125
Using the Drivers and Utilities Media
Manually Reinstalling Drivers
127
128
Using Windows Vista System Restore
Restoring Your Operating System
Creating a Restore Point
129
130
131
132
Adding and Replacing Parts
Before You Begin
Recommended Tools
Turning Off Your Computer
Before Working Inside Your Computer
Hard Drive
135
Removing the Hard Drive
Slide the hard drive out of the computer 136
137
Replacing the Hard Drive
Returning a Hard Drive to Dell
Replacing the Optical Drive
Optical Drive
Removing the Optical Drive
139
Hinge Cover
Removing the Hinge Cover
140
Keyboard
Replacing the Hinge Cover
Removing the Keyboard
141
Removing Memory Module
Memory
Replacing the Keyboard
143
Replacing Memory Module
145
Subscriber Identity Module Optional
146
147
Wireless Mini-Cards
Removing Mini-Card
Disconnect the antenna cables from the Mini-card
148
Flash Cache Module
Replacing Mini-Card
Removing the FCM
149
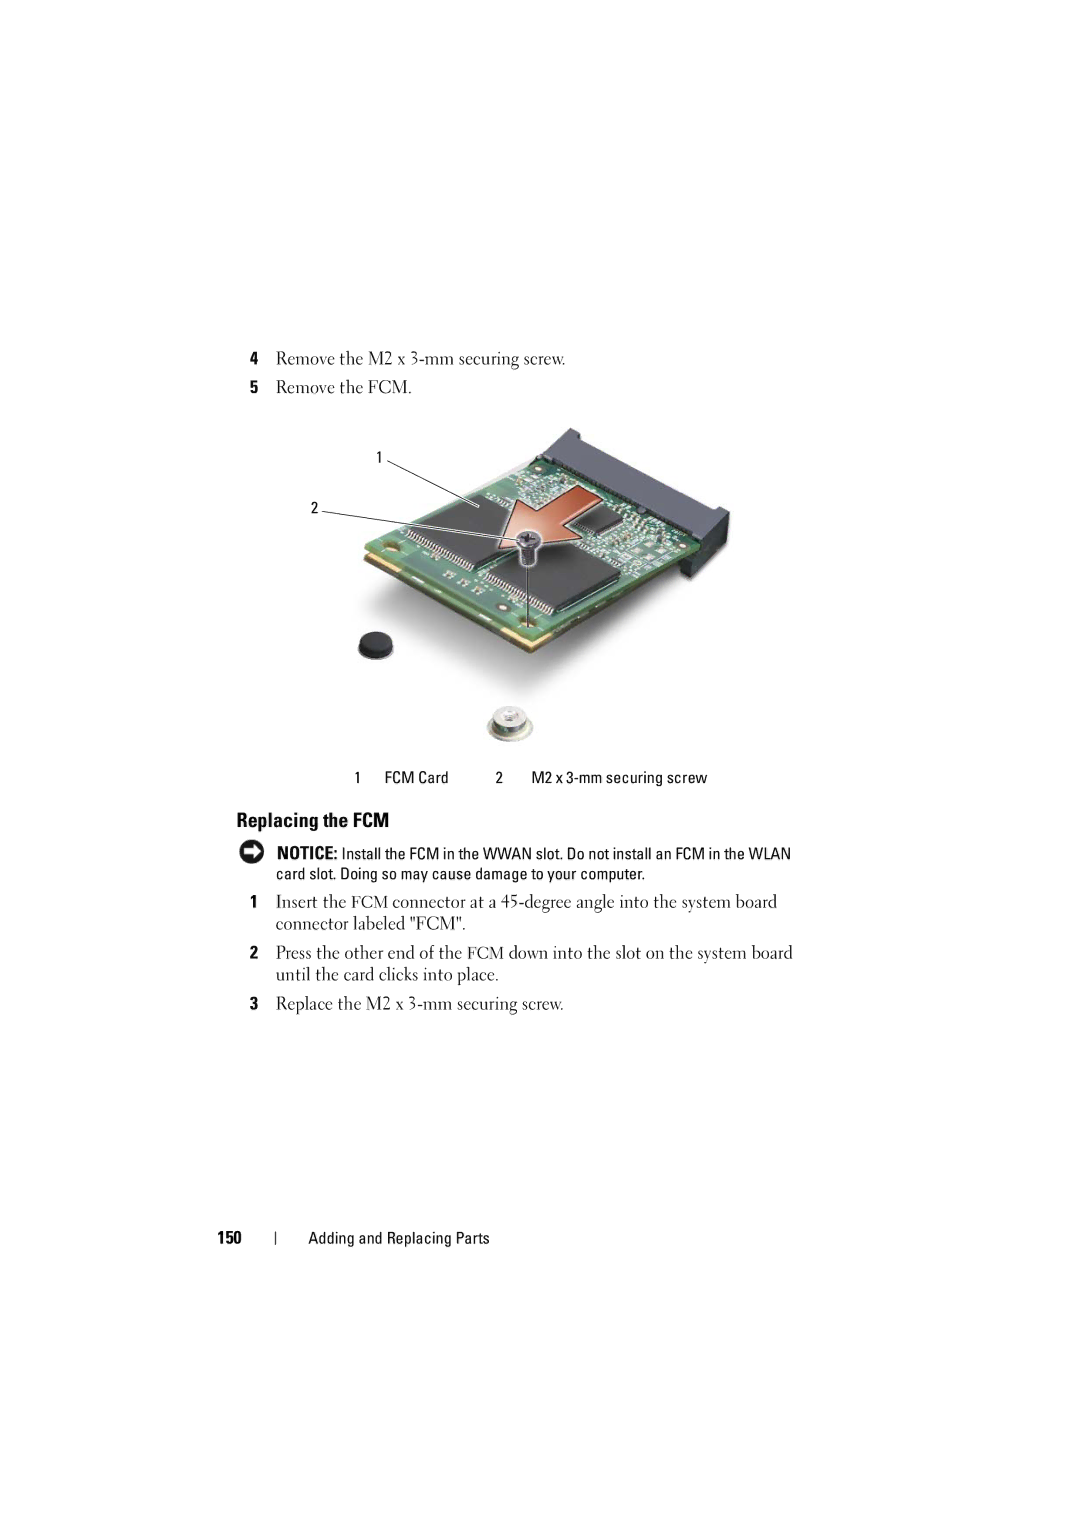
Replacing the FCM
Remove the M2 x 3-mm securing screw Remove the FCM
Internal Card With Bluetooth Wireless Technology
Broadcom Media PC Card
Removing the Card
151
Replacing the Card
Traveling With Your Computer
Identifying Your Computer
Packing the Computer
153
154
Travel Tips
Traveling by Air
155
Getting Help
Obtaining Assistance
156
Technical Support and Customer Service
DellConnect Online Services
Problems With Your Order
AutoTech Service
Automated Order-Status Service
Product Information
158
Returning Items for Warranty Repair or Credit
Before You Call
159
Contacting Dell
Specifications
161
162
163
Sdio
164
Hdmi
165
Wxga
166
167
168
169
170
171
Using the System Setup Program
Appendix
Viewing the System Setup Screen
System Setup Screen
Changing the Boot Sequence
Commonly Used Options
173
Cleaning Your Computer
Computer, Keyboard, and Display
Cleaning an Optical Mouse
Touch Pad
Mouse
Media
Dell Technical Support Policy U.S. Only
176
Definition of Dell-Installed Software and Peripherals
FCC Notice U.S. Only
Definition of Third-Party Software and Peripherals
FCC Class B
Macrovision Product Notice
178
Glossary
179
180
181
182
183
184
185
186
187
188
189
190
191
192
193
194
195
196
Index
197
198
FCM. See Flash Cache Module
199
200
SIM. See Subscriber Identity Module
201
202
See also Mobile Broadband
203
204