ELECTRICAL INSTALLATION

WARNING: Any electrical re-wiring of this appliance must be done by a qualified electrician. This wiring must be done in accordance with local codes and/or in the U.S.A. with the current, National Electrical Code ANSI/NFPA No 70 and in Canada with CSA C22.1 Canadian Electric code.

This fireplace should be connected to a dedicated 15 Amp, branch circuit as other appliances may cause the circuit breaker to trip or the fuse to blow when the heater is in operation.

A junction box with universal strain adaptor is provided to hard wire the unit to a 15 AMP, 120Volt, 60 Hz grounded branch circuit from the right side. If necessary the junction box may be relocated to route supply to the left side by following these instructions:

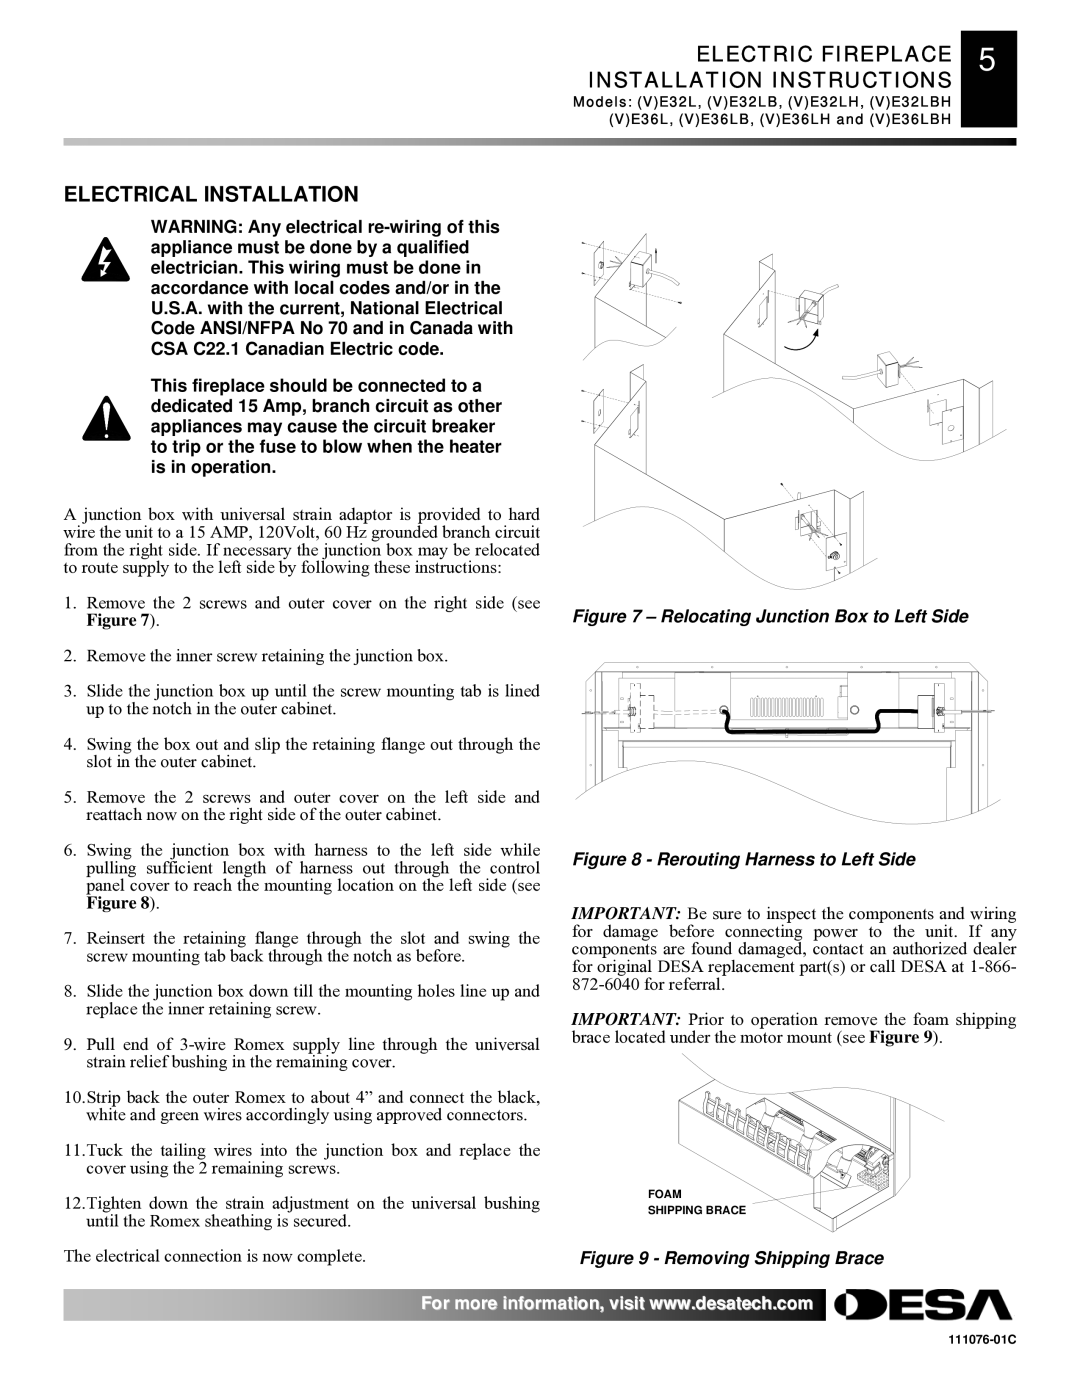
1.Remove the 2 screws and outer cover on the right side (see Figure 7).

2.Remove the inner screw retaining the junction box.

3.Slide the junction box up until the screw mounting tab is lined up to the notch in the outer cabinet.

4.Swing the box out and slip the retaining flange out through the slot in the outer cabinet.

5.Remove the 2 screws and outer cover on the left side and reattach now on the right side of the outer cabinet.

6.Swing the junction box with harness to the left side while pulling sufficient length of harness out through the control panel cover to reach the mounting location on the left side (see Figure 8).

7.Reinsert the retaining flange through the slot and swing the screw mounting tab back through the notch as before.

8.Slide the junction box down till the mounting holes line up and replace the inner retaining screw.

9.Pull end of 3-wire Romex supply line through the universal strain relief bushing in the remaining cover.

10.Strip back the outer Romex to about 4” and connect the black, white and green wires accordingly using approved connectors.

11.Tuck the tailing wires into the junction box and replace the cover using the 2 remaining screws.

12.Tighten down the strain adjustment on the universal bushing until the Romex sheathing is secured.

ELECTRIC FIREPLACE 5 INSTALLATION INSTRUCTIONS

Models: (V)E32L, (V)E32LB, (V)E32LH, (V)E32LBH (V)E36L, (V)E36LB, (V)E36LH and (V)E36LBH

Figure 7 – Relocating Junction Box to Left Side

Figure 8 - Rerouting Harness to Left Side

IMPORTANT: Be sure to inspect the components and wiring for damage before connecting power to the unit. If any components are found damaged, contact an authorized dealer for original DESA replacement part(s) or call DESA at 1-866- 872-6040 for referral.

IMPORTANT: Prior to operation remove the foam shipping brace located under the motor mount (see Figure 9).

FOAM

SHIPPING BRACE

The electrical connection is now complete.

Figure 9 - Removing Shipping Brace

For more information, visit www.desatech.com

111076-01C

Page 5
Image 5
Desa E36(L)(B)(H), E32, VE36, VE32 Electrical Installation, Electric Fireplace 5 Installation Instructions

E32, VE36, VE32, E36(L)(B)(H) specifications

Desa E32, VE36, VE32, and E36 represent a series of innovative models designed to meet the diverse needs of contemporary consumers. These products combine cutting-edge technology with practical features, creating a user-friendly experience that appeals to both residential and commercial applications.

The Desa E32 stands out for its energy efficiency and robust design, making it an ideal choice for those seeking sustainable solutions. Its exterior is built from high-quality materials, ensuring durability and resistance to wear over time. This model boasts advanced insulation technology, minimizing heat loss and enhancing performance. The E32 is equipped with a smart thermostat that allows users to program temperature settings according to their preferences, ensuring optimal comfort throughout the day.

The VE36, on the other hand, is engineered for versatility. Its sleek design and compact size make it suitable for various environments, including homes, offices, and even recreational spaces. This model features an intuitive digital interface that allows for easy operation and monitoring. With multiple heating modes and a quick heat-up time, the VE36 can adapt to any situation, providing immediate warmth when needed.

Next in line is the VE32, which emphasizes both efficiency and safety. It features an advanced safety shut-off mechanism, ensuring peace of mind for users. This model utilizes innovative heating technology to deliver consistent warmth while consuming minimal energy. The VE32 also includes a self-cleaning function, making maintenance hassle-free and increasing the lifespan of the unit.

Lastly, the E36(L)(B)(H) model offers modular designs that can be customized to suit specific needs. This multi-faceted unit can adjust its output based on the space it is heating, optimizing performance while reducing energy consumption. The inclusion of smart connectivity features allows users to control the device remotely via smartphone applications, enhancing convenience and adaptability.

In summary, Desa E32, VE36, VE32, and E36(L)(B)(H) models showcase a commitment to quality, efficiency, and user comfort. With their technological advancements, robust safety features, and stylish designs, these models are well-equipped to elevate any space while addressing modern heating challenges. Their ability to adapt to various settings makes them a valuable addition to any home or business environment.