OPERATION
NOTES ON NETWORK SETUP:
•It is recommended that the AVR be connected to a
•If you are unable to connect to the Internet, try adjusting the network settings. Press the Menu Button and select Network Setup. The Network Settings line will be highlighted. Each press of the OK Button toggles between Manual and Automatic network setup. Select Manual, and the other network settings will be displayed: IP Address, Subnet Mask, Gateway, Primary DNS, Secondary DNS, Proxy Address and Proxy Port. Contact your ISP (Internet Service Provider) for the correct information to enter into these settings. To change a setting, highlight it and press the OK Button. Use the 7/3 Buttons to move the cursor from one position to the next, and scroll to the desired number using the 1/5 Buttons. Press the OK Button when you are finished with an entry. Scroll down to the “Apply and Save” Button and select it. The AVR will turn off and must be powered back on. To return to the previous menu screen, press the Back/Exit Button.
NETWORK PLAYBACK
The AVR 7550HD is capable of playing audio media stored on a PC when both the PC and the AVR are connected to a home- network router.
NOTES:
•The PC must be running Windows Media® Player version 11 or higher, Windows Media Center version 2.0 or 3.0, or Intel® Media Server. It is recommended that any firewalls be turned off, although Windows Media Player may automati- cally make any necessary adjustments to the firewall settings to allow media sharing.
•An Apple Macintosh computer must be running DLNA (Digital Living Network
From the media player software, select the “Share media” option (or a similar menu option), and select the AVR as the device.
On the AVR, select Network as the source. Press the Network Source Selector a second time, if necessary, to switch from the Internet Radio source to the Network source. Press the Menu Button, and the PC should appear by name.
Browse the content stored in the PC’s media player library, using the
NOTES:
•The Repeat, Random and Slideshow Speed settings are global for Network Playback and USB Playback. Changing these settings for one of these sources will have the same effect for the other source.
•Although video content may appear in the menu, the AVR does not support video playback from the network connection.
RECORDING
NOTES:
1.Analog and digital audio signals are not converted to the other format.
2.Only PCM digital audio signals are available for recording. Proprietary formats such as Dolby Digital and DTS may not be recorded using the digital audio connections. Use the analog audio connections to make an analog recording.
3.HDMI and component video sources are not available for recording.
4.Please make certain that you are aware of any copyright restrictions on any material you record. Unauthorized dupli- cation of copyrighted materials is prohibited by federal law.
USING  DOCKING STATION
The Bridge II is an included dock that is compatible with most docking iPod models, 4G and later (not included). When The Bridge II is connected to its proprietary input on the AVR 7550HD and the iPod is docked, you may play the audio, video and
a connected video display, and charge the iPod.
When the source The Bridge is selected and an iPod is docked, the message “The Bridge” appears in the
Table 4 summarizes the controls available with The Bridge II during normal playback.
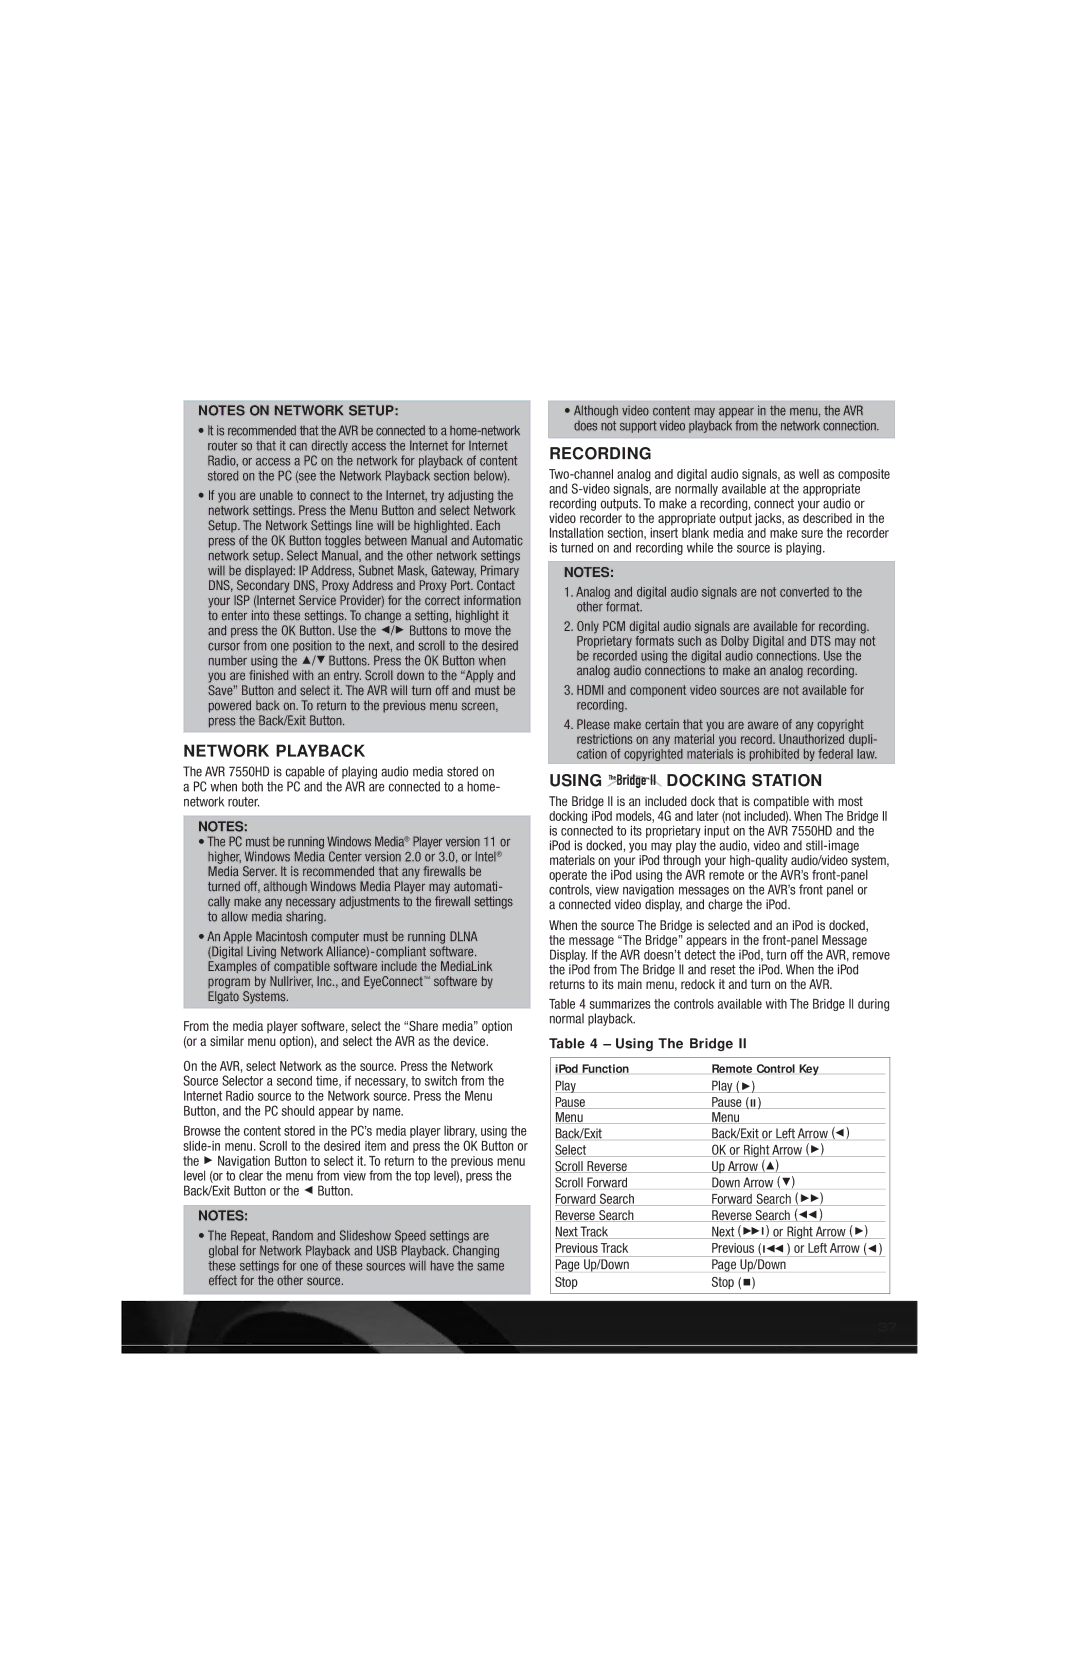
Table 4 – Using The Bridge II
| iPod Function | Remote Control Key |
|
| Play | Play ( 3) |
|
| Pause | Pause ( II ) |
|
| Menu | Menu |
|
| Back/Exit | Back/Exit or Left Arrow (7) |
|
| Select | OK or Right Arrow (3) |
|
| Scroll Reverse | Up Arrow (1) |
|
| Scroll Forward | Down Arrow (5) |
|
| Forward Search | Forward Search ( 33) |
|
| Reverse Search | Reverse Search (77) |
|
| Next Track | Next (33I ) or Right Arrow ( 3) |
|
| Previous Track | Previous ( I77 ) or Left Arrow (7) |
|
| Page Up/Down | Page Up/Down |
|
| Stop | Stop ( ■ ) |
|
|
|
|
|
37