32LD9700U 32LD9700C 32LD9700N 37LD9700U 37LD9700C 37LD9700N
32LD9600 37LD9600
Colour LCD Television Digital Tuner Models
Non Digital Tuner Models
ENGLISH
CONTENTS
IMPORTANT SAFETY INSTRUCTIONS
SAFETY PRECAUTIONS
INTRODUCTION
About This Manual
Trademark Credits
About Software
SAFETY PRECAUTIONS
About the Symbols
Important For United Kingdom
IMPORTANT FOR UNITED KINGDOM
SAFETY PRECAUTIONS continued
ENGLISH
disassemble
SAFETY PRECAUTIONS continued
Do not place the unit on an unstable surface
Cleaning and Maintenance
PRECAUTIONS
SAFETY PRECAUTIONS continued
Do not install areas where it will be subjected to high temperatures
ABOUT LCD PANEL Common Phenomena of LCD Panel
Defective Spots on Panel
Surface on Panel
Residual image
FEATURES
SUPPLIED ACCESSORIES
ENGLISH
COMPONENT NAMES Main Unit
Front Panel
Rear Panel
Control Panel including Card Slot
COMPONENT NAMES Continued Remote Control
Sub Power Function Select TV/DVD/SAT
Volume Up/Down Programme Select
Colour Red, Green, Yellow, Blue Index Time Cancel
PREPARATION Remote Control Batteries Installation
Caution When Moving the Main Unit
Handling the Remote Control
1. Open the battery compartment cover
PREPARATION continued Safety Precaution on Main Unit Installation
Anti-Tumble Measures
Read SAFETY PRECAUTIONS 4 to 7 carefully besides this page
ENGLISH
Connecting Procedure
CONNECTION Terminal Positions
1. Connecting Power Cord to the Rear Panel
2. Connecting Aerial Lead
CONNECTION continued Connecting Procedure continued
3. Connecting to External Equipment Terminals on Rear
ENGLISH
INPUT
CONNECTION continued Connecting Procedure continued
INPUT L AV4
OUTPUT
Y/VIDEO
CONNECTION continued Connecting Procedure continued
ENGLISH
Information
CONNECTION continued Connecting Procedure continued
Terminals on Side
SD MEMORY
CARD
CONNECTION continued Connecting Procedure continued
4. Connecting the plug into the wall socket
Information How to secure the cables
How to fasten the band
BASIC OPERATION Power On/Off
To turn On the power of the unit
To turn Off the power of the unit
Power Status
BASIC OPERATION continued Easy Preset
ENGLISH
BASIC OPERATION continued Volume UP/DOWN
Mute
BASIC OPERATION continued Input Switching to TV/AV1~5, HDMI, and RGB
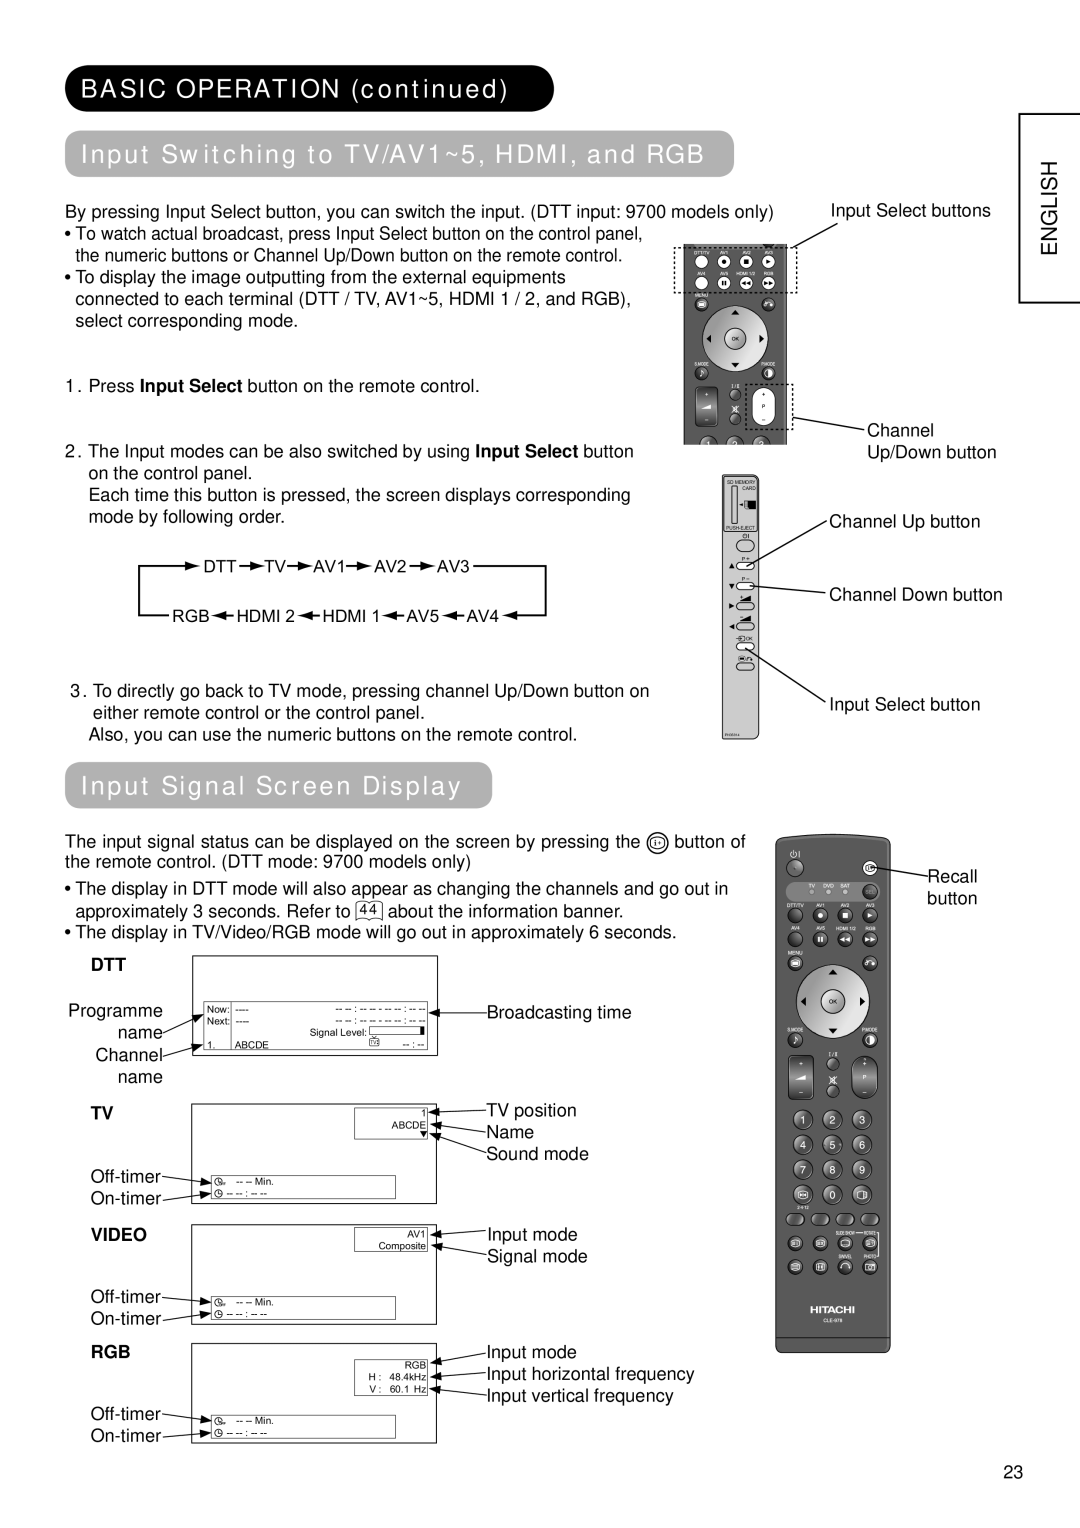
Input Signal Screen Display
ENGLISH
VIDEO
TV SETUP OPERATION How to use the On-Screen Display OSD system
Language Menu
How to set Language
Basic Operation
TV SETUP OPERATION continued Setup Menu TV mode
Setup hint
Auto Tuning
Manual Tuning
TV SETUP OPERATION continued Setup Menu TV mode continued
Setup hint
Manual Tuning
Fine Tuning
TV SETUP OPERATION continued Setup Menu AV mode
Setup hint
ENGLISH
Selected Items
TV SETUP OPERATION continued Setup Menu RGB mode
Setup hint
Auto Adjust
Clock Phase
TV SETUP OPERATION continued Setup Menu RGB mode continued
Setup hint
ENGLISH
Selected Items
TV SETUP OPERATION continued Function Menu
Setup hint
Video Power Save
Default Zoom
TV SETUP OPERATION continued Function Menu continued
Setup hint
Reset
ENGLISH
TV SETUP OPERATION continued Picture Menu TV/AV mode
Setup hint
Selected Items
Picture Mode
TV SETUP OPERATION continued Picture Menu TV/AV mode continued
Setup hint
Reset
Reset
TV SETUP OPERATION continued Picture Menu TV/AV mode continued
Setup hint
Colour Temp. Adjust
Selected Items
TV SETUP OPERATION continued Picture Menu RGB mode
Setup hint
ENGLISH
Selected Items
TV SETUP OPERATION continued Picture menu RGB mode continued
Setup hint
Colour Temp. Adjust
Reset
TV SETUP OPERATION continued Audio Menu
Setup hint
Perfect Volume
Reset
TV SETUP OPERATION continued Audio Menu continued
Timer Menu
Setup hint
Headphone Volume
Analogue Teletext
TV SETUP OPERATION continued
How to operate the Teletext
ENGLISH
How to use the On-Screen Display OSD system
DIGITAL TERRESTRIAL TELEVISION DTT OPERATION
2. Service
Basic Operation
Select First Time Installation
ENGLISH
3. Select Add New Channels
System Language
DIGITAL TERRESTRIAL TELEVISION DTT OPERATION continued
Channel Selections
Using the Electronic Programme Guide EPG
Stepping through the Channel
Channel Sort
Channel Editing
DIGITAL TERRESTRIAL TELEVISION DTT OPERATION continued
ENGLISH
Utilizing the Infomation Tool
DIGITAL TERRESTRIAL TELEVISION DTT OPERATION continued
Information Banner
Digital Teletext
Utilizing the Infomation Tool continued
DIGITAL TERRESTRIAL TELEVISION DTT OPERATION continued
ENGLISH
7days EPG
Timer Programming
From “Timers” Menu
DIGITAL TERRESTRIAL TELEVISION DTT OPERATION continued
From EPG Screen
Configuring the Setting
Setting Audio and Subtitle Language
DIGITAL TERRESTRIAL TELEVISION DTT OPERATION continued
ENGLISH
Configuring the Setting continued
Setting the Protection
3. Select “Parental Setting”
Installation Menu Lock
Configuring the Setting continued
Setting Favourite Mode
3. Select “Receiver Upgrade”
DIGITAL TERRESTRIAL TELEVISION DTT OPERATION continued
TV Setup Menu
Common Interface
Picture Audio Timer Function Setup Language Select OK Set
DIGITAL TERRESTRIAL TELEVISION DTT OPERATION continued
FUNCTION Power Swivel
ENGLISH
Information
Swivel The Swivel Display
FUNCTION continued Size Switching
DTT/TV/AV1~AV3 signal input
Input Signal
Current Output
FUNCTION continued Size Switching continued
AV4 / AV5 / HDMI1 / HDMI2 signal input
Input Signal
ENGLISH
FUNCTION continued Size Switching continued
Position Adjustment
Vertical Size Adjustment at Panoramic Mode
Panoramic
FUNCTION continued Size Switching continued
Using a wide-screen monitor
RGB signal input
Display Area Selection Diagram
FUNCTION continued Multi Picture Mode
This function is NOT available in HDMI input
DTT input 9700 models only
2-picture mode
FUNCTION continued Multi Picture Mode continued
2-picture mode continued
4-picture mode
ENGLISH
FUNCTION continued Multi Picture Mode continued
4-picture mode continued
12-picture mode
FUNCTION continued Multi Picture Mode continued
Activate the Multi Picture Mode in RGB Mode
ENGLISH
Input mode indication
FUNCTION continued Picture Freezing
A AI
Split
Strobe
FUNCTION continued Photo Input Function
Operating the Photo Input
ENGLISH
FUNCTION continued Photo Input Function continued
Displaying Still Picture in Photo Mode
Thumbnail-Size Image Index to Full-Size Image
Rotation Function
Table 1. Slide Show Adjustment
FUNCTION continued Photo Input Function continued
Displaying Still Picture in Photo Mode continued Slide Show Function
ENGLISH
FUNCTION continued Photo Input Function continued
Displaying Movie Picture in Movie Mode
Thumbnail-Size Image Index to Full-Size Image
Operating the Movie
Accessing
FUNCTION continued Photo Input Function continued
Other
To exit from Photo Input…
FUNCTION continued Photo Input Function continued
In case of copying, viewing or editing a picture by computers, etc., it may not be displayed in this function
FUNCTION continued Audio Switching
NICAM / Sound Multiplexincluding A2 TV mode
Bilingual/Dual Sound broadcast
ENGLISH
FUNCTION continued Power Save Mode
When AV input is selected
When the RGB input is selected
When no signal is detected
FUNCTION continued
DVD Player / STB Selection
Set up hint
1. Set up the maker
TROUBLESHOOTING
When Following Messages Appear on the Screen
Symptom and Check List
Check the Indicating lamp status Off, Red, Green, or Orange
TROUBLESHOOTING continued Symptom and Check List continued
ENGLISH
Check if the cables are connected correctly
TROUBLESHOOTING continued Symptom and Check List continued
AAAAA
PRODUCT SPECIFICATIONS
Input signals
ENGLISH
PRODUCT SPECIFICATIONS continued Signal Input
RGB terminal D-sub 15-pin connector
S-input connector pin specifications
HDMI connector pin specifications
PRODUCT SPECIFICATIONS continued Recommended Signal List
Signal mode
With HDMI input
With RGB input
PRODUCT SPECIFICATION continued Recommended Signal List continued
With Multi Picture Function
With Picture Freezing Function
2-Picture
This guarantee does not affect your statutory rights
In all cases of difficulty please consult your Hitachi dealer