3 | BUBBLE LEVEL | ||||||||||||||||||||||||||||||
|
| Use this bubble level, along with the four levelling screws (1), to make sure | |||||||||||||||||||||||||||||
|
| that the Nº31.5’s transport assembly is level. | |||||||||||||||||||||||||||||
4 | LASER ASSEMBLY | ||||||||||||||||||||||||||||||
|
| This assembly contains the Nº31.5’s laser pickup, the device that reads the | |||||||||||||||||||||||||||||
|
| underside of the CD. | |||||||||||||||||||||||||||||
|
|
|
|
|
|
|
|
|
|
|
|
|
|
|
|
|
|
|
|
|
|
|
|
|
|
|
|
|
|
|
|
Caution: | Never touch or attempt to clean the laser assembly. | ||||||||||||||||||||||||||||||
|
|
|
|
|
|
|
|
|
|
|
|
|
|
|
|
|
|
|
|
|
|
|
|
|
|
|
|
|
|
|
|
The Disc Damper | To clamp a CD onto its spindle, the Nº31.5 uses a disc damper held in | ||||||||||||||||||||||||||||||
|
| place by a strong magnet: | |||||||||||||||||||||||||||||
|
|
|
|
|
|
|
|
|
|
|
|
|
|
|
|
|
|
|
|
|
|
|
|
|
|
|
| Disc damper | |||
|
|
|
|
|
|
|
|
|
|
|
|
|
|
|
|
|
|
|
|
|
|
|
|
|
|
|
| ||||
|
|
|
|
|
|
|
|
|
|
|
|
|
|
|
|
|
|
|
|
|
|
|
|
|
|
|
| ||||
|
|
|
|
|
|
|
|
|
|
|
|
|
|
|
|
|
|
|
|
|
|
|
|
|
|
|
| Compact disc | |||
|
|
|
|
|
|
|
|
|
|
|
|
|
|
|
|
|
|
|
|
|
|
|
|
|
|
| |||||
|
|
|
|
|
|
|
|
|
|
|
|
|
|
|
|
|
|
|
|
|
|
|
|
|
|
|
| ||||
|
|
|
|
|
|
|
|
|
|
|
|
|
|
|
|
|
|
|
|
|
|
|
|
|
|
|
| Spindle | |||
|
|
|
|
|
|
|
|
|
|
|
|
|
|
|
|
|
|
|
|
|
|
|
|
|
|
|
| ||||
|
| Always make sure that the disc damper is in place before closing the lid. If | |||||||||||||||||||||||||||||
|
| you close the lid without the disc damper in place, the display will show | |||||||||||||||||||||||||||||
|
| NO DAMPER and you’ll be unable to play the CD. | |||||||||||||||||||||||||||||
|
| When loading a CD for play, install the CD on the spindle, then place the | |||||||||||||||||||||||||||||
|
| disc damper on top of the CD. | |||||||||||||||||||||||||||||
|
| The CD and the disc damper must be centered on the spindle. You’ll feel | |||||||||||||||||||||||||||||
|
| the disc damper’s magnet “catch” when both are centered. | |||||||||||||||||||||||||||||
Removing the Disc Damper | 
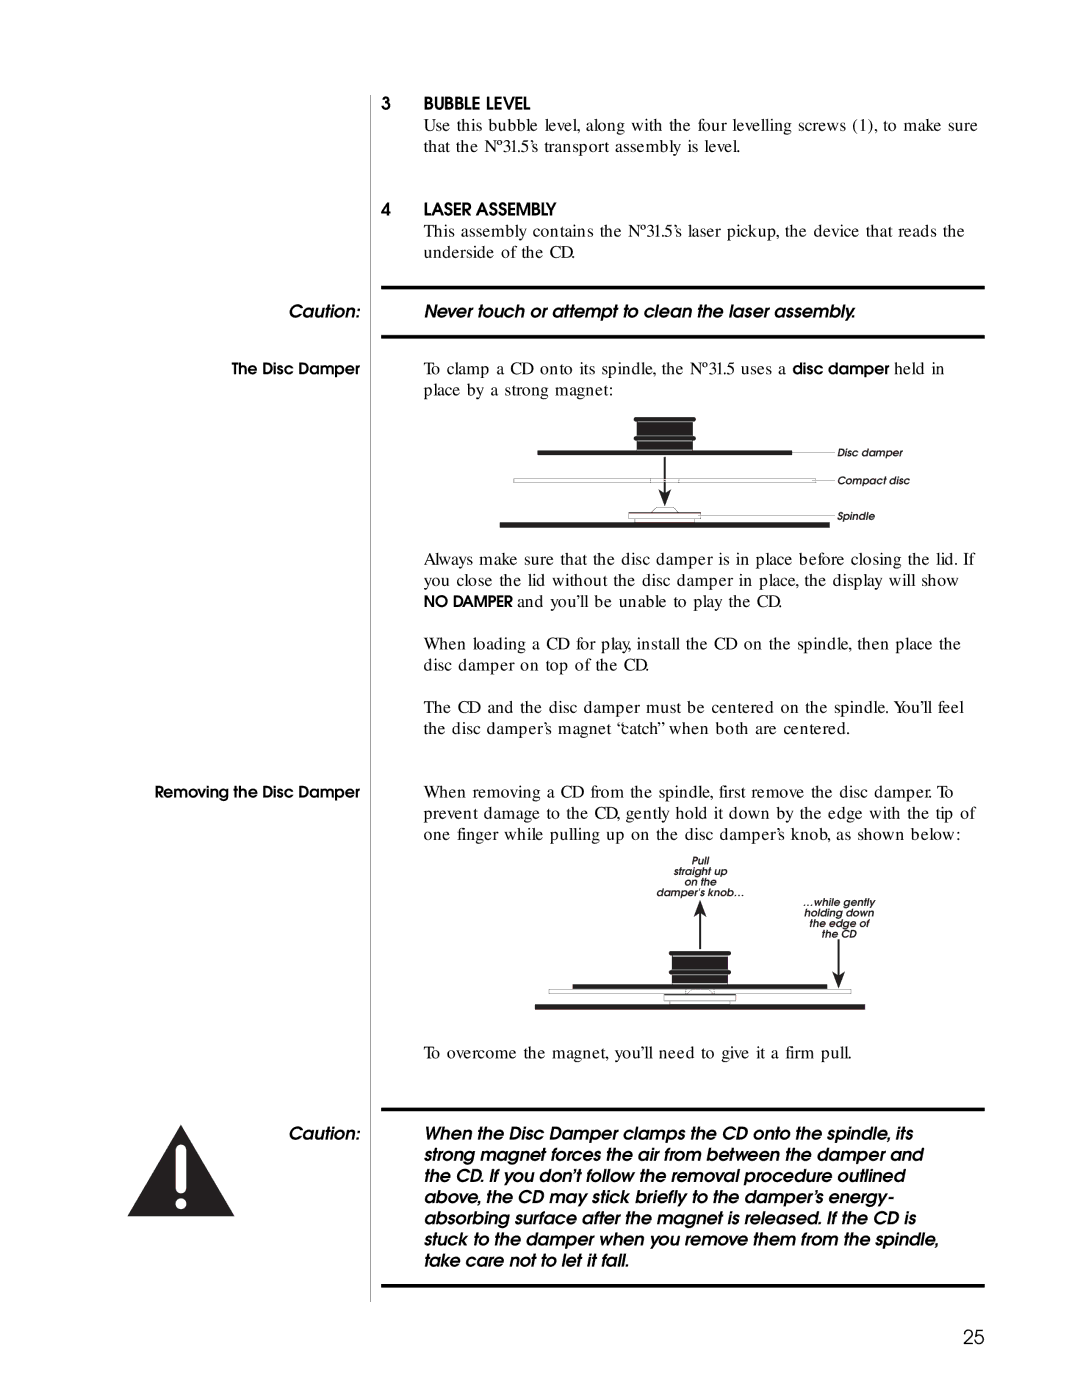
When removing a CD from the spindle, first remove the disc damper. To | ||||||||||||||||||||||||||||||
|
| prevent damage to the CD, gently hold it down by the edge with the tip of | |||||||||||||||||||||||||||||
|
| one finger while pulling up on the disc damper’s knob, as shown below: | |||||||||||||||||||||||||||||
|
|
|
|
|
|
|
|
|
|
|
|
|
| Pull | |||||||||||||||||
|
|
|
|
|
|
|
|
|
|
|
|
|
| straight up | |||||||||||||||||
|
|
|
|
|
|
|
|
|
|
|
|
|
| on the | |||||||||||||||||
|
|
|
|
|
|
|
|
|
|
| damper's knob… | ||||||||||||||||||||
|
|
|
|
|
|
|
|
|
|
|
|
|
|
|
|
|
|
|
|
|
|
| …while gently | ||||||||
|
|
|
|
|
|
|
|
|
|
|
|
|
|
|
|
|
|
|
|
|
|
| holding down | ||||||||
|
|
|
|
|
|
|
|
|
|
|
|
|
|
|
|
|
|
|
|
|
|
| the edge of | ||||||||
|
|
|
|
|
|
|
|
|
|
|
|
|
|
|
|
|
|
|
|
|
|
|
|
| the CD | ||||||
|
|
|
|
|
|
|
|
|
|
|
|
|
|
|
|
|
|
|
|
|
|
|
|
|
|
|
|
|
|
|
|
|
|
|
|
|
|
|
|
|
|
|
|
|
|
|
|
|
|
|
|
|
|
|
|
|
|
|
|
|
|
|
|
|
|
|
|
|
|
|
|
|
|
|
|
|
|
|
|
|
|
|
|
|
|
|
|
|
|
|
|
|
|
|
|
|
|
|
|
|
|
|
|
|
|
|
|
|
|
|
|
|
|
|
|
|
|
|
|
|
|
|
|
|
|
|
|
|
|
|
|
|
|
|
|
|
|
|
|
|
|
|
|
|
|
|
|
|
|
|
|
|
|
|
|
|
|
|
|
|
|
|
|
|
|
|
|
|
|
|
|
|
|
|
|
|
|
|
|
|
|
|
|
|
|
|
|
|
|
|
|
|
|
|
|
|
|
|
|
|
|
|
|
|
|
|
|
|
|
|
|
|
|
|
|
|
|
|
|
|
|
|
|
| To overcome the magnet, you’ll need to give it a firm pull. |
|
|
Caution: | When the Disc Damper clamps the CD onto the spindle, its |
| strong magnet forces the air from between the damper and |
| the CD. If you don’t follow the removal procedure outlined |
| above, the CD may stick briefly to the damper’s energy- |
| absorbing surface after the magnet is released. If the CD is |
| stuck to the damper when you remove them from the spindle, |
| take care not to let it fall. |
|
|
25