3

5

4

6

D

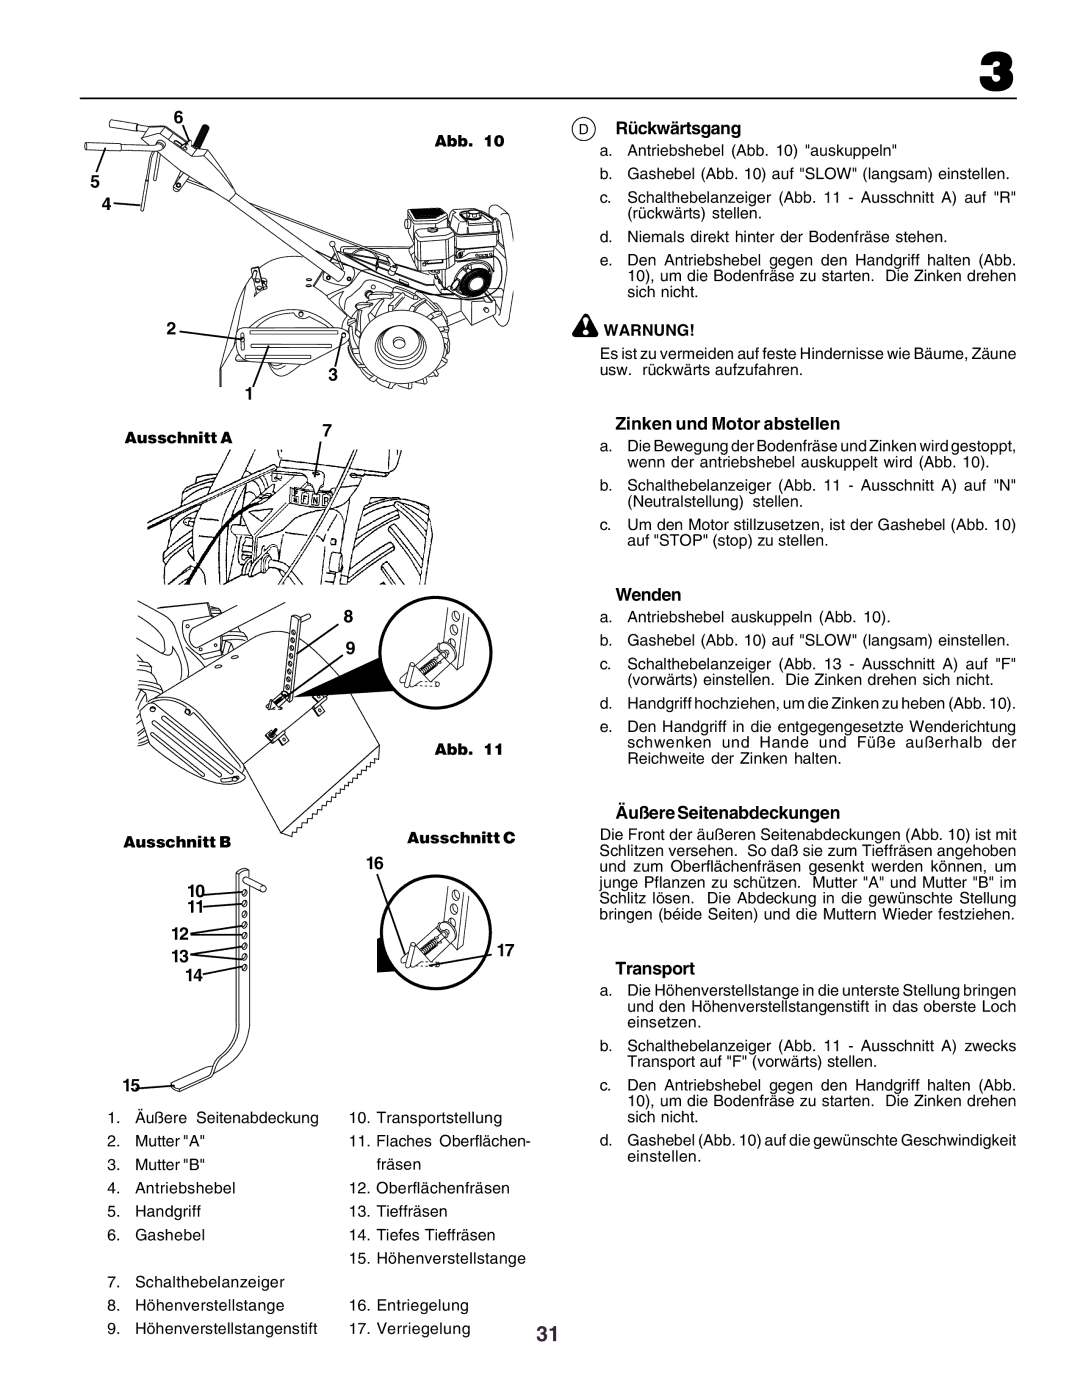
Rückwärtsgang

Abb. 10

a.

Antriebshebel (Abb. 10) "auskuppeln"


b.

Gashebel (Abb. 10) auf "SLOW" (langsam) einstellen.


c.

Schalthebelanzeiger (Abb. 11 - Ausschnitt A) auf "R"


(rückwärts) stellen.


d.

Niemals direkt hinter der Bodenfräse stehen.


e.

Den Antriebshebel gegen den Handgriff halten (Abb.


10), um die Bodenfräse zu starten. Die Zinken drehen


sich nicht.

2


WARNUNG!


Es ist zu vermeiden auf feste Hindernisse wie Bäume, Zäune


3

usw. rückwärts aufzufahren.


1


Ausschnitt A

7


Zinken und Motor abstellen

a.

Die Bewegung der Bodenfräse und Zinken wird gestoppt,


wenn der antriebshebel auskuppelt wird (Abb. 10).


b.

Schalthebelanzeiger (Abb. 11 - Ausschnitt A) auf "N"


(Neutralstellung) stellen.


c.

Um den Motor stillzusetzen, ist der Gashebel (Abb. 10)


auf "STOP" (stop) zu stellen.

8

9

Abb. 11

Ausschnitt BAusschnitt C


16

10


11


12

17

13


14

15

1.

Äußere Seitenabdeckung

10.

Transportstellung


2.

Mutter "A"

11.

Flaches Oberflächen-


3.

Mutter "B"


fräsen


4.

Antriebshebel

12.

Oberflächenfräsen


5.

Handgriff

13.

Tieffräsen


6.

Gashebel

14.

Tiefes Tieffräsen


15.

Höhenverstellstange


7.

Schalthebelanzeiger


8.

Höhenverstellstange

16.

Entriegelung


9.

Höhenverstellstangenstift

17.

Verriegelung

31

Wenden

a.Antriebshebel auskuppeln (Abb. 10).

b.Gashebel (Abb. 10) auf "SLOW" (langsam) einstellen.

c.Schalthebelanzeiger (Abb. 13 - Ausschnitt A) auf "F" (vorwärts) einstellen. Die Zinken drehen sich nicht.

d.Handgriff hochziehen, um die Zinken zu heben (Abb. 10).

e.Den Handgriff in die entgegengesetzte Wenderichtung schwenken und Hande und Füße außerhalb der Reichweite der Zinken halten.

Äußere Seitenabdeckungen

Die Front der äußeren Seitenabdeckungen (Abb. 10) ist mit Schlitzen versehen. So daß sie zum Tieffräsen angehoben und zum Oberflächenfräsen gesenkt werden können, um junge Pflanzen zu schützen. Mutter "A" und Mutter "B" im Schlitz lösen. Die Abdeckung in die gewünschte Stellung bringen (béide Seiten) und die Muttern Wieder festziehen.

Transport

a.Die Höhenverstellstange in die unterste Stellung bringen und den Höhenverstellstangenstift in das oberste Loch einsetzen.

b.Schalthebelanzeiger (Abb. 11 - Ausschnitt A) zwecks Transport auf "F" (vorwärts) stellen.

c.Den Antriebshebel gegen den Handgriff halten (Abb. 10), um die Bodenfräse zu starten. Die Zinken drehen sich nicht.

d.Gashebel (Abb. 10) auf die gewünschte Geschwindigkeit einstellen.

Page 31
Image 31
Husqvarna crt51 instruction manual Rückwärtsgang, Zinken und Motor abstellen, Wenden, Äußere Seitenabdeckungen, Transport

crt51 specifications

The Husqvarna CRT51 is a sophisticated piece of garden equipment designed for both professional landscapers and enthusiastic homeowners looking for an efficient solution for lawn care and maintenance. This robust and versatile machine excels in cutting, mulching, and maintaining grass, ensuring a well-manicured lawn with minimal effort.

One of the standout features of the CRT51 is its high-quality cutting deck. The deck is constructed robustly to withstand the rigors of regular use while providing optimal cutting performance. Its adjustable cutting height offers versatility, allowing users to customize their lawn care according to seasonal changes and personal preferences. This unique adaptability ensures a professional finish every time, regardless of the lawn type or condition.

The CRT51 is engineered with advanced technology that enhances its performance. One notable innovation is the patented blade system, which ensures clean cuts while optimizing energy efficiency. This system not only prolongs the life of the blades but also minimizes the need for frequent maintenance, making it an ideal choice for those who love spending time in their gardens rather than constantly repairing their tools.

Ergonomics is a significant focus in the design of the Husqvarna CRT51. The machine features an adjustable handle, ensuring that users of all heights can operate it comfortably. Its lightweight frame and well-placed center of gravity help in maneuverability, making navigating tight corners and small spaces effortless. This ergonomic approach contributes to reduced fatigue during longer mowing sessions, allowing users to complete their tasks with ease.

Additional features include a user-friendly control panel that enables easy adjustments to speed and cutting height. This convenience means that even novice users can operate the CRT51 efficiently, while experienced users can maximize its potential with precision settings.

Durability is a key characteristic of the CRT51. Built with high-quality materials, it is designed to withstand harsh outdoor conditions without compromising its performance. This means that users can rely on the Husqvarna CRT51 for years, making it a worthwhile investment for maintenance and care of their lawns.

In summary, the Husqvarna CRT51 stands out as an exemplary option for lawn care, combining robust cutting capabilities, advanced technology, ergonomic design, and durability. Whether for professional landscaping or home lawn maintenance, this machine delivers exceptional results, ensuring that your outdoor space remains pristine and inviting. With its impressive features and user-friendly design, the CRT51 is sure to fulfill the needs of any gardener or landscaper.