FWD WHEELCHAIRS |
|
| PROCEDURE 8 | |
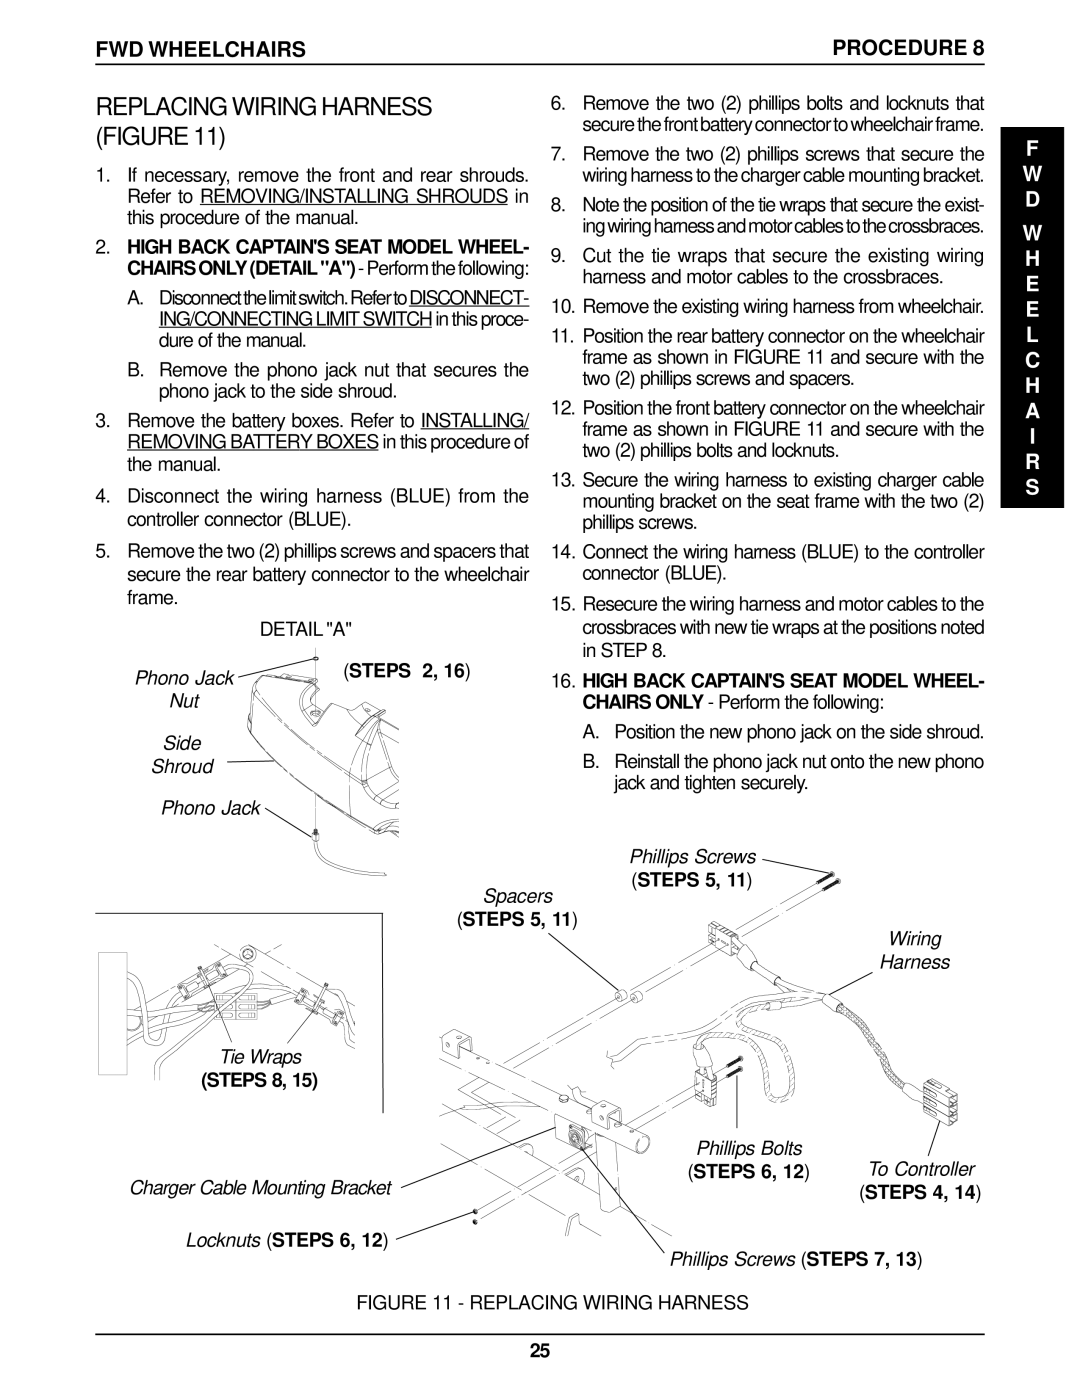
REPLACING WIRING HARNESS | 6. | Remove the two (2) phillips bolts and locknuts that | ||
(FIGURE 11) |
|
| secure the front battery connector to wheelchair frame. | |
| 7. | Remove the two (2) phillips screws that secure the | ||
|
| |||
1. If necessary, remove the front and rear shrouds. |
| wiring harness to the charger cable mounting bracket. | ||
Refer to REMOVING/INSTALLING SHROUDS in | 8. | Note the position of the tie wraps that secure the exist- | ||
this procedure of the manual. | ||||
| ingwiringharnessandmotorcablestothecrossbraces. | |||
2. HIGH BACK CAPTAIN'S SEAT MODEL WHEEL- |
| |||
9. | Cut the tie wraps that secure the existing wiring | |||
CHAIRS ONLY (DETAIL "A") - Perform the following: |
| harness and motor cables to the crossbraces. | ||
A. Disconnectthelimitswitch.RefertoDISCONNECT- |
| |||
10. | Remove the existing wiring harness from wheelchair. | |||
ING/CONNECTING LIMIT SWITCH in this proce- | ||||
11. | Position the rear battery connector on the wheelchair | |||
dure of the manual. |
| |||
B. Remove the phono jack nut that secures the |
| frame as shown in FIGURE 11 and secure with the | ||
| two (2) phillips screws and spacers. | |||
phono jack to the side shroud. |
| |||
12. | Position the front battery connector on the wheelchair | |||
3. Remove the battery boxes. Refer to INSTALLING/ | ||||
| frame as shown in FIGURE 11 and secure with the | |||
REMOVING BATTERY BOXES in this procedure of |
| |||
| two (2) phillips bolts and locknuts. | |||
the manual. |
|
| ||
| 13. | Secure the wiring harness to existing charger cable | ||
4. Disconnect the wiring harness (BLUE) from the | ||||
| mounting bracket on the seat frame with the two (2) | |||
controller connector (BLUE). |
| phillips screws. | ||
5. Remove the two (2) phillips screws and spacers that | 14. | Connect the wiring harness (BLUE) to the controller | ||
secure the rear battery connector to the wheelchair |
| connector (BLUE). | ||
frame. |
| 15. | Resecure the wiring harness and motor cables to the | |
|
| |||
DETAIL "A" |
| crossbraces with new tie wraps at the positions noted | ||
| (STEPS 2, 16) |
| in STEP 8. | |
Phono Jack | 16. | HIGH BACK CAPTAIN'S SEAT MODEL WHEEL- | ||
| ||||
Nut |
|
| CHAIRS ONLY - Perform the following: | |
Side |
|
| A. Position the new phono jack on the side shroud. | |
|
| B. Reinstall the phono jack nut onto the new phono | ||
Shroud |
|
| ||
|
|
| jack and tighten securely. | |
Phono Jack |
|
|
| |
|
|
| Phillips Screws | |
| Spacers | (STEPS 5, 11) | ||
|
| |||
| (STEPS 5, 11) | Wiring | ||
|
|
| ||
|
|
| Harness | |
Tie Wraps
(STEPS 8, 15)
Phillips Bolts | To Controller |
(STEPS 6, 12) | |
Charger Cable Mounting Bracket | (STEPS 4, 14) |
Locknuts (STEPS 6, 12) |
|
Phillips Screws (STEPS 7, 13)
FIGURE 11 - REPLACING WIRING HARNESS
F
W
D
W
H
E
E
L
C H A I R S
25