Manuals
/
Brands
/
Personal Care
/
Mobility Aid
/
Invacare
/
Personal Care
/
Mobility Aid
Invacare
Pronto M61
- page 75
1
75
80
80
Download
80 pages, 4.98 Mb
SECTION 12—ELECTRONICS
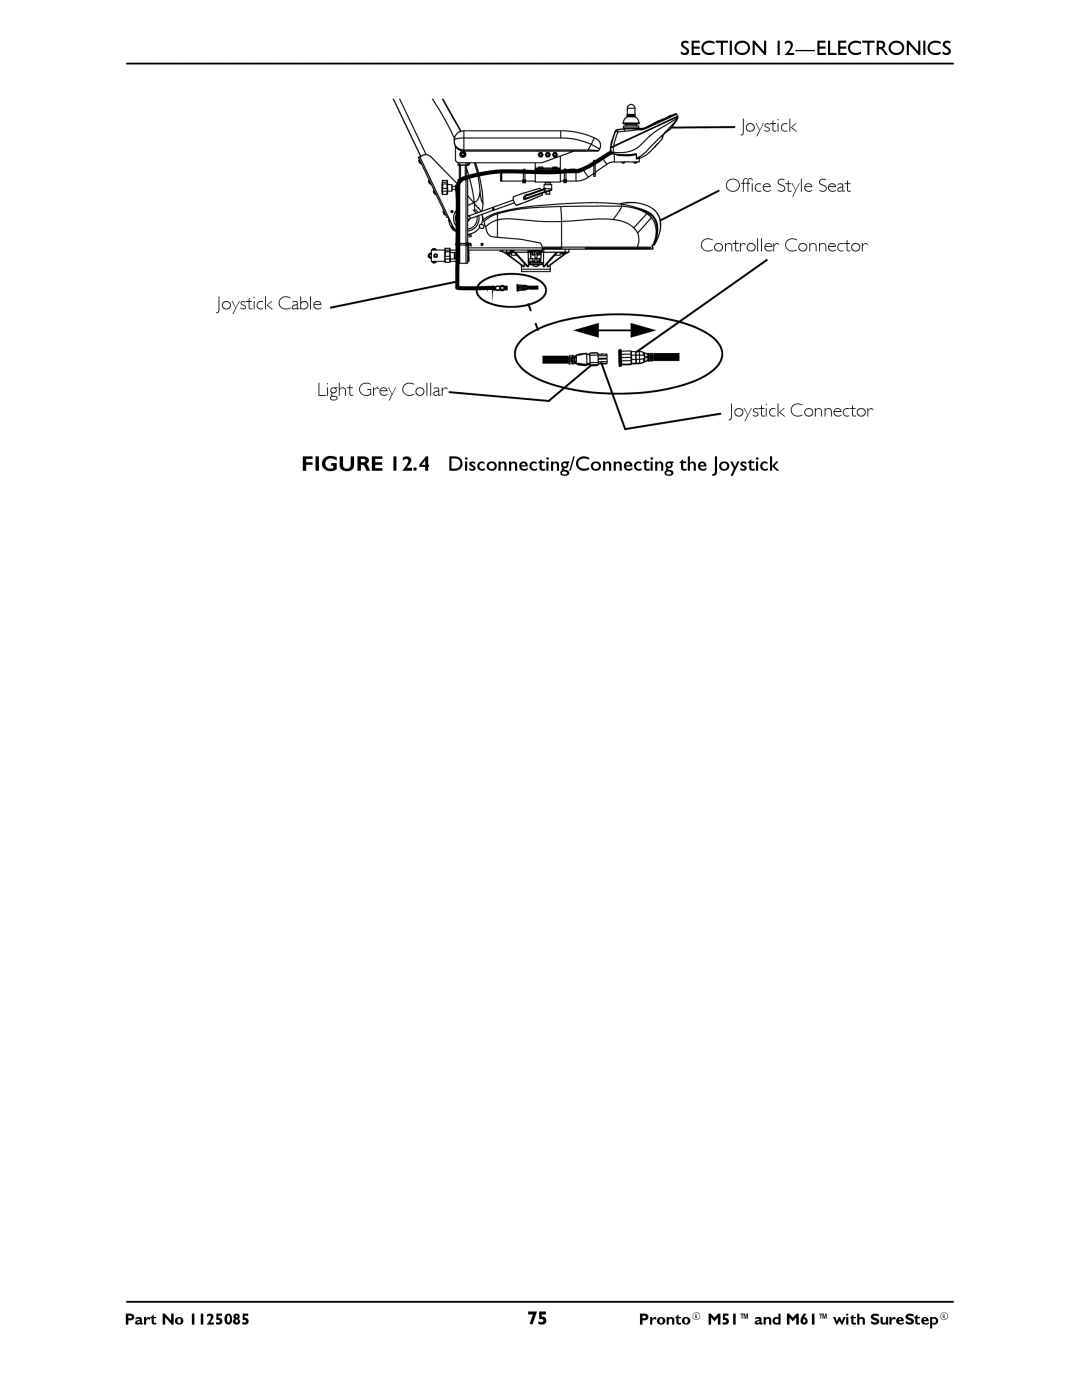
Part No 1125085
75
Pronto® M51™and M61™with SureStep®
FIGURE 12.4
Disconnecting/Connecting the Joystick
Joystick
Office Style Seat
Joystick Cable
Joystick Connector
Controller Connector
Light Grey Collar
Contents
Main
WARNING
ACCESSORIES WARNING
REFERENCE DOCUMENTS
Page
TABLE OF CONTENTS
REGISTER YOUR PRODUCT
Register ONLINE at warranty.invacare.com
SPECIAL NOTES
NOTICE
ACCESSORIES WARNING
WARNING CONTINUED
Page
TYPICAL PRODUCT PARAMETERS
MEDIUM
SEMI-RECLINE
OFFICE STYLE, SEMI-RECLINE
ASBA
Page
SECTION 1GENERAL GUIDELINES
Controller Settings/Repair or Service
Accessories
Operation Information
Page
M61 Wheelchairs Only
Batteries
Charging Batteries
Grounding Instructions
Rain Test
Weight Training
Weight Limitation
SECTION 2EMI INFORMATION
Page
SECTION 3SAFETY/HANDLING OF WHEELCHAIRS
Stability and Balance
Coping With Everyday Obstacles
A Note to Wheelchair Assistants
Pinch Points
Lifting/Stairways
WARNING - ESCALATORS
Transferring To and From Other Seats
Reaching, Leaning andBending - Forward
Reaching and Bending - Backward
SECTION 4SAFETY INSPECTION/ TROUBLESHOOTING
Safety Inspection Checklists
All Wheelchairs
Page
Additional Requirements for M61 Wheelchairs
Troubleshooting Guide
All Wheelchairs
Page
SECTION 4SAFETY INSPECTION/TROUBLESHOOTING
Service Indicator Light Diagnostics
NUMBER OF FLASHES
ERROR CODE DESCRIPTION POSSIBLE SOLUTION
DISPLAY DESCRIPTION DEFINITION COMMENTS
Checking Battery Charge Level
ThefollowingDosandDontsareprovidedforyourconvenienceandsafety.
SYMPTOM PROBABLE CAUSE SOLUTIONS
DO DONT
SECTION 5WHEELCHAIR OPERATION
Operating the Wheelchair
Turning the Power On/Off
Using the Joystick to Drive the Wheelchair
Adjusting the Speed
Using the Horn
Elevating the Seat
Page
SECTION 5WHEELCHAIR OPERATION
SPJ+ and SPJ+ w/ACC Joystick Switches and Indicators
FIGURE 5.6 SPJ+ and SPJ+ w/ACC Joystick Switches and Indicators
NOTE:Forthefollowinginformation,refertoFIGURE 5.6.
On/Off Button
Speedometer
Speed Control Buttons
Mode Button
Joystick
Charger/Programming Input
Service Indicator
Information Gauge Display
SECTION 6ARMS
Removing/Installing the Arms
Adjusting the Arms
Adjusting Width
Adjusting Angle
Adjusting Height
Installing/Removing Flip Back Armrests
Positioning/Adjusting Flip Back Armrests
Positioning Flip Back Armrests for User Transfer
Positioning Flip Back Armrests for Use
Adjusting Height
SECTION 7SEAT
Adjusting the Back Angle
Semi-Recline Back Angle
Fold Down Back Angle
Adjusting the Headrest (Semi-Recline Only)
Removing/Installing the Seat Assembly
Replacing the Seat Positioning Strap
Van Seat
Page
SECTION 8FOOTBOARD ASSEMBLY
Removing/Installing the Footboard Assembly
Adjusting the Footboard Assembly
Angle
Depth
SECTION 9FRONT RIGGINGS
Installing/Removing Front Riggings
Adjusting Footrest Height
Model PHWH93
Model PH904A and PHAL4A
Replacing Heel Loops
Raising/Lowering Elevating Front Riggings
Adjusting/Replacing Telescoping Front Rigging Supports
Office Style Seat
SECTION 9FRONT RIGGINGS
FIGURE 9.6 Adjusting/Replacing Telescoping Front Rigging Supports - Office Style Seat
FRONT RIGGING MODEL
STANDARD POSITION
1 INCH OUT 2 INCHES OUT
Standard Seat
Page
Page
SECTION 10TOP SHROUD AND WHEELS
Replacing the Flat Free Tires on the Wheel Rim
Removing/Installing the Top Shroud
Engaging/Disengaging Motor Release Lever
Replacing Front/Rear Caster Assemblies
Adjusting Forks
SECTION 11BATTERIES
Warnings For Handling and Replacing Batteries
Using the Proper Batteries
Removing/Installing Batteries from/into Battery Tray
Page
Connecting/Disconnecting Battery Cables
Connecting Battery Cables
Page
SECTION 11BATTERIES
FIGURE 11.3 Connecting/Disconnecting Battery Cables
NOTE:Handlesonbatteries removedforclarity.
NOTE:Handlesonbatteriesremovedforclarity.
NOTE:Batteryterminal capsnotshownonfront batteryforclarity.
Charging Batteries
Battery Charger Operation
On-Board Battery Charger
Charging Using An Independent Charger Plugged Into The Joystick
Page
SECTION 12ELECTRONICS
Removing/Installing the Joystick
Repositioning the Joystick
Van Seat
Page
Disconnecting/Connecting the Joystick
Disconnecting
Connecting
Page
SECTION 13ACCESSORIES
Installing/Removing the Crutch/Cane Holder
Installing/Removing the Oxygen Holder
Installing/Removing/Using the Walker Holder
INSTALLATION WARNINGS
Installing/Removing the Walker Holder
Using the Walker Holder
GLOBAL LIMITED WARRANTY (EXCLUDING CANADA)
CANADA LIMITED WARRANTY