Pour l’utilisateur
For customer Use
Model No No de modèle
Serial No No de série
DLA-G20U
About burning-in of the D-ILA device
Safety Precautions
Lighters that present special hazards when over heated
Safety Precautions
Lamp is turned on. Exposure of your eyes to the strong
Xenon gas is enclosed with high pressure inside the light
Contents
Accessories
Front Side / Top Surface / Right Side
Controls and Features
How to extend the adjustable foot on the rear
Connector panel
Left-hand side
Control panel
Air intake area filter
Bottom Surface
Opening for replacing the light-source lamp
Fixing foot Position selecting screw for ceiling mounting
Control Panel
When a menu is shown
Setting button
Video button
Computer button
C S video input terminal Mini DIN 4 pin
Connector Panel
RS-232C terminal D-sub 9 pin
Computer OUT computer output terminal D-sub 3-row 15 pin
Audio input terminal stereo mini jack
Input of external sync signals is automatically detected
Row 15 pin
Audio audio input terminal stereo mini jack
Remote Control Unit
Install the batteries
Installing Batteries
Precautions for using batteries
Open the back cover
Precautions for Installation
Installing the Projector
Do not install the projector in the following places
When installing the projector, observe the followings
Projection screen size diagonal length
Projection Distance and Screen Size
Center line of the lens
Projection
59.04 ft 18.0 m 311 Approx cm 469
55.76 ft 17.0 m 294 Approx cm 443
62.32 ft 19.0 m 328 Approx cm 495
65.6 ft 20.0 m 345 Approx cm 521
Setting the position selecting screw for Ceiling Mounting
Effective Range and Distance of the Remote Control Unit
Effective range and distance of the remote control unit
Signals that Can Be Input to the Projector
Connecting to Various Devices
Video signals
Computer signals
Connecting to Hi-Vision Devices
Connecting to Video Devices
Video devices
Hi-Vision devices
Connecting to Devices which Control the Projector
Connecting to Other Devices
Desktop type
Game device, etc
Connection to an IBM PC or IBM-compatible computer
Connecting to Computer Devices
Read the manual which comes with each device thoroughly
RGB output devices
Connection to Macintosh
To monitor connector Supplied
Personal computer connection cable
To use the projector
Connecting the Power Cord Supplied
Remove the lens cap
To prevent fire and electric shock, observe the following
When Turning On the Devices Connected to the Projector
Turn on the Main Power switch
Turning on the Power
Basic Operations
Press the Operate button for one second or more
Switch the input
Adjust the screen size
When you press Video
When you press Computer
Adjust sound volume
Adjust focus
Adjust focus with the remote control’s Focus +
Buttons
To use the quick alignment function
To turn off video image and audio sound temporarily
Projector’s button
Press once
To use the remote control’s Preset button
To display the Setting menu
Values, press the remote control’s Preset button
Projector button
Back button
To display Channel
Making Basic Settings
Operating the Setting Menu
Press the Setting button of the projector
Press the Setting button to select the desired item
Operating the Main Menu
Configuration of the Main Menu Computer-related input
Operating the Main Menu Basic Operation of the Main Menu
Select Decoder with the cursor button 5 or ∞
Changing the Color System
Set the color system with the cursor button 2 or
¶ To finish the main menu, press the page Back button
Select Language with the cursor button 5 or ∞
Changing the Language Display
Set the desired language with the cursor button 2 or
Button
Adjust Tracking and Phase with the cursor buttons
Adjusting the Pixel Clock
Select Pixel Clock with the cursor button 5 or ∞
Main menu appears on the screen
Adjust H. POS. and V. POS. with the cursor buttons
Adjusting the Screen Position
¶To return to the main menu, press
Back button. To finish the main menu, press
Select the item to adjust with the cursor button 5 or ∞
Adjusting Picture Quality
When AV signals are input
When computer-related signals are input
For video system input
Submenu items
For computer system input
Picture menu
Adjustment values 0, text
Sets a mode which allows easy
30 ← 0 ← +30 Gets brighter 30 → 0 → +30 Gets lower
30 ← 0 ← +30 Gets higher 30 → 0 → +30 Gets less reddish
Adjust Treble and Bass with the cursor buttons
Adjusting Sound Quality
Select the Sound with the cursor
Button 5 or ∞
Select the item to set adjust with the cursor button 5 or ∞
Setting and Adjusting Other Functions Options
Following optional functions can be set adjusted
Select the Options with the cursor button 5 or ∞
Options menu
Set adjust the desired item with the cursor button 2 or
Aspect
Select a submenu item Source using the cursor button 5 or ∞
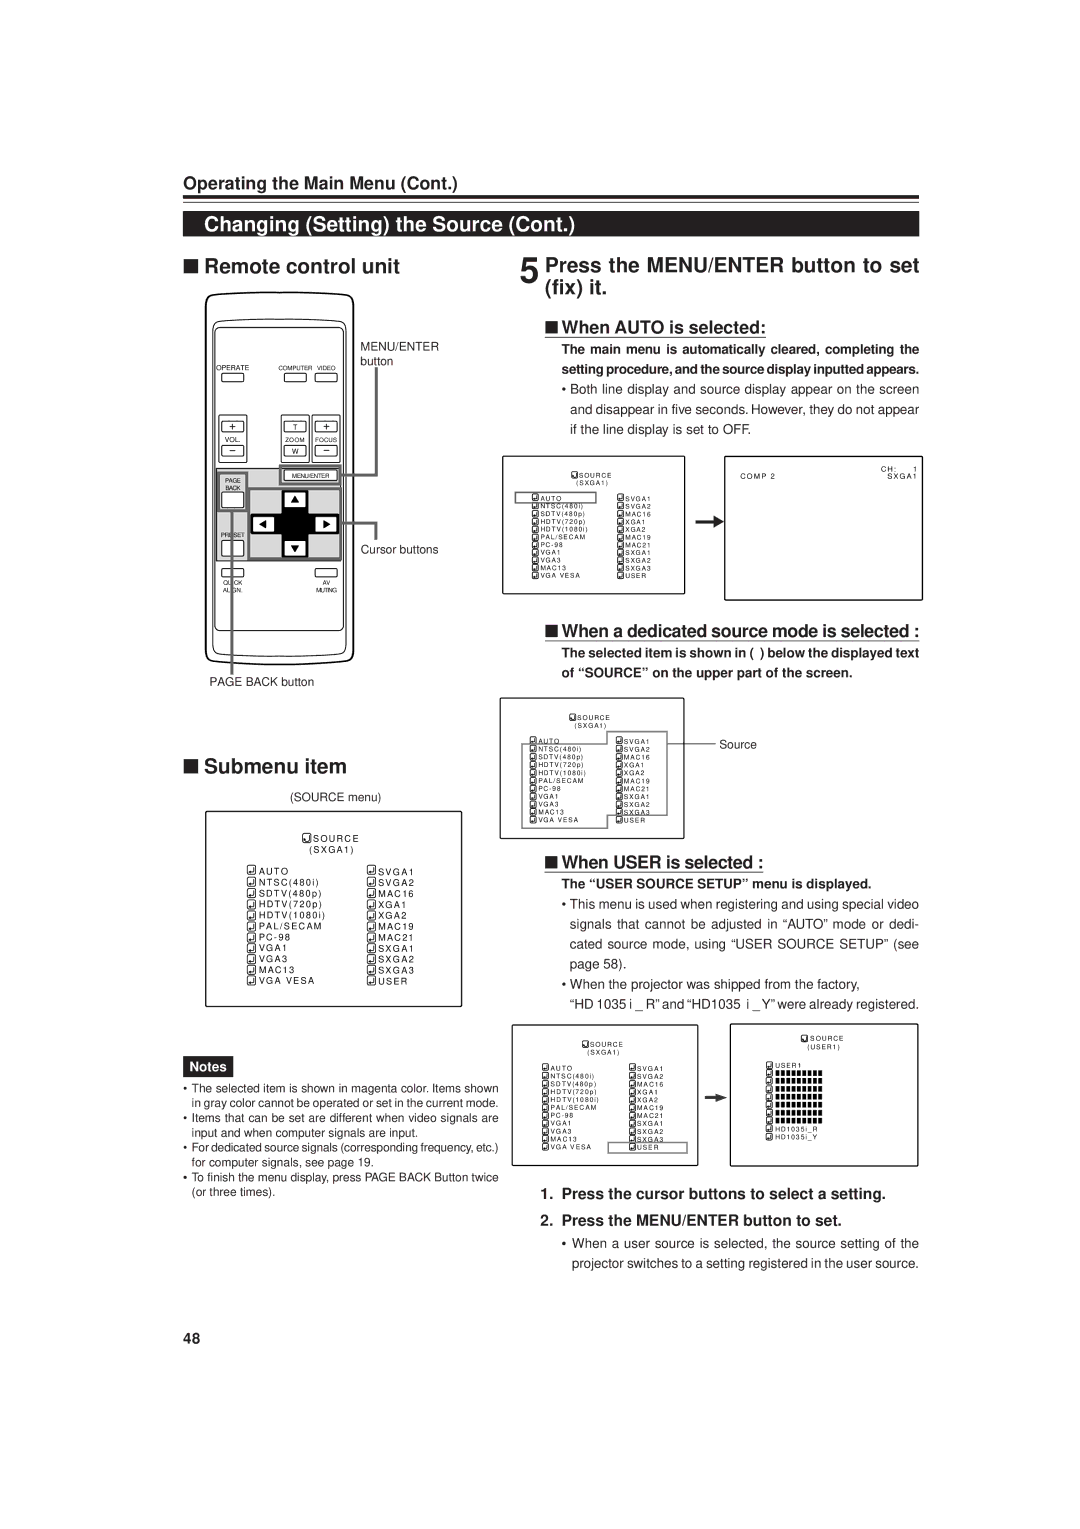
Changing Setting the Source
Select the item to set using the cursor buttons 5/∞ or 2/3
Source item displayed in text is indicated in magenta color
When a dedicated source mode is selected
When Auto is selected
When User is selected
Fix it
Channel Setup menu
Setting Up Channels
Select the Channel with the cursor button 5 or ∞
Submenu item Channel
Fix
¶ To delete the contents of the channel registered set up
Press the cursor button 5or ∞to select a Line item
Press the MENU/ENTER button to set fix
Source Setup menu is displayed on the screen
Channel setup menu
If any Line item is not registered, you cannot choose a
SOURCE’ or SWNo item. First register a Line item
Press the MENU/ENTER button to set
Press the cursor button 3 to move to SWNo
To set up a switcher number SWNo
Press the cursor button 2or 3to select a number
Press the page Back button
To changing channels using a Direct Channel
Press the page Back when no menu is displayed
Changing Channels
Select the Channel number with the cursor button 5 or ∞
Selected CH is shown in magenta color
Channel Setup/Selection menu
Submenu item Channel Source
Before setting up a user source
Press the cursor button 5 or ∞ to select User Source Setup
Submenu item User Source Setup
Selected item text display is shown in magenta color
Press the cousor button 3 to move to User Name
SettinguporChangeUserSources
To delete user names
Cont
Overwrite the user name with spaces
Up to 9 input positions can be selected
Press the cursor button 5or ∞to select an item to adjust
SettinguporChangingtheDisplaySize
Press the cursor button 2or 3to make adjustments
Item to adjust Contents of adjustment
Replacing the Fuse
Place the main power switch to the OFF ‡ position
Loosenit. the fuse holder to remove
Fuse 15A Fuse holder
Replacing the Light-Source Lamp
Remove the lamp-replacement
Opening cover By loosening Screws
Loosen the two screws with a flat-end screwdriver
Fasten the two screws with a flat-end screwdriver
Insert the new lamp unit fully inside and fasten the screws
Turn on the Main Power switch to go into stand-by mode
Resetting the Lamp Use Time
This completes the resetting of the lamp use time
Projector’s button
Clean the filter
Cleaning and Replacing the Filter
Reinstall the filter
Fasten the screw with a flat-end screwdriver
Troubleshooting
Maintenance
When the emergency indicator starts blinking
AV in AV in input
Specifications
Computer in Computer input
Other
DTV-format signals
Outside dimensions
Top
Front
Terminal
Pin assignment Specifications for terminals
RS-232C terminal
Computer IN-1 PC / Computer OUT Terminal
Projecteur
Propos de la brûlure du dispositif D-ILA
Précautions DE Sécurité
Demandez au revendeur d’installer l’appareil
Table des matières
Télécommande RM-M10G
Accessoires
Pour Macintosh
Face avant / Surface supérieure/ Face droite
Commandes et fonctions
Face gauche
Panneau de commande
Panneau de connexion
Extension du pied arrière réglable
Surface inférieure
Commandes et fonctions suite
Zone d’entrée d’air filtre
Pied de fixation
Panneau de commande
Panneau de commande suite
Prises d’entrée Audio L/R Audio gauche/droite prises cinch
Panneau de connexion
Terminal RS-232C D-sub 9 broches
Pour choisir l’entrée audio correcte pour l’entrée vidéo
Prise d’entrée Audio prise mini stéréo
Panneau de connexion suite
Prise d’entrée Audio audio prise mini stéréo
Télécommande
Mise en place des piles
Installez les piles
Ouvrez le couvercle arrière
Refermez le couvercle arrière
Précautions pour l’installation
Installation du projecteur
’installez pas le projecteur dans les endroits suivants
Espace minimum requis
Distance de projection et taille de l’écran
Installation du projecteur suite
Taille de l’écran de projection longueur de la diagonale
Ligne centrale de l’objectif
17,0 m 55,76 pieds Pouces Env cm
Taille de l’écran de projection longueur de la diagonale
18,0 m 59,04 pieds Pouces Env cm
19,0 m 62,32 pieds Pouces Env cm
Plage et distance effective de la télécommande
Plage et distance effective de la télécommande
Pour un montage de bureau
Pour un montage à l’envers ou un montage au plafond
Signaux pouvant être entrés dans le projecteur
Connexions de divers appareils
Signaux vidéo
Signaux d’ordinateur
Connexion à des appareils Hi-Vision
Connexion à des appareils vidéo
Connexions de divers appareils suite
Appareils vidéo
Connexion d’autres appareils
Connexion à des appareils qui commandent le projecteur
Ordinateur de Bureau
Ordinateur portable
Connexion à un ordinateur IBM PC ou compatible
Connexion à des ordinateurs
Ordinateur portatif
Appareils à sortie RVB
Connexion à un Macintosh
Connexion à des ordinateurs suite
Fourni
Câble de connexion d’ordinateur
Pour utiliser le projecteur
Connexion du cordon d’alimentation fourni
Retirez le capuchon d’objectif
Cordon d’alimentation fourni
Précautions ET Remarques
Mise sous tension des appareils connectés au projecteur
Fonctionnement de base
Télécommande
Mise sous tension
Mise hors tension
Fonctionnement de base suite
Ajustement de la taille de l’écran
Appuyez sur la touche Video ou sur la touche
Computer pour choisir l’entrée
Ajustement de la mise au point
Ajustement du volume sonore
Touches Focus + Touches VOL. +
Affichage sur l’écran
Pour utiliser la fonction d’alignement rapide
Pour couper l’image vidéo et le son temporairement
Appuyez une fois
Appuyez de nouveau
Pour afficher le menu Réglage menu
Pour utiliser la touche Preset de la télécommande
Pour afficher le menu principal
Pour changer la langue du menu affiché
Être réglés. Pour de plus amples détails concernant cette
Pour afficher Channel
Touche page Back
Utilisation du menu de réglage
Appuyez sur la touche Setting du projecteur
Réglages de base
Menu de réglage
Utilisation du menu principal
Utilisation du menu principal suite
Configuration du menu principal Entrées d’ordinateur
Appuyez sur la touche MENU/ENTER
Télécommande
Choisissez un élément avec la touche de curseur 5 ou ∞
Réglez ajustez l’élément
Réglez le système de couleur avec la touche de curseur 2 ou
Modification du système de couleur
Est identifié automatiquement
NTSC480i Spécialisé pour NTSC480i NTSC4.43
Choisissez Language avec la touche de curseur 5 ou ∞
Modification de la langue d’affichage
Réglez la langue souhaitée avec la touche de curseur 2 ou
Ajustement de l’horloge pixel
Ajustez Track et Phase avec les touches de curseur
Choisissez Horloge Pixel avec la touche de curseur 5 ou ∞
Élément ajusté Touche Contenu de l’ajustement
Ajustement de la position de l’écran
Choisissez Image avec la touche de curseur 5 ou ∞
Ajustement de la qualité de l’image
Quand des signaux AV sont entrés
Quand des signaux d’ordinateur sont entrés
Éléments de sous-menu
Ajustement de la qualité de l’image suite
Réalisez l’ajustement avec la touche de curseur 2 ou
Pour l’entrée vidéo
Ajustées 0, mode texte
Règle un mode qui permet de Lire facilement les textes
Devient plus élevé
Devient moins rouge
Curseur 5 ou ∞
Ajustement de la qualité du son
Ajustez Aiguë et Grave avec les touches de curseur
Le menu principal apparaît sur l’écran
Choisissez Options avec la touche de curseur 5 ou ∞
Réglage et ajustement des autres fonctions Options
Les éléments de sous-menu du menu Options sont affichés
’élément à régler ajuster apparaît en magenta
Menu Options
Réglage et ajustement des autres fonctions Options suite
Pour ajuster plusieurs éléments, répétez les étapes 4 et
CHG
Changement Sélection de source
Réglage usine Mode dentrée
Lélément Source affiché en texte apparaît en magenta
Lélément à régler apparaît en magenta
Appuyez sur la touche MENU/ENTER pour le régler valider
Changement Sélection de source suite
Élément de sous-menu
Le menu principal s’affiche sur l’écran
Réglage des canaux
Poste de menu secondaire Channel
Menu de réglage des canaux
Un menu de sélection Line s’affiche sur l’écran
Réglage des canaux suite
Menu de sélection de ligne
Menu de réglage Channel
Le menu User Source Setup s’affiche
Pour préciser une source, Source
Si vous choisissez User sur le menu Source
Appuyez sur la touche ENTER/MENU pour valider
Appuyez sur la touche page Back
Appuyez sur la touche MENU/ENTER validation
Pour préciser un numéro de commutation SWNo
Menu de définition de numéro de commutation
Changement de canal par le moyen direct
Changement de canal
Menu de changement direct de canal
Canal Ligne
Le canal choisi est de couleur magenta sur l’écran
Changement de canal suite
Menu de sélection/réglags Channel
Réglage ou changement de source utilisateur
Poste de menu secondaire User Source Setup
Avant de régler une source utilisateur
Curseur 5 ou ∞ pour choisir User
Réglage ou changement de source utilisateur suite
Sur l’écran
Touches de
Curseur 5 ou ∞ pour choisir le caractère
Utilisez les touches de déplacement du
Pour effacer un nom utilisateur
Remplacez le nom utilisateur par des
Poste à régler Nature du réglage
Réglage ou changement de taille d’affichage
Nous conseillons de procéder de la manière suivante
Mettez l’interrupteur Main Power sur la position OFF ‡
Remplacement du fusible
Tournevis Philips Fusible 15 A, 250 Porte-fusible
Dévissez les deux vis avec un tournevis plat
Remplacement de la lampe source de lumière
Faites attention de ne pas endommager la griffe
Serrez les deux vis avec un tournevis plat
Remplacement de la lampe source de lumière suite
Vis Module-lampe Poignée
Remise à zéro de la durée dutilisation de la lampe
Interrupteur Main Power Panneau de commande
Touches du projecteur
Les indicateurs Stand by et Operate sallument en même temps
Nettoyez le filtre
Réinstallez le filtre
Vissez les vis avec un tournevis plat
Guide de dépannage
Quand lindicateur Emergency commence à clignoter
Guide de dépannage suite
Entretien
AV in Entrée AV
Spécifications
Computer in Entrée Computer
Computer OUT sortie Computer
Spécifications suite
Autre
Signaux au format-DTV
Dimensions extérieures
Dessus
Avant
Prise Y/C
Affectation des broches Spécification pour les prises
Prise RS-232C
Prise Computer IN-1 PC / Computer OUT
M-VP
LCT0600-001B