EN 19

NOTES:

When you use the LCD monitor outdoors in direct sunlight, the LCD monitor may be difficult to see. If this happens, use the viewfinder instead.

The image will not appear simultaneously in the LCD monitor and the viewfinder except during Interface Shooting. It will appear in the viewfinder when the LCD monitor is in the lock position, and it will appear on the LCD monitor when fully extended.

The cassette holder cannot be opened unless a power supply is attached.

There may be a delay after you open the cassette holder cover until the cassette holder opens. Do not use force.

Once the cassette holder is closed, it recedes automatically. Wait until it recedes completely before closing the cassette holder cover.

When the Recording Start/Stop button is pressed, it may take a few seconds before actual recording starts. “ ” starts rotating when the camcorder actually starts recording.

The time required to calculate and display the remaining tape length, and the accuracy of the calculation, may vary according to the type of tape used.

“TAPE END” appears when the tape reaches its end, and the power goes off automatically if left in this condition for 5 minutes. “TAPE END” also appears when a cassette at its end is loaded.

If the Record-Standby mode continues for 5 minutes, the camcorder’s power shuts off automatically. To turn the camcorder on again, push back and pull out the viewfinder again or close and re-open the LCD monitor.

When a blank portion is left between recorded scenes on the tape, the time code is interrupted and errors may occur when editing the tape. To avoid this, refer to “Recording from the middle of a tape” ( pg. 23).

During recording, sound is not heard from the speaker. To hear the sound, connect optional headphones to the PHONE connector. The sound volume is at the level it was adjusted to during playback ( pg. 25).

To turn the tally lamp or beep sounds off,  pg. 28, 30.

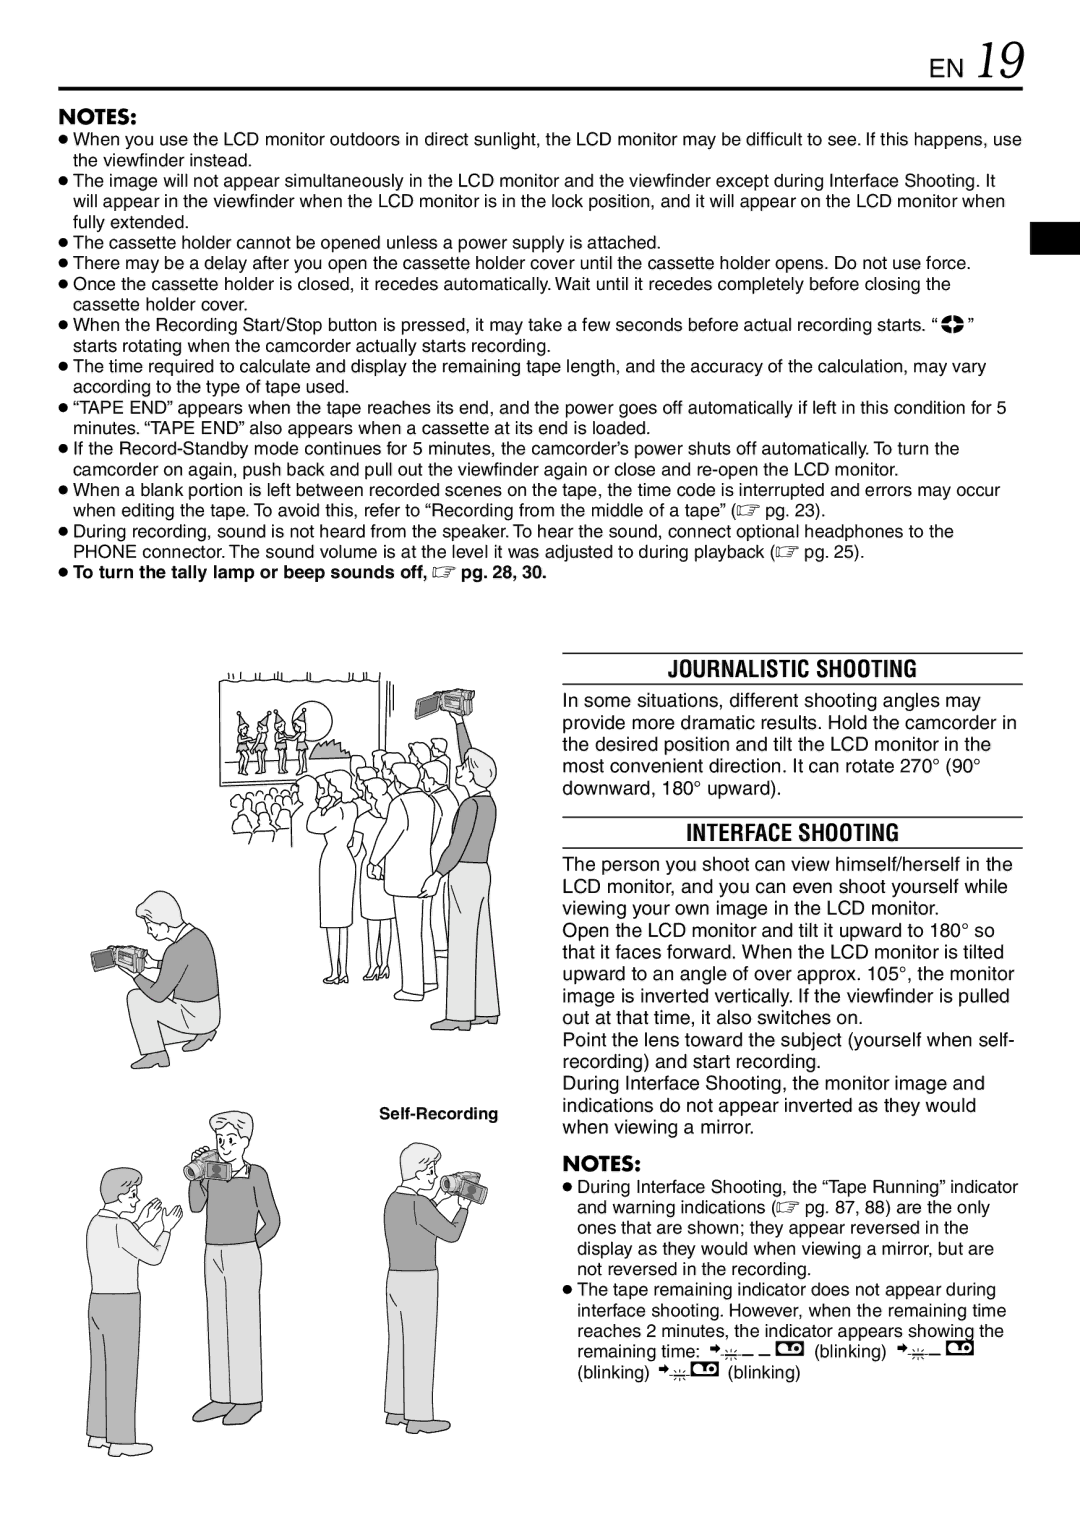
JOURNALISTIC SHOOTING

In some situations, different shooting angles may provide more dramatic results. Hold the camcorder in the desired position and tilt the LCD monitor in the most convenient direction. It can rotate 270° (90° downward, 180° upward).

INTERFACE SHOOTING


The person you shoot can view himself/herself in the


LCD monitor, and you can even shoot yourself while


viewing your own image in the LCD monitor.


Open the LCD monitor and tilt it upward to 180° so


that it faces forward. When the LCD monitor is tilted


upward to an angle of over approx. 105°, the monitor


image is inverted vertically. If the viewfinder is pulled


out at that time, it also switches on.


Point the lens toward the subject (yourself when self-


recording) and start recording.


During Interface Shooting, the monitor image and

Self-Recording

indications do not appear inverted as they would

when viewing a mirror.


NOTES:

During Interface Shooting, the “Tape Running” indicator and warning indications ( pg. 87, 88) are the only ones that are shown; they appear reversed in the display as they would when viewing a mirror, but are not reversed in the recording.

The tape remaining indicator does not appear during interface shooting. However, when the remaining time reaches 2 minutes, the indicator appears showing the

remaining time:

(blinking)

(blinking)

(blinking)

Page 19
Image 19
JVC GR-DV3000 specifications Journalistic Shooting, Interface Shooting

GR-DV3000 specifications

The JVC GR-DV3000 is a compact digital camcorder that impresses with its advanced features and user-friendly design. Intended for enthusiasts and professionals alike, this model caters to those who are looking for high-quality video capture in a portable format.

One of the standout features of the GR-DV3000 is its MegaPixel CCD image sensor. This technology provides enhanced image clarity and detail, allowing users to capture stunning 640 x 480 resolution still images along with high-quality video. The camcorder supports a variety of recording formats, including Mini DV, ensuring that users can easily transfer their footage to digital platforms for editing or sharing.

A highlight of the GR-DV3000 is its powerful 10x optical zoom lens, which allows for detailed close-up shots without compromising image quality. Coupled with a 700x digital zoom, users can explore further distances while retaining the ability to capture vivid detail. The lens features a fast aperture, making it easier to shoot in low-light conditions—a significant advantage for those shooting in diverse environments.

The camcorder also boasts a 2.5-inch LCD screen that provides clear playback and easy framing of shots. This screen is not only vital for composing your videos but also plays a crucial role during playback, allowing for an immersive viewing experience. Additionally, the GR-DV3000 is equipped with a night vision mode, making it possible to capture video even in near darkness, an essential feature for outdoor and low-light enthusiasts.

Audio quality is another strength of the GR-DV3000, thanks to its built-in stereo microphone and the ability to input external audio sources. This feature is crucial for capturing high-quality sound, whether in interviews or in a bustling outdoor setting.

The camcorder is designed with ease of use in mind, featuring a simple interface that allows for quick access to various settings and options. Its lightweight build makes it portable, perfect for on-the-go shooting, while the durable design ensures longevity—even with regular use.

Overall, the JVC GR-DV3000 combines a range of advanced technologies and user-friendly features, making it an excellent choice for anyone looking to create high-quality video content. Whether you're a budding filmmaker or a seasoned professional, this camcorder offers an impressive suite of tools to help you tell your story with clarity and impact.