42 EN

VIDEO/MEMORY Switch (Open the LCD monitor to access this switch.)

SNAPSHOT Button


MENU Wheel


Lock Button


NAVI Button


Power

F


P


L

Switch

FO YA


Display

Menu

Screen

NAV I GAT I ON – OF F

ON

LP100min

Displayed while the

PAUSE

captured image is


being stored in the


memory card.

NAV I GAT I ON


NAVIGATION

DATE : MAY 2 4

’ 0 2

3 : 2 9AM

thumbnail

TC : 1 1 3 : 2 3

: 1 5


image screen

1

2

3

4

5

006

CAUTION

Do not remove the memory card or perform any other operation (such as turning off the camcorder) during deletion. Also, be sure to use the provided AC Power Adapter/Charger, as the memory card may be corrupted if the battery becomes exhausted during deletion. If the memory card becomes corrupted, initialize it. ( pg. 51)

ADVANCED FEATURES (cont.)

NAVIGATION Function

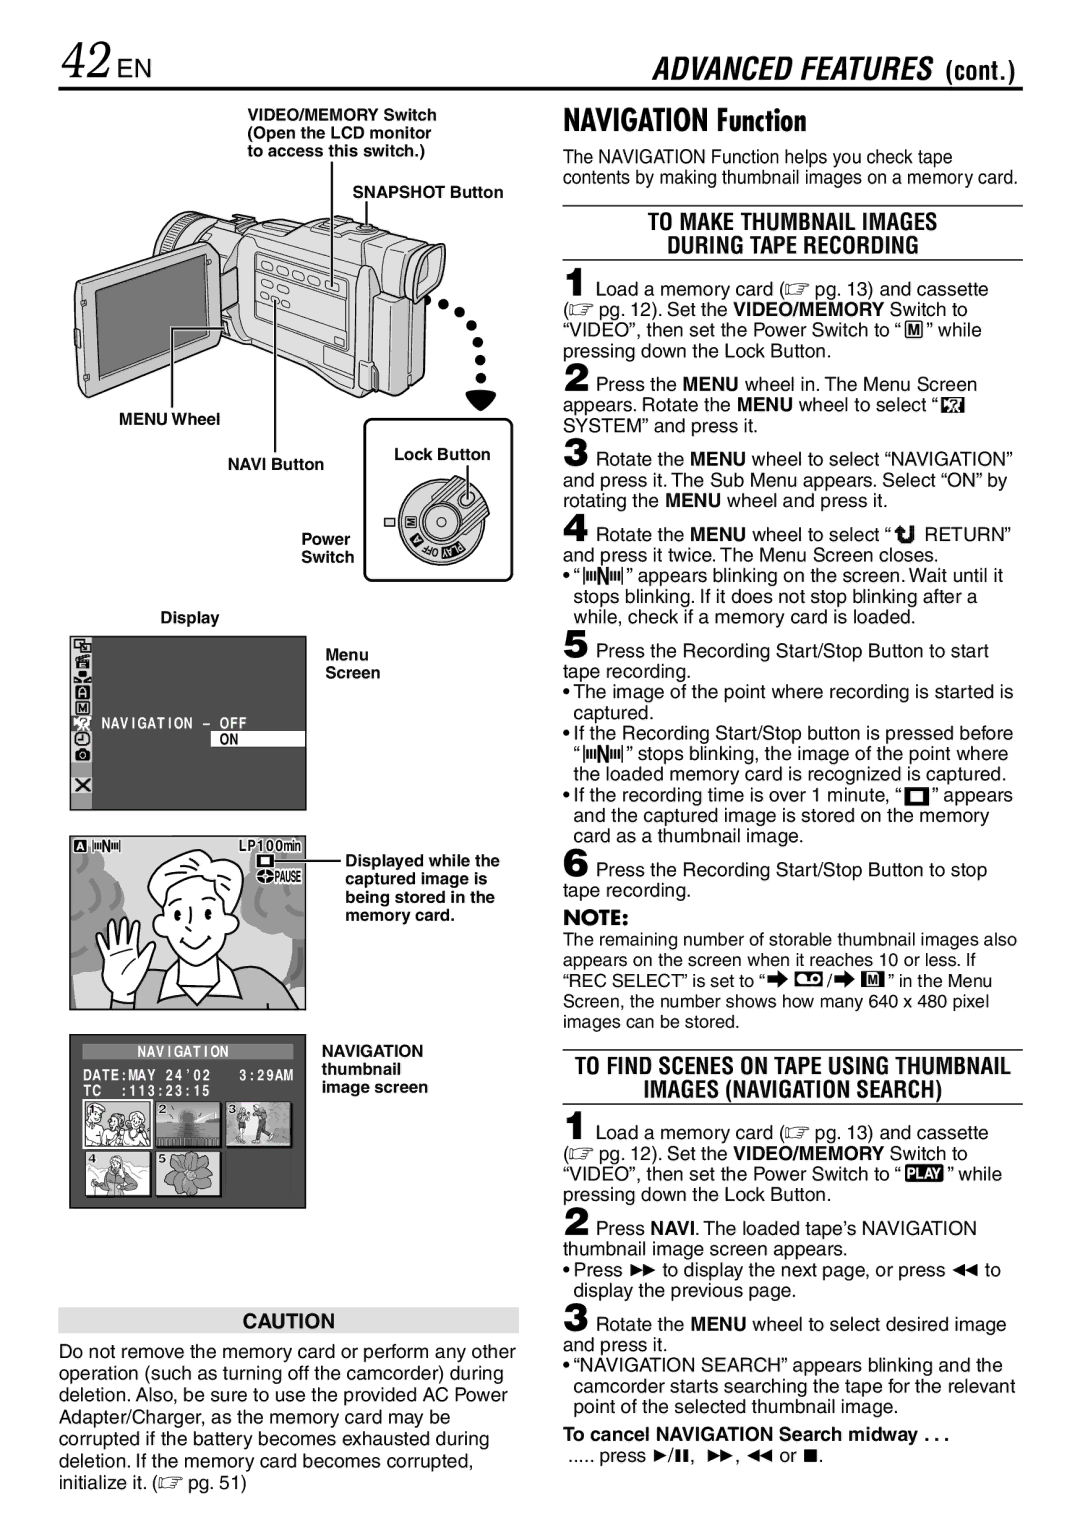
The NAVIGATION Function helps you check tape contents by making thumbnail images on a memory card.

TO MAKE THUMBNAIL IMAGES

DURING TAPE RECORDING

1 Load a memory card ( pg. 13) and cassette ( pg. 12). Set the VIDEO/MEMORY Switch to “VIDEO”, then set the Power Switch to “ ” while pressing down the Lock Button.

2 Press the MENU wheel in. The Menu Screen appears. Rotate the MENU wheel to select “ SYSTEM” and press it.

3 Rotate the MENU wheel to select “NAVIGATION” and press it. The Sub Menu appears. Select “ON” by rotating the MENU wheel and press it.

4 Rotate the MENU wheel to select “ RETURN” and press it twice. The Menu Screen closes.

” appears blinking on the screen. Wait until it stops blinking. If it does not stop blinking after a while, check if a memory card is loaded.

5 Press the Recording Start/Stop Button to start tape recording.

The image of the point where recording is started is captured.

If the Recording Start/Stop button is pressed before

” stops blinking, the image of the point where the loaded memory card is recognized is captured.

If the recording time is over 1 minute, “ ” appears and the captured image is stored on the memory card as a thumbnail image.

6 Press the Recording Start/Stop Button to stop tape recording.

NOTE:

The remaining number of storable thumbnail images also appears on the screen when it reaches 10 or less. If

“REC SELECT” is set to “ / ” in the Menu Screen, the number shows how many 640 x 480 pixel images can be stored.

TO FIND SCENES ON TAPE USING THUMBNAIL

IMAGES (NAVIGATION SEARCH)

1 Load a memory card ( pg. 13) and cassette ( pg. 12). Set the VIDEO/MEMORY Switch to

“VIDEO”, then set the Power Switch to “ ” while pressing down the Lock Button.

2 Press NAVI. The loaded tape’s NAVIGATION thumbnail image screen appears.

Press 3to display the next page, or press 2to display the previous page.

3 Rotate the MENU wheel to select desired image and press it.

“NAVIGATION SEARCH” appears blinking and the camcorder starts searching the tape for the relevant point of the selected thumbnail image.

To cancel NAVIGATION Search midway . . .

..... press 4/6, 3, 2or 5.

Page 42
Image 42
JVC GR-DV3000 specifications 42 EN, Navigation Function, To Make Thumbnail Images During Tape Recording, Press 4/6, 3, 2or

GR-DV3000 specifications

The JVC GR-DV3000 is a compact digital camcorder that impresses with its advanced features and user-friendly design. Intended for enthusiasts and professionals alike, this model caters to those who are looking for high-quality video capture in a portable format.

One of the standout features of the GR-DV3000 is its MegaPixel CCD image sensor. This technology provides enhanced image clarity and detail, allowing users to capture stunning 640 x 480 resolution still images along with high-quality video. The camcorder supports a variety of recording formats, including Mini DV, ensuring that users can easily transfer their footage to digital platforms for editing or sharing.

A highlight of the GR-DV3000 is its powerful 10x optical zoom lens, which allows for detailed close-up shots without compromising image quality. Coupled with a 700x digital zoom, users can explore further distances while retaining the ability to capture vivid detail. The lens features a fast aperture, making it easier to shoot in low-light conditions—a significant advantage for those shooting in diverse environments.

The camcorder also boasts a 2.5-inch LCD screen that provides clear playback and easy framing of shots. This screen is not only vital for composing your videos but also plays a crucial role during playback, allowing for an immersive viewing experience. Additionally, the GR-DV3000 is equipped with a night vision mode, making it possible to capture video even in near darkness, an essential feature for outdoor and low-light enthusiasts.

Audio quality is another strength of the GR-DV3000, thanks to its built-in stereo microphone and the ability to input external audio sources. This feature is crucial for capturing high-quality sound, whether in interviews or in a bustling outdoor setting.

The camcorder is designed with ease of use in mind, featuring a simple interface that allows for quick access to various settings and options. Its lightweight build makes it portable, perfect for on-the-go shooting, while the durable design ensures longevity—even with regular use.

Overall, the JVC GR-DV3000 combines a range of advanced technologies and user-friendly features, making it an excellent choice for anyone looking to create high-quality video content. Whether you're a budding filmmaker or a seasoned professional, this camcorder offers an impressive suite of tools to help you tell your story with clarity and impact.