22![]()
![]()
![]() EN
EN![]()
![]()
![]()
![]()
![]()
![]()
![]()
![]()
![]()
![]()
![]()
![]()
![]()
![]()
![]()
![]()
![]()
![]()
![]()
![]()
![]()
![]()
![]()
![]()
![]()
![]()
![]()
![]()
![]()
![]()
![]()
![]()
![]()
![]()
![]()
![]()
![]()
![]()
![]()
![]()
![]()
![]()
![]()
![]()
![]()
![]()
![]()
![]()
![]()
![]()
![]()
![]()
![]()
![]()
![]()
![]()
![]()
![]()
![]()
![]()
![]()
![]()
![]()
![]()
![]()
![]() RECORDING
RECORDING![]() (cont.)
(cont.)![]()
![]()
![]()
AUDIO
1 2 3
2
4 5 6
7 8 9
S-VHS (Super VHS) and VHS
Your recorder can record in either
To record in S-VHS:
Perform the steps 1 – 4 below to set
Then, insert a cassette marked
The
0 | 4 |
| PLAY |
1
FF
REW
PAUSE
3 | OK |
MENU |
|
JOG | JOG/SHUTTLE |
|
Retake
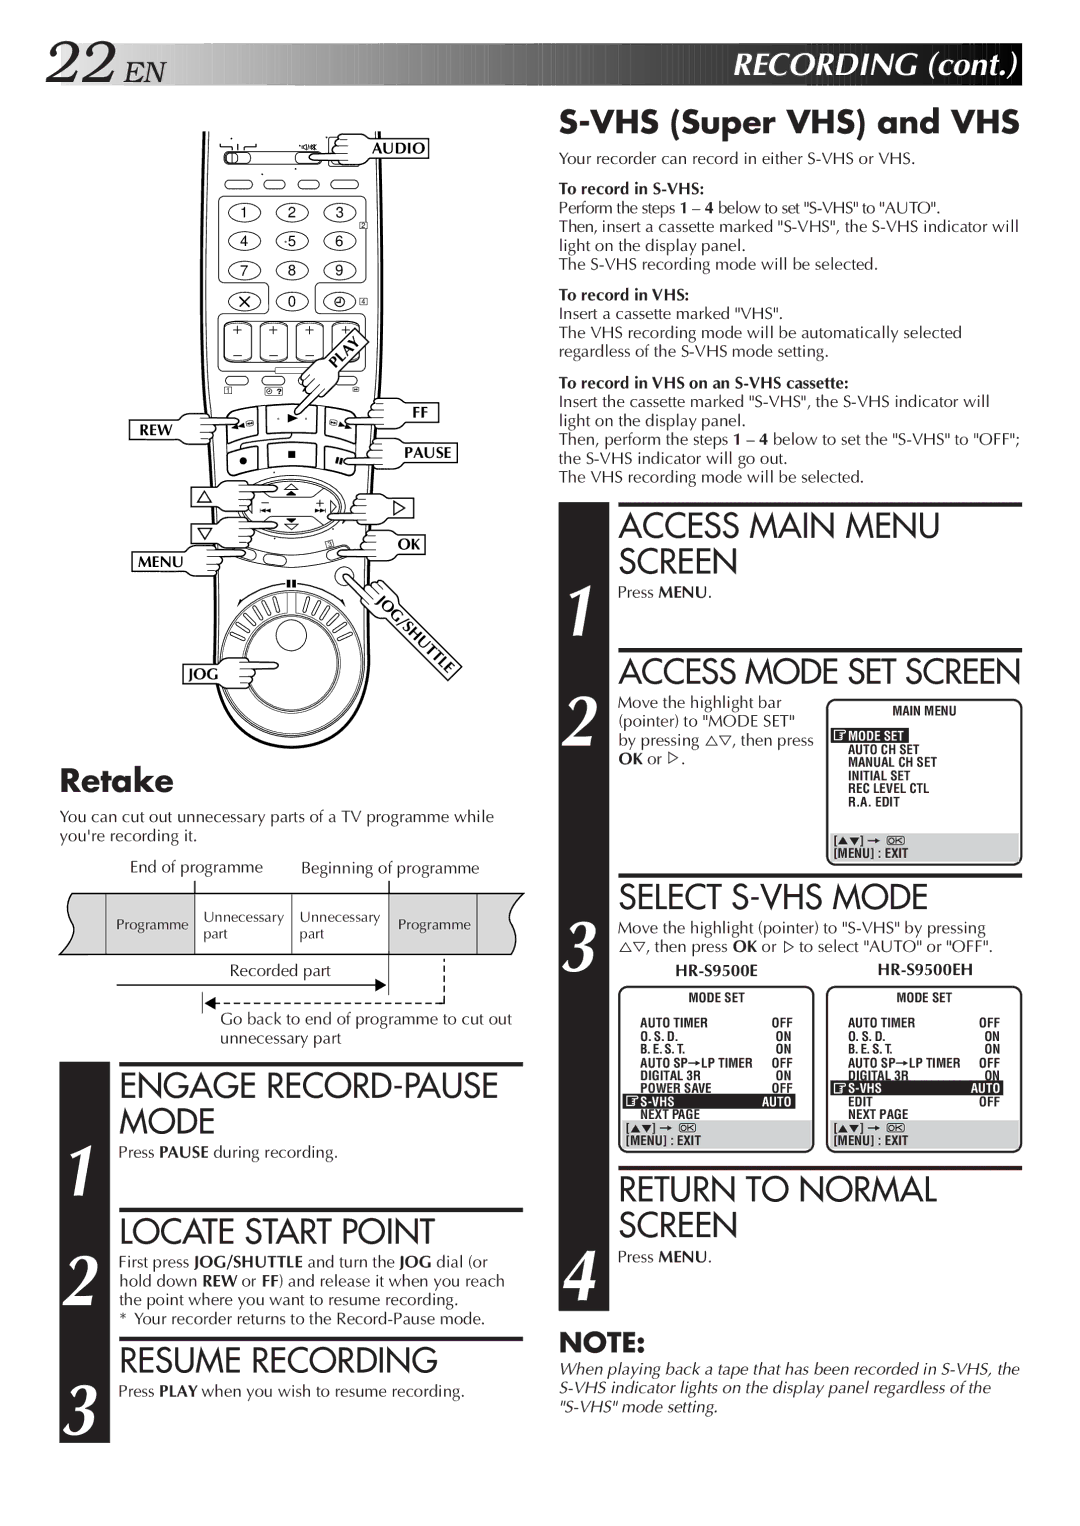
You can cut out unnecessary parts of a TV programme while you're recording it.
End of programme | Beginning of programme | ||
|
|
|
|
Programme | Unnecessary | Unnecessary | Programme |
| part | part |
|
|
|
|
|
Recorded part
Go back to end of programme to cut out unnecessary part
ENGAGE RECORD-PAUSE MODE
1 Press PAUSE during recording.
LOCATE START POINT
2 First press JOG/SHUTTLE and turn the JOG dial (or hold down REW or FF) and release it when you reach the point where you want to resume recording.
* Your recorder returns to the
RESUME RECORDING
3 Press PLAY when you wish to resume recording.
To record in VHS:
Insert a cassette marked "VHS".
The VHS recording mode will be automatically selected regardless of the
To record in VHS on an S-VHS cassette:
Insert the cassette marked
Then, perform the steps 1 – 4 below to set the
The VHS recording mode will be selected.
|
|
| ACCESS MAIN MENU |
|
|
| ||||||||||
| 1 |
| SCREEN |
|
|
|
|
|
|
|
| |||||
| Press MENU. |
|
|
|
|
|
|
|
| |||||||
| 2 |
| ACCESS MODE SET SCREEN | |||||||||||||
| Move the highlight bar | MAIN MENU |
|
|
| |||||||||||
|
| (pointer) to "MODE SET" |
|
|
| |||||||||||
|
|
|
|
|
|
| ||||||||||
|
| by | pressing | , then press | MODE SET |
|
|
|
| |||||||
|
| AUTO CH SET |
|
|
| |||||||||||
|
|
| % | . | %Þ |
|
|
|
|
|
| |||||
|
|
| OK or |
|
|
|
|
| MANUAL CH SET |
|
|
| ||||
|
|
|
|
|
|
|
|
|
|
|
| INITIAL SET |
|
|
| |
|
|
|
|
|
|
|
|
|
|
|
| REC LEVEL CTL |
|
|
| |
|
|
|
|
|
|
|
|
|
|
|
| R.A. EDITT |
|
|
| |
|
|
|
|
|
|
|
|
|
|
|
|
|
|
|
|
|
|
|
|
|
|
|
|
|
|
|
|
| [5°] = |
|
|
|
|
|
|
|
|
|
|
|
|
|
|
|
| [MENU] : EXIT |
|
|
| |
|
|
|
|
|
|
|
|
|
|
|
|
|
|
|
|
|
| 3 |
| SELECT |
|
|
| ||||||||||
| Move the highlight (pointer) to | |||||||||||||||
|
| %Þ, then press OK or%to select "AUTO" or "OFF". | ||||||||||||||
|
|
|
|
|
|
|
|
| ||||||||
|
|
|
|
|
|
| MODE SET |
|
|
| MODE SET |
|
|
| ||
|
|
|
|
| AUTO TIMER | OFF | AUTO TIMER | OFF | ||||||||
|
|
|
|
| O. S. D. |
|
| ON | O. S. D. | ON | ||||||
|
|
|
|
| B. E. S. T. |
| ON | B. E. S. T. | ON | |||||||
|
|
|
|
| AUTO SP=LP TIMER | OFF | AUTO SP=LP TIMER | OFF | ||||||||
|
|
|
|
| DIGITAL 3R |
| ON | DIGITAL 3R | ON | |||||||
|
|
|
|
| POWER SAVE | OFF | AUTO |
| ||||||||
|
|
|
|
|
|
| AUTO |
|
| EDIT | OFF |
| ||||
|
|
|
|
| NEXT PAGE |
|
|
|
| NEXT PAGE |
|
|
| |||
|
|
| [5°] = |
|
|
|
|
| [5°] = |
|
|
|
| |||
|
|
|
| [MENU] : EXIT |
|
|
|
| [MENU] : EXIT |
|
|
| ||||
|
|
|
|
|
|
|
|
|
|
|
|
|
|
|
|
|
|
|
| RETURN TO NORMAL |
|
|
| ||||||||||
| 4 |
| SCREEN |
|
|
|
|
|
|
|
| |||||
| Press MENU. |
|
|
|
|
|
|
|
| |||||||
NOTE:
When playing back a tape that has been recorded in
