![]() T-
T-![]()
![]() V
V![]()
![]() LI
LI![]() NK
NK![]()
![]()
![]()
![]()
![]()
![]()
![]()
![]()
![]()
![]()
![]()
![]()
![]()
![]()
![]()
![]()
![]()
![]()
![]()
![]()
![]()
![]()
![]()
![]()
![]()
![]()
![]()
![]()
![]()
![]()
![]()
![]()
![]()
![]()
![]()
![]()
![]()
![]()
![]()
![]()
![]()
![]()
![]()
![]()
![]()
![]()
![]()
![]()
![]()
![]()
![]()
![]()
![]()
![]()
![]()
![]()
![]()
![]()
![]()
![]()
![]()
![]()
![]()
![]()
![]()
![]()
![]()
![]()
![]()
![]()
![]()
![]()
![]()
![]()
![]()
![]()
![]()
![]()
![]()
![]()
![]()
![]()
![]() 11
11![]()
T-V Link
Functions
When you connect the recorder and your TV via a
For details, refer to the instruction manual for your TV.
*Compatible with TVs offering
NexTView Link
You can download the EPG (Electronic Programme Guide) information from your TV for
For details, refer to the instruction manual for your TV.
TV Auto Power On
You can turn on the TV and set it to video mode automatically whenever you play a tape.
For details, refer to the instruction manual for your TV.
VCR Auto Standby
You can use your TV's remote control to turn off the recorder. For details, refer to the instruction manual for your TV.
Direct Rec
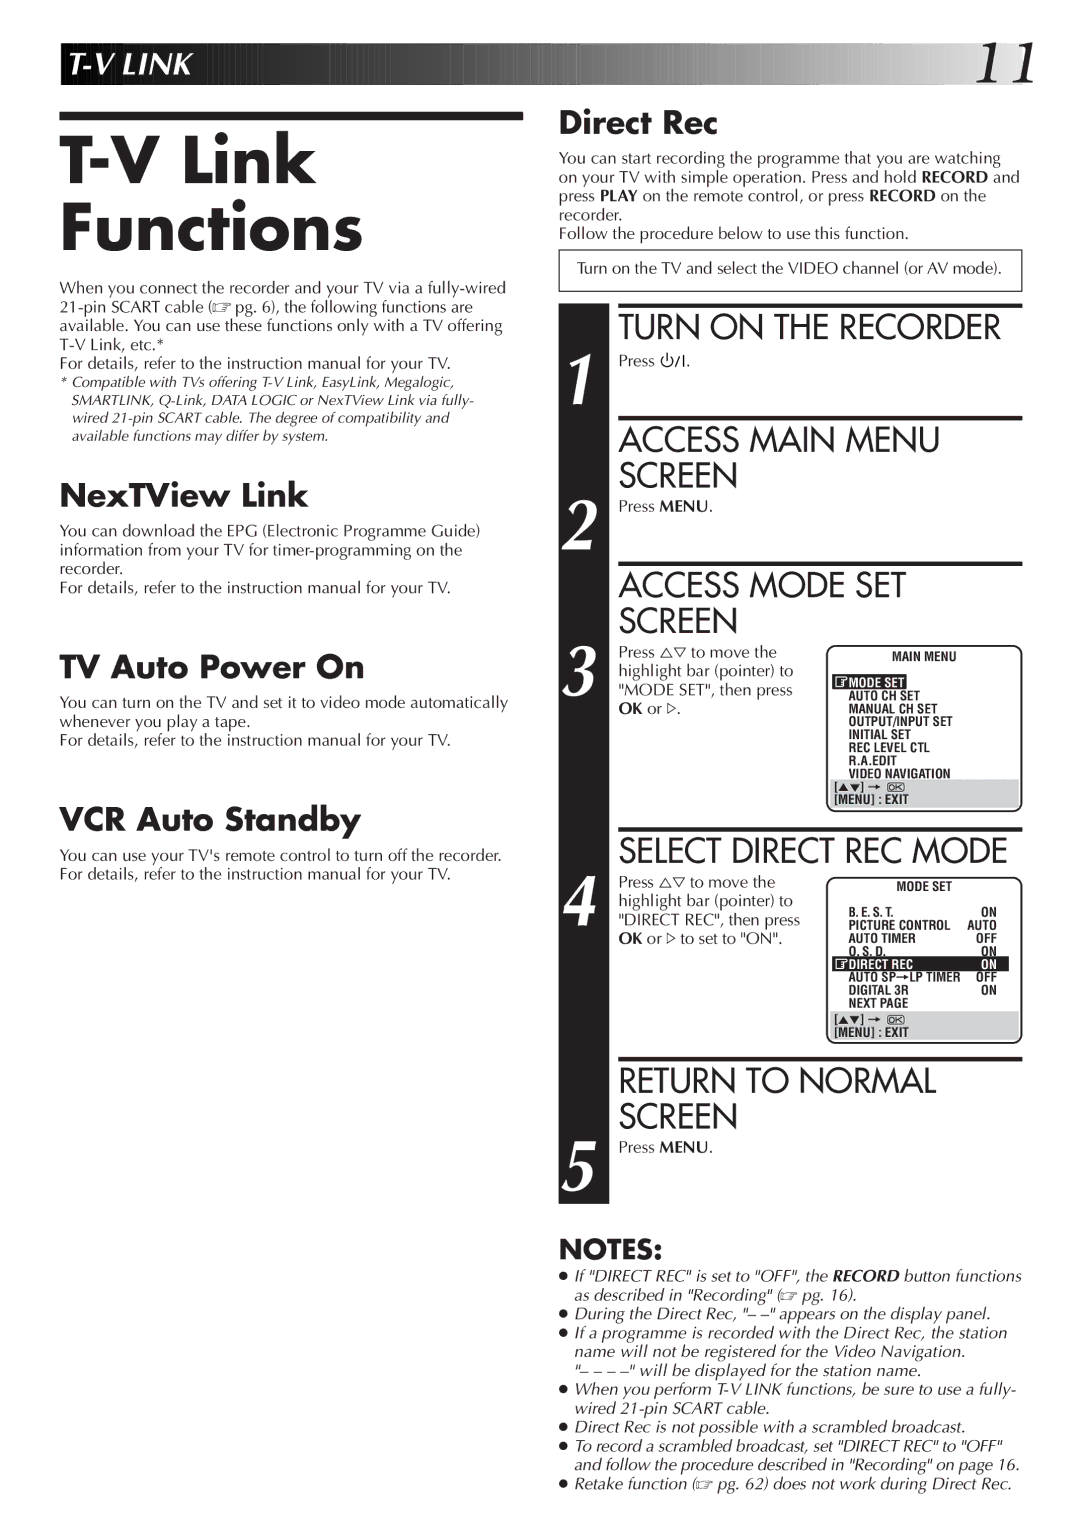
You can start recording the programme that you are watching on your TV with simple operation. Press and hold RECORD and press PLAY on the remote control, or press RECORD on the recorder.
Follow the procedure below to use this function.
Turn on the TV and select the VIDEO channel (or AV mode).
TURN ON THE RECORDER
1 Press |
|
|
| . |
|
|
|
|
| ||
|
|
|
|
|
|
| |||||
| ACCESS MAIN MENU |
|
|
| |||||||
| SCREEN |
|
|
|
|
| |||||
2 Press MENU. |
|
|
|
|
| ||||||
| ACCESS MODE SET |
|
|
| |||||||
3 | SCREEN |
|
|
|
|
| |||||
Press %Þ to move the | MAIN MENU |
|
|
| |||||||
highlight bar (pointer) to |
|
|
|
|
| ||||||
MODE SET |
|
|
|
| |||||||
"MODE SET", then press |
|
|
|
| |||||||
AUTO CH SET |
|
|
| ||||||||
OK or #. | MANUAL CH SET |
|
|
| |||||||
|
|
|
|
|
| OUTPUT/INPUT SET |
|
|
| ||
|
|
|
|
|
| INITIAL SET |
|
|
| ||
|
|
|
|
|
| REC LEVEL CTLT |
|
|
| ||
|
|
|
|
|
| R.A.EDIT |
|
|
| ||
|
|
|
|
|
| VIDEO NAVIGATION |
|
|
| ||
|
|
|
|
|
| [5°] = |
|
|
|
| |
|
|
|
|
|
| [MENU] : EXIT |
|
|
| ||
|
|
|
|
|
|
|
|
|
|
| |
4 | SELECT DIRECT REC MODE | ||||||||||
Press %Þ to move the | MODE SET |
|
|
| |||||||
highlight bar (pointer) to | B. E. S. T. | ON | |||||||||
"DIRECT REC", then press | |||||||||||
PICTURE CONTROL | AUTO | ||||||||||
OK or #to set to "ON". | AUTO TIMER | OFF | |||||||||
|
|
|
|
|
| O. S. D. | ON | ||||
|
|
|
|
|
| DIRECT REC | ON |
| |||
|
|
|
|
|
| AUTO SP=LP TIMER | OFF |
| |||
|
|
|
|
|
| DIGITAL 3R | ON | ||||
|
|
|
|
|
| NEXT PAGE |
|
|
| ||
|
|
|
|
|
| [5°] = |
|
|
|
| |
|
|
|
|
|
| [MENU] : EXIT |
|
|
| ||
|
|
|
|
|
|
|
|
|
|
| |
| RETURN TO NORMAL |
|
|
| |||||||
| SCREEN |
|
|
|
|
| |||||
5 Press MENU. |
|
|
|
|
| ||||||
NOTES:
●If "DIRECT REC" is set to "OFF", the RECORD button functions as described in "Recording" (☞ pg. 16).
●During the Direct Rec, "–
●If a programme is recorded with the Direct Rec, the station name will not be registered for the Video Navigation.
"– – –
●When you perform
●Direct Rec is not possible with a scrambled broadcast.
●To record a scrambled broadcast, set "DIRECT REC" to "OFF" and follow the procedure described in "Recording" on pageÊ 16.
●Retake function (☞ pg. 62) does not work during Direct Rec.
