Basic Settings
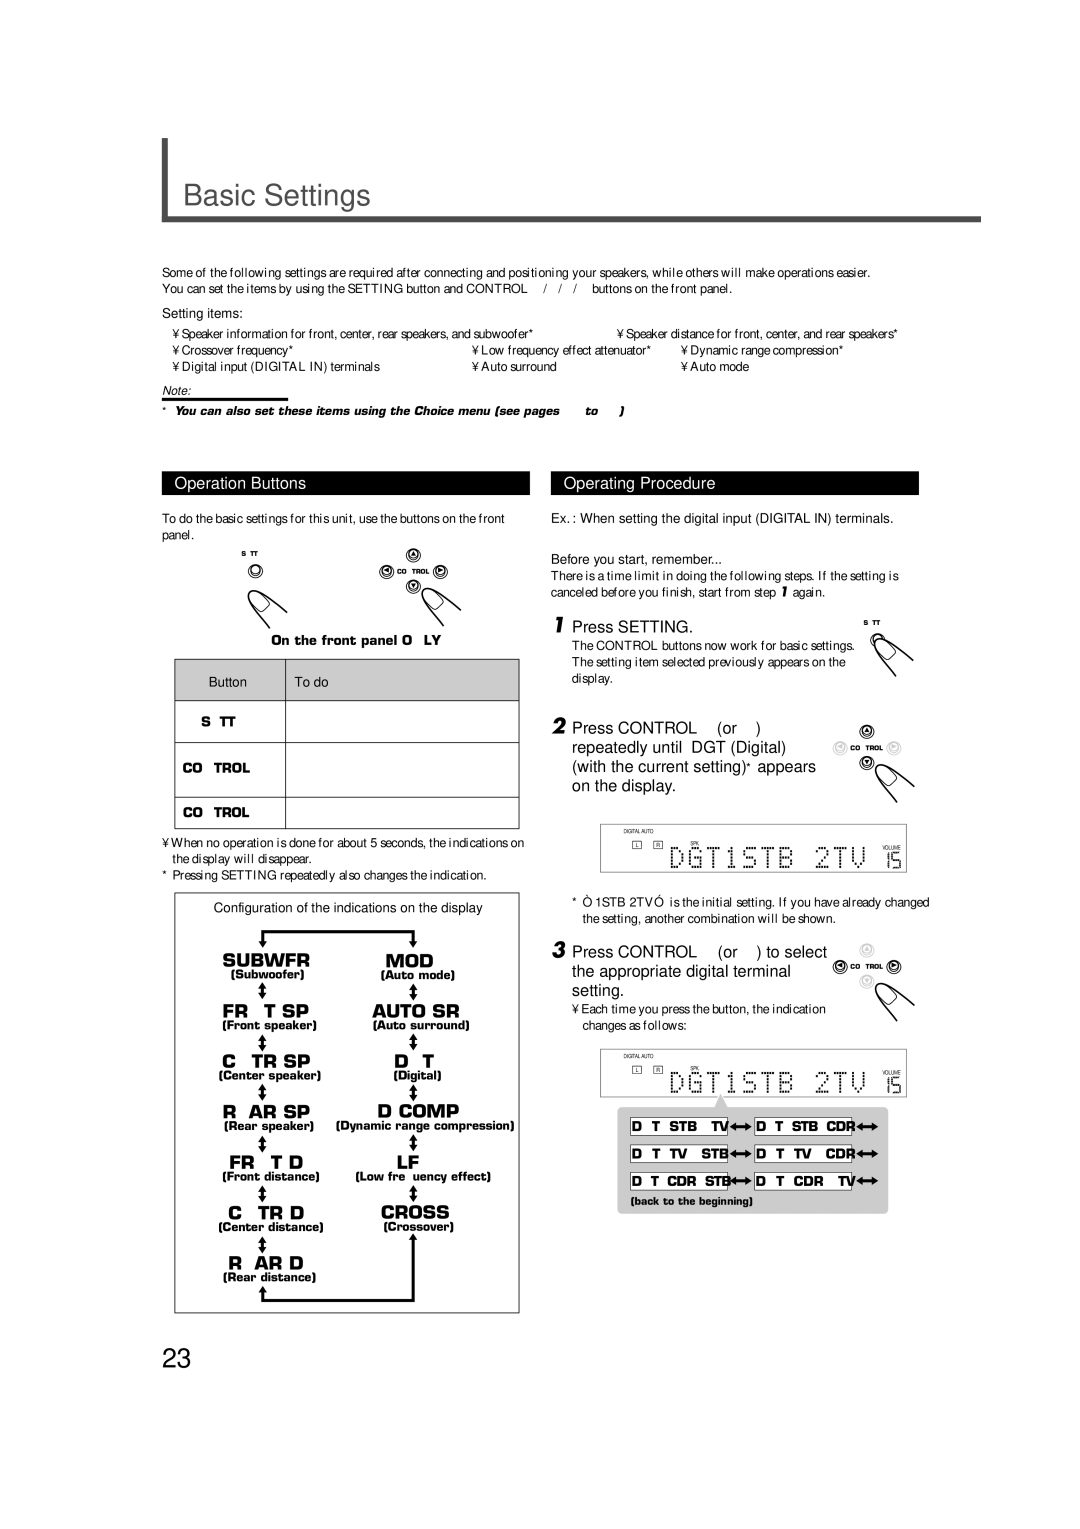
Some of the following settings are required after connecting and positioning your speakers, while others will make operations easier. You can set the items by using the SETTING button and CONTROL 5/∞/2/3 buttons on the front panel.
Setting items: |
|
|
|
|
| |
• Speaker information for front, center, rear speakers, and subwoofer* | • Speaker distance for front, center, and rear speakers* | |||||
• | Crossover frequency* | • | Low frequency effect attenuator* | • | Dynamic range compression* | |
• | Digital input (DIGITAL IN) terminals | • | Auto surround |
| • | Auto mode |
Note:
*You can also set these items using the Choice menu (see pages 51 to 56).
Operation Buttons
To do the basic settings for this unit, use the buttons on the front panel.
SETTING
![]() CONTROL
CONTROL
| On the front panel ONLY | |
|
|
|
Button |
| To do |
|
|
|
SETTING |
| Display the setting indications on the |
| display*. | |
|
| |
|
|
|
CONTROL 5/∞ | Select an item on the display. | |
Each time you press the button, the | ||
|
| indication changes as illustrated below. |
CONTROL 3/2 | Adjust the selected item. | |
|
|
|
•When no operation is done for about 5 seconds, the indications on the display will disappear.
*Pressing SETTING repeatedly also changes the indication.
Configuration of the indications on the display
SUBWFR | MODE | ||
(Subwoofer) | (Auto mode) | ||
|
|
|
|
|
|
|
|
FRNT SP | AUTO SR | ||
(Front speaker) | (Auto surround) | ||
|
|
|
|
|
|
|
|
CNTR SP | DGT | ||
(Center speaker) | (Digital) | ||
|
|
|
|
|
|
|
|
REAR SP | D.COMP | ||
(Rear speaker) | (Dynamic range compression) | ||
|
|
|
|
|
|
|
|
FRNT D | LFE | ||
(Front distance) | (Low frequency effect) | ||
|
|
|
|
|
|
|
|
CNTR D | CROSS | ||
(Center distance) | (Crossover) | ||
|
|
|
|
|
|
|
|
REAR D |
|
| |
(Rear distance) |
|
| |
|
|
|
|
|
|
|
|
Operating Procedure
Ex. : When setting the digital input (DIGITAL IN) terminals.
Before you start, remember...
There is a time limit in doing the following steps. If the setting is canceled before you finish, start from step 1 again.
1 Press SETTING. |
| SETTING |
|
| |
The CONTROL buttons now work for basic settings. | ||
The setting item selected previously appears on the |
| |
display. |
|
|
2 Press CONTROL ∞ (or 5) |
| |
repeatedly until “DGT (Digital)” | CONTROL | |
(with the current setting)* appears |
| |
on the display. |
|
|
DIGITAL AUTO |
|
|
L R | SPK. | VOLUME |
| ||
|
| |
*“1STB 2TV” is the initial setting. If you have already changed the setting, another combination will be shown.
3 Press CONTROL 3 (or 2) to select
the appropriate digital terminal | CONTROL |
| |
setting. |
|
•Each time you press the button, the indication changes as follows:
DIGITAL AUTO |
|
| |
L | R | SPK. | |
VOLUME | |||
|
|
DGT1STB 2TV ![]()
![]()
![]()
![]() DGT1STB2CDR
DGT1STB2CDR ![]()
![]()
![]()
DGT1TV 2STB ![]()
![]()
![]()
![]() DGT1TV 2CDR
DGT1TV 2CDR ![]()
![]()
![]()
DGT1CDR2STB ![]()
![]()
![]()
![]() DGT1CDR 2TV
DGT1CDR 2TV ![]()
![]()
![]()
(back to the beginning)
23
