9. APPENDICES
9.1APPENDIX A: Sensor Trim
Sensor trim is preset at the factory for a specific type of probe, installation and application condition.
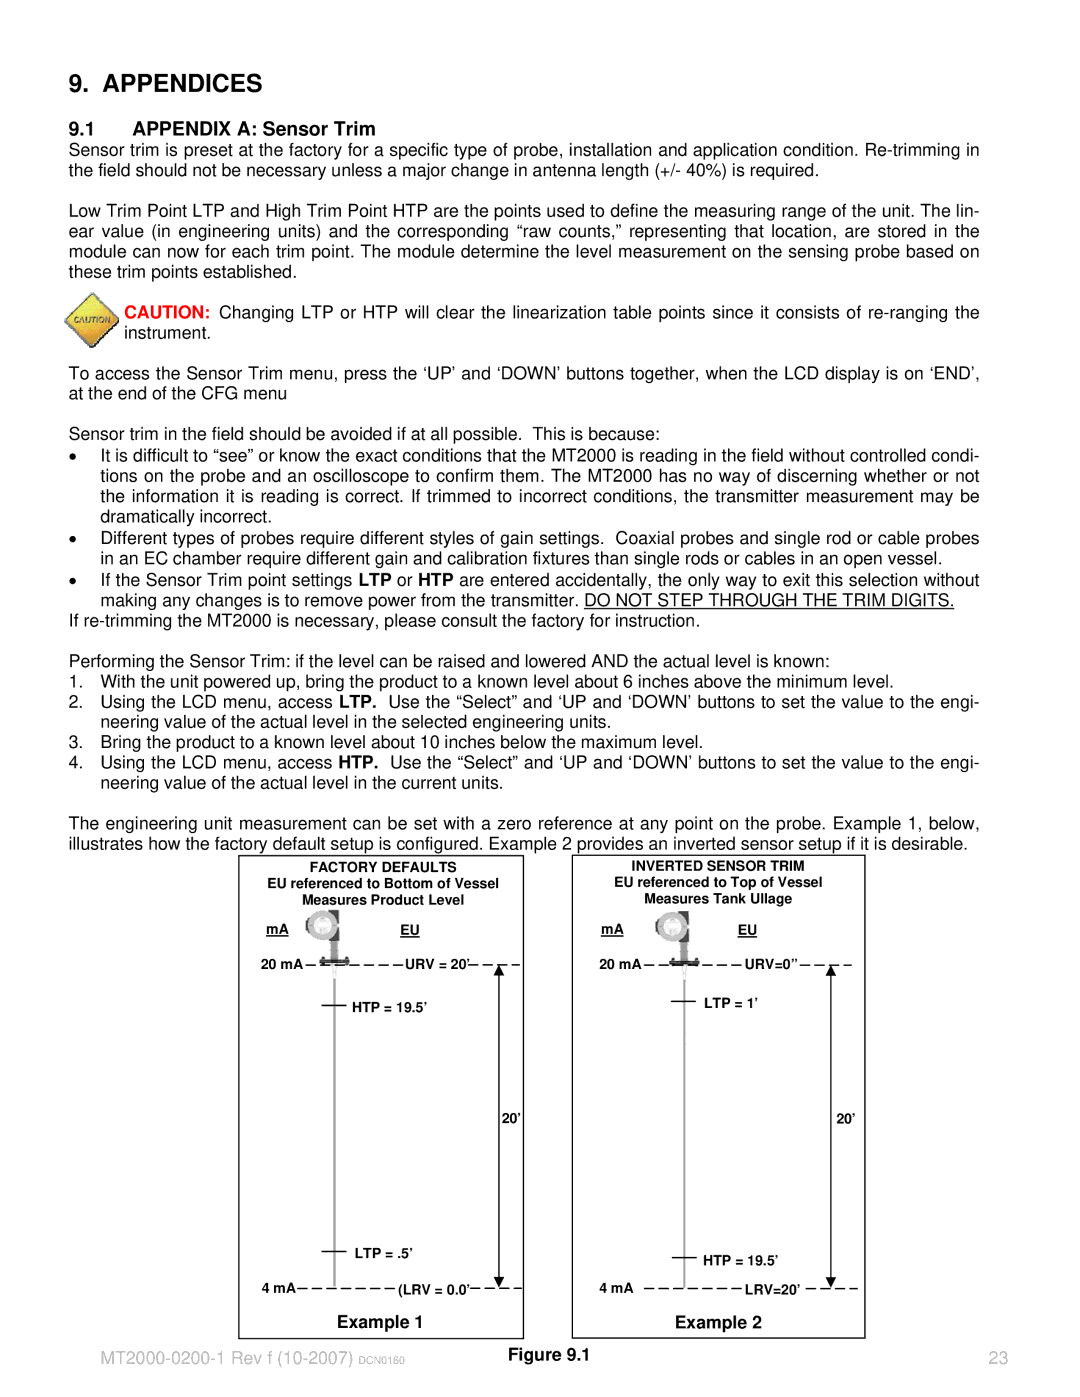
Low Trim Point LTP and High Trim Point HTP are the points used to define the measuring range of the unit. The lin- ear value (in engineering units) and the corresponding “raw counts,” representing that location, are stored in the module can now for each trim point. The module determine the level measurement on the sensing probe based on these trim points established.
CAUTION: Changing LTP or HTP will clear the linearization table points since it consists of
To access the Sensor Trim menu, press the ‘UP’ and ‘DOWN’ buttons together, when the LCD display is on ‘END’, at the end of the CFG menu
Sensor trim in the field should be avoided if at all possible. This is because:
•It is difficult to “see” or know the exact conditions that the MT2000 is reading in the field without controlled condi- tions on the probe and an oscilloscope to confirm them. The MT2000 has no way of discerning whether or not the information it is reading is correct. If trimmed to incorrect conditions, the transmitter measurement may be dramatically incorrect.
•Different types of probes require different styles of gain settings. Coaxial probes and single rod or cable probes in an EC chamber require different gain and calibration fixtures than single rods or cables in an open vessel.
•If the Sensor Trim point settings LTP or HTP are entered accidentally, the only way to exit this selection without making any changes is to remove power from the transmitter. DO NOT STEP THROUGH THE TRIM DIGITS.
If
Performing the Sensor Trim: if the level can be raised and lowered AND the actual level is known:
1.With the unit powered up, bring the product to a known level about 6 inches above the minimum level.
2.Using the LCD menu, access LTP. Use the “Select” and ‘UP and ‘DOWN’ buttons to set the value to the engi- neering value of the actual level in the selected engineering units.
3.Bring the product to a known level about 10 inches below the maximum level.
4.Using the LCD menu, access HTP. Use the “Select” and ‘UP and ‘DOWN’ buttons to set the value to the engi- neering value of the actual level in the current units.
The engineering unit measurement can be set with a zero reference at any point on the probe. Example 1, below, illustrates how the factory default setup is configured. Example 2 provides an inverted sensor setup if it is desirable.
HTP = 19.5’ |
| LTP = 1’ |
|
LL
20’20’
H | LTP = .5’ | H |
| HTP = 19.5’ |
| ||||
|
|
|
|
Figure 9.1 | 23 |
