Preparations
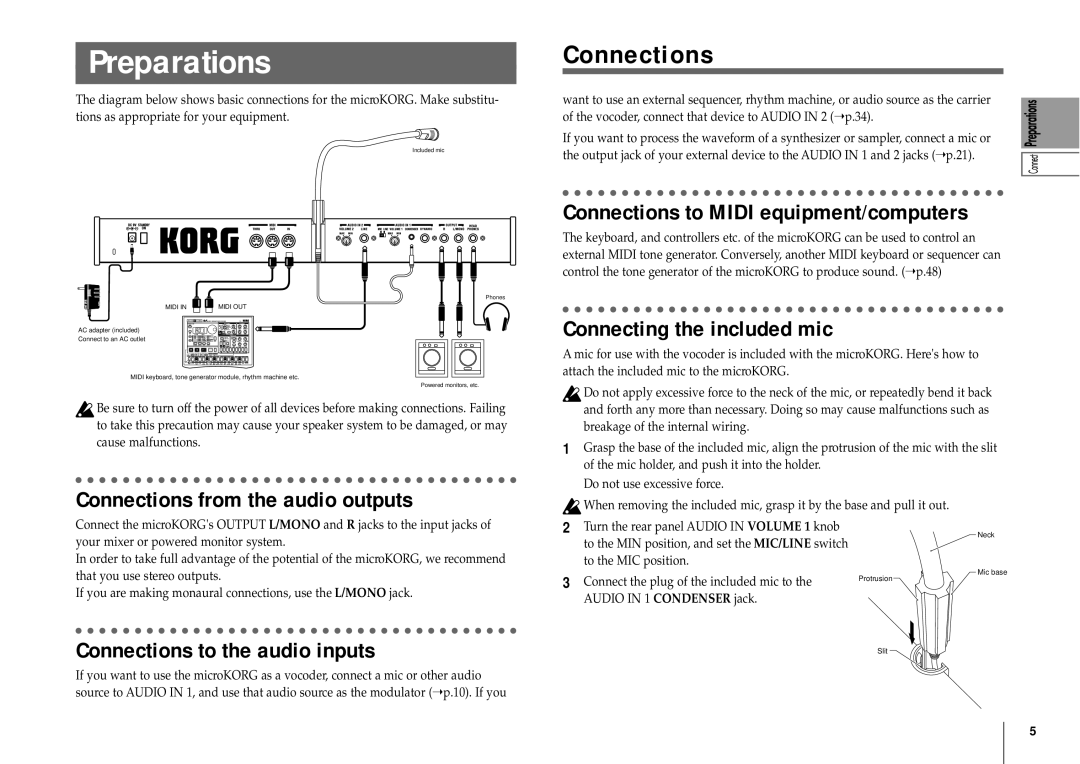
The diagram below shows basic connections for the microKORG. Make substitu- tions as appropriate for your equipment.
Included mic
Connections
want to use an external sequencer, rhythm machine, or audio source as the carrier of the vocoder, connect that device to AUDIO IN 2 (➝ p.34).
If you want to process the waveform of a synthesizer or sampler, connect a mic or the output jack of your external device to the AUDIO IN 1 and 2 jacks (➝ p.21).
| Phones |
MIDI IN | MIDI OUT |
AC adapter (included)
Connect to an AC outlet
MIDI keyboard, tone generator module, rhythm machine etc.
Powered monitors, etc.
![]() Be sure to turn off the power of all devices before making connections. Failing to take this precaution may cause your speaker system to be damaged, or may cause malfunctions.
Be sure to turn off the power of all devices before making connections. Failing to take this precaution may cause your speaker system to be damaged, or may cause malfunctions.
Connections from the audio outputs
Connect the microKORG's OUTPUT L/MONO and R jacks to the input jacks of your mixer or powered monitor system.
In order to take full advantage of the potential of the microKORG, we recommend that you use stereo outputs.
If you are making monaural connections, use the L/MONO jack.
Connections to the audio inputs
If you want to use the microKORG as a vocoder, connect a mic or other audio source to AUDIO IN 1, and use that audio source as the modulator (➝ p.10). If you
Connections to MIDI equipment/computers
The keyboard, and controllers etc. of the microKORG can be used to control an external MIDI tone generator. Conversely, another MIDI keyboard or sequencer can control the tone generator of the microKORG to produce sound. (➝ p.48)
Connecting the included mic
A mic for use with the vocoder is included with the microKORG. Here's how to attach the included mic to the microKORG.
![]() Do not apply excessive force to the neck of the mic, or repeatedly bend it back and forth any more than necessary. Doing so may cause malfunctions such as breakage of the internal wiring.
Do not apply excessive force to the neck of the mic, or repeatedly bend it back and forth any more than necessary. Doing so may cause malfunctions such as breakage of the internal wiring.
1Grasp the base of the included mic, align the protrusion of the mic with the slit of the mic holder, and push it into the holder.
Do not use excessive force.
![]() When removing the included mic, grasp it by the base and pull it out.
When removing the included mic, grasp it by the base and pull it out.
2 | Turn the rear panel AUDIO IN VOLUME 1 knob | Neck | |
| to the MIN position, and set the MIC/LINE switch | ||
|
| ||
| to the MIC position. | Mic base | |
3 | Connect the plug of the included mic to the | ||
Protrusion | |||
|
AUDIO IN 1 CONDENSER jack.
Slit
5