Your Seamless Switcher / Scaler
| # |
| Feature |
| Function | |
|
|
|
|
|
| |
| 21 | ENTER Button | Moves to the next level in the OSD screen | |||
| 22 | MENU Button | Displays the OSD Menu screen1 and locks/unlocks the front panel2 | |||
| 23 | SELECTORINPUT |
| DVI | Press3 to select the DVI / audio source and illuminate the DVI LED | |
| 24 | Buttons | VGA | Press3 to select the VGA / audio source and illuminates the VGA LED | ||
|
|
| ||||
| 25 |
|
| Component | Press3 to select the component video/audio source and illuminate the | |
|
|
|
|
| component LED | |
|
|
|
|
|
|
|
| 26 |
|
| YC2 | Press3 to select the | |
| 27 |
|
| YC1 | Press3 to select the | |
| 28 |
|
| AV2 | Press3 to select the composite video / audio source 2 and illuminate the AV2 LED | |
| 29 |
|
| AV1 | Press3 to select the composite video / audio source 1 and illuminate the AV1 LED | |
|
|
|
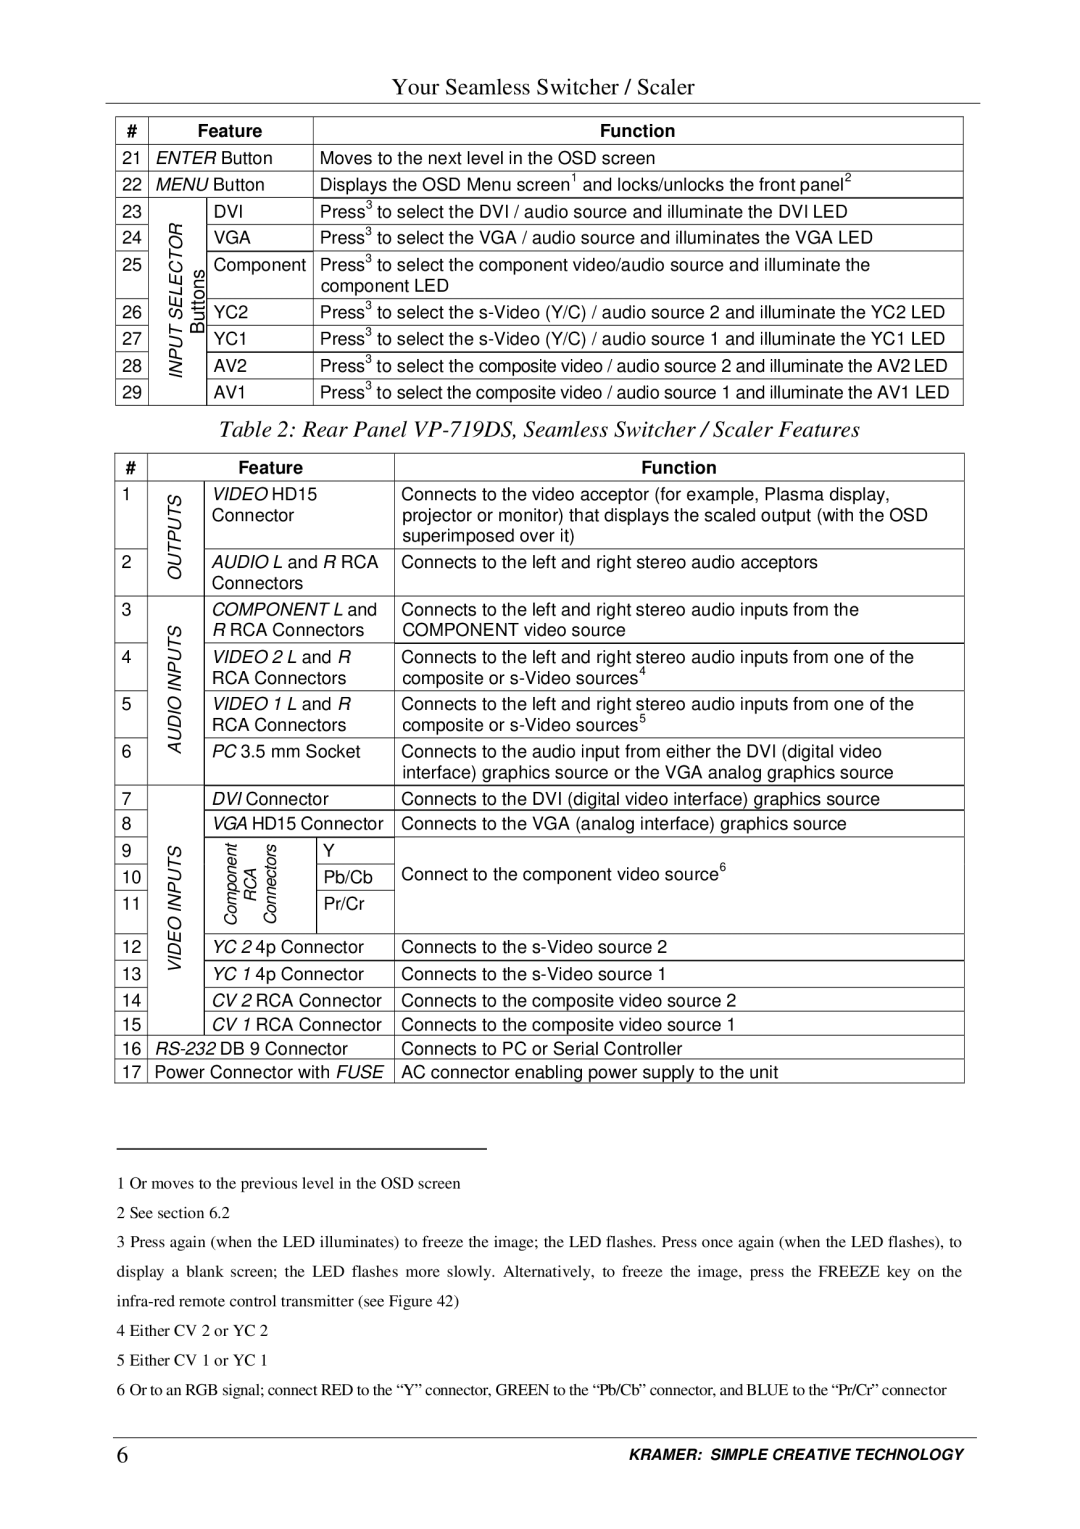
| Table 2: Rear Panel | ||
|
|
|
|
|
|
|
| # |
|
| Feature |
| Function |
|
|
|
|
|
|
|
| 1 | OUTPUTS |
| VIDEO HD15 |
| Connects to the video acceptor (for example, Plasma display, |
|
|
| Connector |
| projector or monitor) that displays the scaled output (with the OSD | |
|
|
|
|
| ||
|
|
|
|
|
| superimposed over it) |
| 2 |
|
| AUDIO L and R RCA | Connects to the left and right stereo audio acceptors | |
|
|
|
| Connectors |
|
|
|
|
|
|
|
|
|
| 3 |
|
| COMPONENT L and | Connects to the left and right stereo audio inputs from the | |
|
| INPUTS |
| R RCA Connectors | COMPONENT video source | |
| 4 |
| VIDEO 2 L and R | Connects to the left and right stereo audio inputs from one of the | ||
|
|
|
| RCA Connectors | composite or | |
| 5 | AUDIO |
| VIDEO 1 L and R | Connects to the left and right stereo audio inputs from one of the | |
|
|
| RCA Connectors | composite or | ||
|
|
|
| |||
| 6 |
|
| PC 3.5 mm Socket | Connects to the audio input from either the DVI (digital video | |
|
|
|
|
|
| interface) graphics source or the VGA analog graphics source |
| 7 |
|
| DVI Connector | Connects to the DVI (digital video interface) graphics source | |
| 8 |
|
| VGA HD15 Connector | Connects to the VGA (analog interface) graphics source | |
|
|
|
|
|
|
|
| 9 | INPUTS |
| Component RCA Connectors | Y | Connect to the component video source6 |
|
|
|
| |||
| 10 |
| Pb/Cb | |||
|
|
|
| |||
| 11 |
|
|
| Pr/Cr |
|
|
| VIDEO |
|
|
|
|
| 12 |
| YC 2 4p Connector | Connects to the | ||
|
|
| ||||
|
|
|
|
|
| |
| 13 |
|
| YC 1 4p Connector | Connects to the | |
|
|
|
|
|
| |
| 14 |
|
| CV 2 RCA Connector | Connects to the composite video source 2 | |
| 15 |
|
| CV 1 RCA Connector | Connects to the composite video source 1 | |
| 16 | Connects to PC or Serial Controller | ||||
| 17 | Power Connector with FUSE | AC connector enabling power supply to the unit | |||
1 Or moves to the previous level in the OSD screen 2 See section 6.2
3 Press again (when the LED illuminates) to freeze the image; the LED flashes. Press once again (when the LED flashes), to display a blank screen; the LED flashes more slowly. Alternatively, to freeze the image, press the FREEZE key on the
4 Either CV 2 or YC 2
5 Either CV 1 or YC 1
6 Or to an RGB signal; connect RED to the “Y” connector, GREEN to the “Pb/Cb” connector, and BLUE to the “Pr/Cr” connector
6 | KRAMER: SIMPLE CREATIVE TECHNOLOGY |
