Manuals
/
Kramer Electronics
/
Household Appliance
/
Vacuum Cleaner
Kramer Electronics
user manual
Connecting the VP-719DS Rear Panel
Models:
VP-719DS
1
15
43
43
Download
43 pages
35.53 Kb
12
13
14
15
16
17
18
19
Specification
Connecting a PC
Preset Position Control Keys
RS-232 Read Command
Graphic Setting Utility Screen
Feature Function
Seamless Switch Utility Screen
Output Mode LED Sequence
Page 15
Image 15
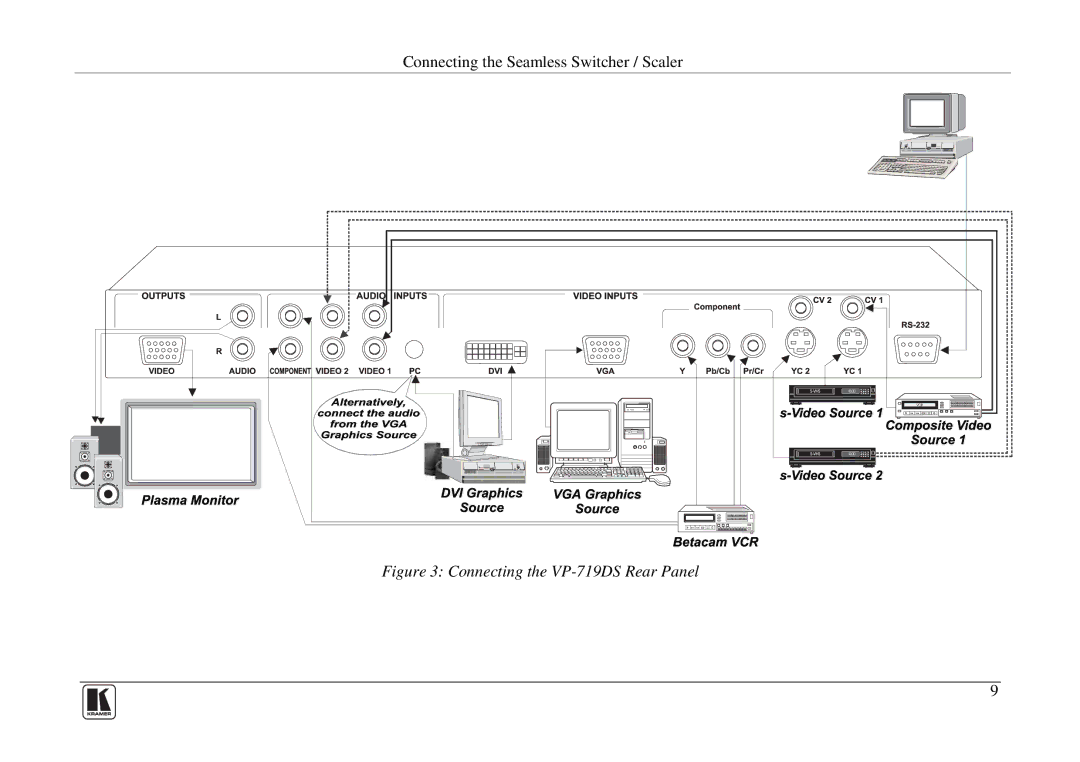
Connecting the Seamless Switcher / Scaler
Figure 3: Connecting the
VP-719DS
Rear Panel
9
Page 14
Page 16
Page 15
Image 15
Page 14
Page 16
Contents
Model
Contents
Figures
Tables
Addendum Scalers Group
Total Horizontal total Start
Introduction
Getting Started
Overview
Overview
Define the front and rear panels of the VP-719DS
Your Seamless Switcher / Scaler
VP-719DS Seamless Switcher / Scaler
Feature Function
Front Panel VP-719DS, Seamless Switcher / Scaler Features
Enter Button
Rear Panel VP-719DS, Seamless Switcher / Scaler Features
Connecting the Seamless Switcher / Scaler
Connecting a PC
Connecting the VP-719DS Rear Panel
Selecting the Output Mode Resolution
Understanding the Seamless Switcher / Scaler
Output Mode LED Sequence
Locking and Unlocking the Front Panel
OSD Input Status
Operating the Seamless Switcher / Scaler
Controlling the Seamless Switcher / Scaler
Illustrates the Brightness and Contrast Screen
Selecting the Source
Controlling the Scale Geometry
Illustrates the Geometry Zoom Screen
OSD Enlarge Status
Preset Position Control Keys
Using the OSD Menu buttons see Figure
Graphic Setting Utility Screen
Video Setting Utility Screen
Audio Setting Utility Screen
Seamless Switch Utility Screen
OSD Size Utility Screen
Output Setting Utility Screen
Output Setting Refresh Rate Utility Screen
Define1 the Infra-red Remote Control Transmitter
Infra-red Remote Control Transmitter
Keys Function
Infra-red Remote Control Transmitter Functions
Technical Specifications1 of the VP-719DS
Technical Specifications
Communication Protocol
RS-232 Protocol
RS-232 Communication Code
OUT
Command Sent Return
RS-232 Read Command
Only the first purchase customer may enforce this warranty
2900 007014 REV
Top
Page
Image
Contents