Installation & Operation Manual

2 Venting (continued)

2.For PVC, CPVC, ABS, dryer vent, or flex duct air inlet piping, use a silicone sealant to ensure a proper seal at the unit inlet and the air inlet cap.

3.For Dryer vent or flex duct, also use a screw-type clamp to attach the inlet vent material to the unit inlet and the air inlet cap. Properly sealing the air inlet pipe ensures that combustion air will be free of contaminates and supplied in proper volume.

4.Ensure that the air inlet pipes are properly supported.

￿WARNING

Properly seal all joints and seams in the inlet vent piping system. Failure to do so may result in flue gas recirculation, spillage of flue products, and carbon monoxide emissions. Carbon monoxide poisoning can cause severe personal injury or death.

Vertical and sidewall combustion air inlet

NOTICE

￿WARNING

To prevent recirculation of flue products into the combustion air inlet, follow all instructions in this section.

Locate and install the combustion air inlet termination correctly. Failure to do so can allow the discharge of flue products to be drawn into the combustion process. This can result in incomplete combustion and potentially hazardous levels of carbon monoxide in the flue products. This will cause operational problems and the spillage of flue products. Spillage of flue products can cause personal injury or death due to carbon monoxide poisoning.

You must locate the combustion air cap and the flue gas outlet on the same rooftop surface (vertical direct vent system) or sidewall surface (horizontal direct vent system) and in the same pressure zone as the vent termination. Follow all clearance requirements listed on this page.

Purchase and assemble the combustion air inlet cap to protect the air inlet from wind and weather.

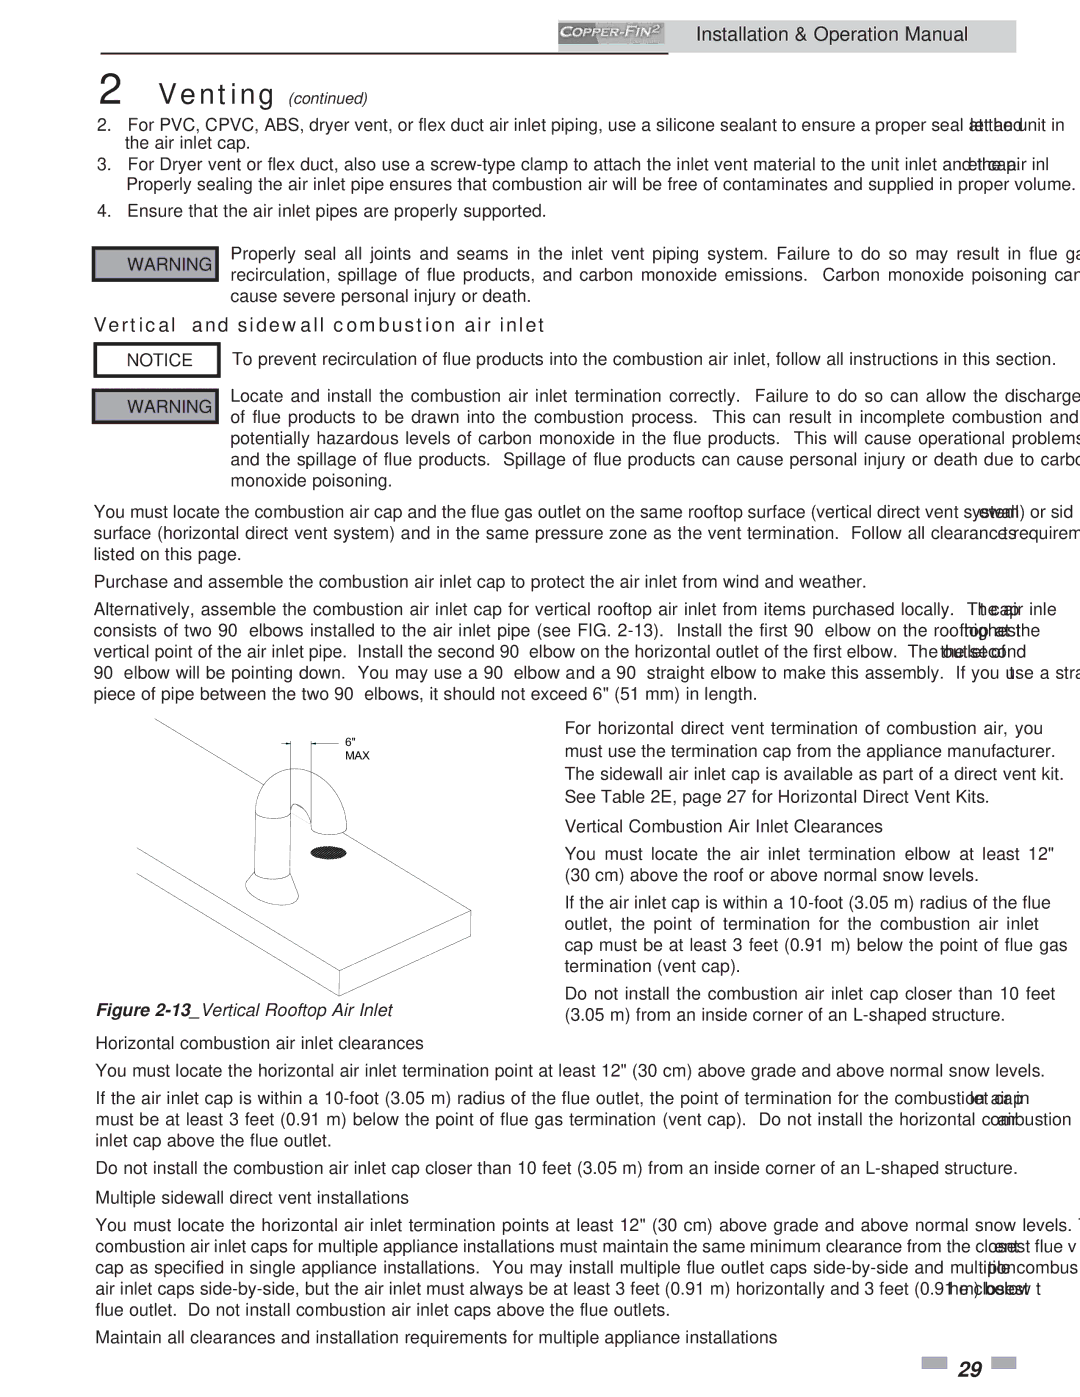
Alternatively, assemble the combustion air inlet cap for vertical rooftop air inlet from items purchased locally. The air inlet cap consists of two 90° elbows installed to the air inlet pipe (see FIG. 2-13). Install the first 90° elbow on the rooftop at the highest vertical point of the air inlet pipe. Install the second 90° elbow on the horizontal outlet of the first elbow. The outlet of the second 90° elbow will be pointing down. You may use a 90° elbow and a 90° straight elbow to make this assembly. If you use a straight piece of pipe between the two 90° elbows, it should not exceed 6" (51 mm) in length.

6"

MAX

Figure 2-13_Vertical Rooftop Air Inlet

Horizontal combustion air inlet clearances

For horizontal direct vent termination of combustion air, you must use the termination cap from the appliance manufacturer. The sidewall air inlet cap is available as part of a direct vent kit. See Table 2E, page 27 for Horizontal Direct Vent Kits.

Vertical Combustion Air Inlet Clearances

You must locate the air inlet termination elbow at least 12" (30 cm) above the roof or above normal snow levels.

If the air inlet cap is within a 10-foot (3.05 m) radius of the flue outlet, the point of termination for the combustion air inlet cap must be at least 3 feet (0.91 m) below the point of flue gas termination (vent cap).

Do not install the combustion air inlet cap closer than 10 feet (3.05 m) from an inside corner of an L-shaped structure.

You must locate the horizontal air inlet termination point at least 12" (30 cm) above grade and above normal snow levels.

If the air inlet cap is within a 10-foot (3.05 m) radius of the flue outlet, the point of termination for the combustion air inlet cap must be at least 3 feet (0.91 m) below the point of flue gas termination (vent cap). Do not install the horizontal combustion air inlet cap above the flue outlet.

Do not install the combustion air inlet cap closer than 10 feet (3.05 m) from an inside corner of an L-shaped structure.

Multiple sidewall direct vent installations

You must locate the horizontal air inlet termination points at least 12" (30 cm) above grade and above normal snow levels. The combustion air inlet caps for multiple appliance installations must maintain the same minimum clearance from the closest flue vent cap as specified in single appliance installations. You may install multiple flue outlet caps side-by-side and multiple combustion air inlet caps side-by-side, but the air inlet must always be at least 3 feet (0.91 m) horizontally and 3 feet (0.91 m) below the closest flue outlet. Do not install combustion air inlet caps above the flue outlets.

Maintain all clearances and installation requirements for multiple appliance installations.

29

Page 29
Image 29
Lochinvar 2072, 502 operation manual Vertical and sidewall combustion air inlet, Horizontal combustion air inlet clearances

2072, 502 specifications

Lochinvar 2072,502 is an innovative and robust water-heating solution tailored for residential and commercial applications. This model represents a significant advancement in energy efficiency and performance, catering to the dynamic heating requirements of modern buildings.

One of the standout features of Lochinvar 2072,502 is its advanced thermal efficiency. With an impressive AFUE (Annual Fuel Utilization Efficiency) rating, the unit delivers exceptional heat output while minimizing energy consumption. This not only reduces utility bills for homeowners and businesses but also supports sustainability efforts by decreasing carbon footprints.

The Lochinvar 2072,502 incorporates cutting-edge technologies that set it apart in the market. It is equipped with advanced control systems that allow users to precisely manage heating outputs, ensuring optimal comfort while conserving energy. The user-friendly digital display provides real-time data, allowing for efficient monitoring and control.

Another significant characteristic of the Lochinvar 2072,502 is its robust stainless-steel construction. This feature enhances the unit's durability and longevity, ensuring reliable performance even in challenging conditions. The high-quality materials also contribute to maintaining consistent water temperatures, which is essential for both residential and commercial heating needs.

The Lochinvar 2072,502 operates silently, making it ideal for installations in areas where noise is a concern. Its compact design allows for flexible installation options, fitting seamlessly into various spaces, whether it’s a utility room, basement, or outdoor area.

Furthermore, the unit supports multiple venting options, accommodating different building architectures and layouts. This versatility makes it an ideal choice for new builds and retrofitting existing systems.

Maintenance is streamlined with the Lochinvar 2072,502, as it features a self-diagnostics system that simplifies troubleshooting. Regular service check-ups are made easier with accessible components, allowing technicians to perform maintenance tasks efficiently.

In summary, the Lochinvar 2072,502 stands out for its high efficiency, advanced technology, durability, and flexible installation options. It is an ideal choice for those seeking a reliable and technologically advanced water-heating solution that meets the challenges of contemporary heating demands while promoting energy savings and environmental responsibility.