1.4. Tools Required for installation
Make sure the following items are ready before proceeding with the installation of your new DVD Recorder (see illustration).
• Phillips screwdriver | • A pair of narrow pliers | • Memorex DVD Recorder |
• Installation | • This Quick Install Guide |
|
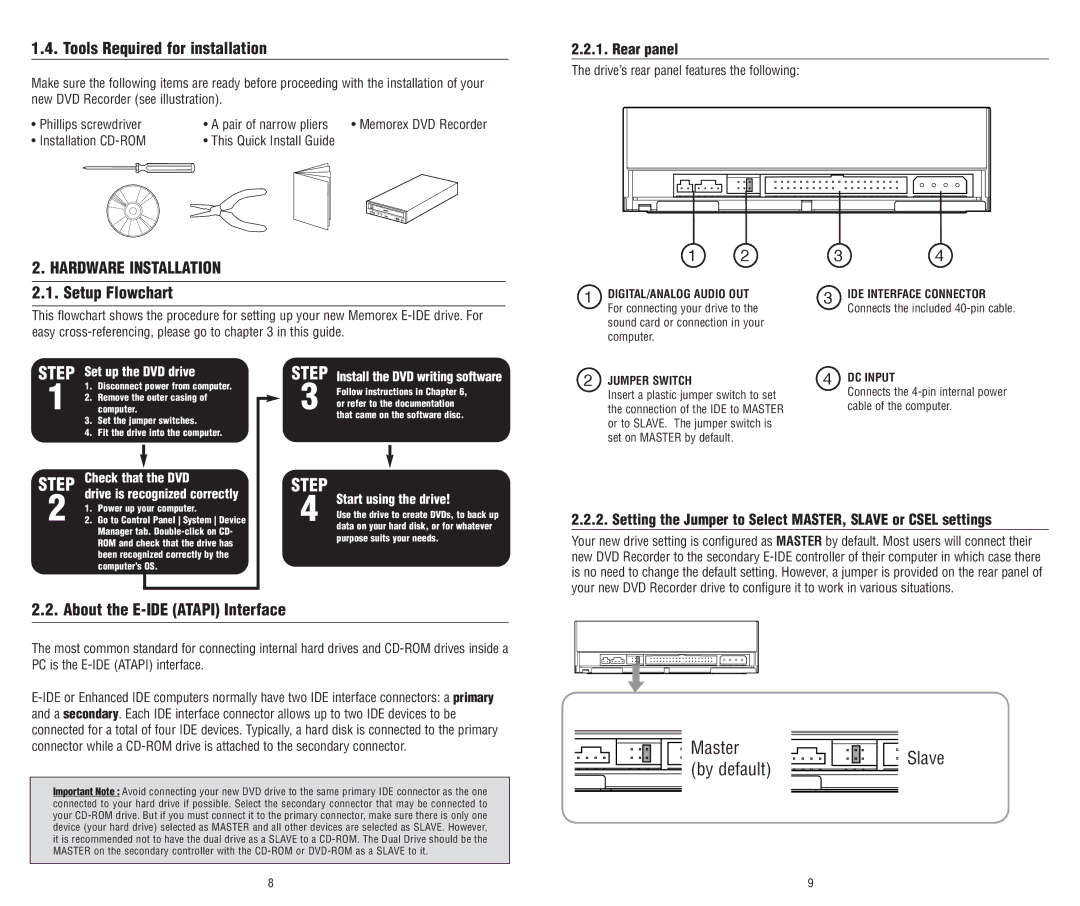
2.2.1. Rear panel
The drive’s rear panel features the following:
2.HARDWARE INSTALLATION
2.1.Setup Flowchart
This flowchart shows the procedure for setting up your new Memorex
1 2
1 DIGITAL/ANALOG AUDIO OUT |
For connecting your drive to the |
sound card or connection in your |
computer. |
3 4
3IDE INTERFACE CONNECTOR Connects the included
STEP Set up the DVD drive
1.Disconnect power from computer.
12. Remove the outer casing of computer.
3.Set the jumper switches.
4.Fit the drive into the computer.
STEP | Check that the DVD |
| drive is recognized correctly |
STEP
3
STEP
Install the DVD writing software
Follow instructions in Chapter 6, or refer to the documentation that came on the software disc.
2 JUMPER SWITCH |
Insert a plastic jumper switch to set |
the connection of the IDE to MASTER |
or to SLAVE. The jumper switch is |
set on MASTER by default. |
4DC INPUT
Connects the 4-pin internal power cable of the computer.
2 | 1. | Power up your computer. |
2. | Go to Control Panel System Device |
Manager tab.
4
Start using the drive!
Use the drive to create DVDs, to back up data on your hard disk, or for whatever purpose suits your needs.
2.2.2. Setting the Jumper to Select MASTER, SLAVE or CSEL settings
Your new drive setting is configured as MASTER by default. Most users will connect their new DVD Recorder to the secondary
2.2. About the E-IDE (ATAPI) Interface
The most common standard for connecting internal hard drives and
Important Note : Avoid connecting your new DVD drive to the same primary IDE connector as the one connected to your hard drive if possible. Select the secondary connector that may be connected to your
Master | Slave | |
(by default) | ||
|
8 | 9 |