venting installation

HDV Series Direct Vent Gas Fireplace

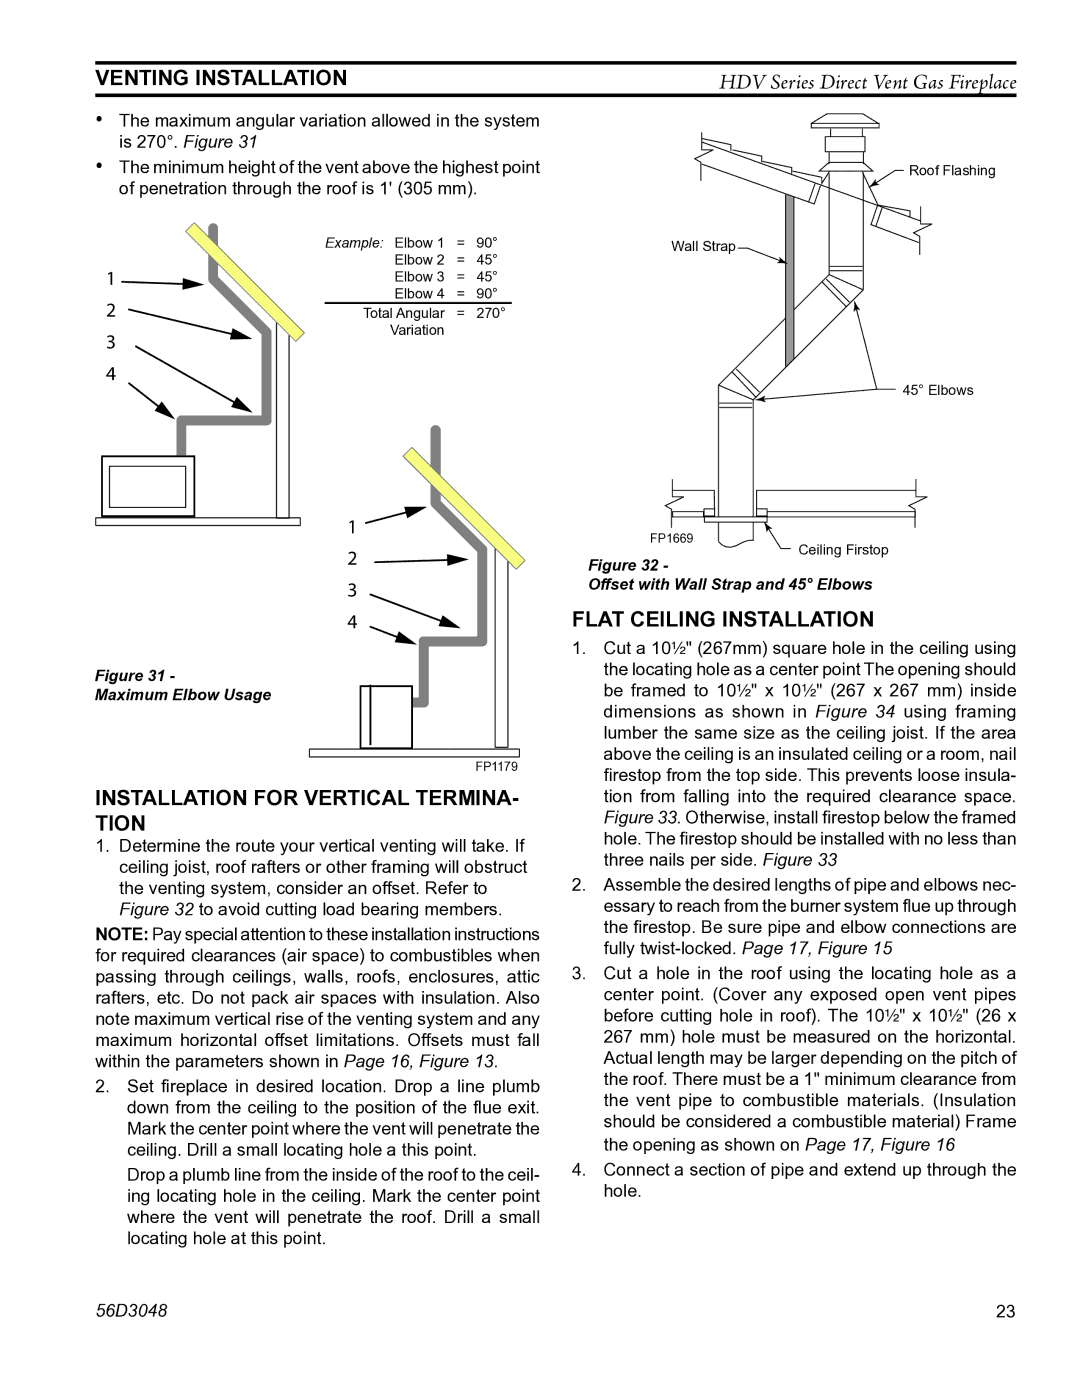
The maximum angular variation allowed in the system is 270°. Figure 31

The minimum height of the vent above the highest point of penetration through the roof is 1' (305 mm).

Roof Flashing

1

2

3

4

Example: Elbow 1 = 90°

Elbow 2 = 45°

Elbow 3 = 45°

Elbow 4 = 90°

Total Angular = 270° Variation

Wall Strap

1

2

FP1669

Figure 32 -

45° Elbows

Ceiling Firstop

Figure 31 -

Maximum Elbow Usage

3

4

FP1179

Offset with Wall Strap and 45° Elbows

Flat ceiling installation

1. Cut a 10Z\x" (267mm) square hole in the ceiling using

the locating hole as a center point The opening should

be framed to 10Z\x" x 10Z\x" (267 x 267 mm) inside

dimensions as shown in Figure 34 using framing

lumber the same size as the ceiling joist. If the area

above the ceiling is an insulated ceiling or a room, nail

firestop from the top side. This prevents loose insula-

installation for vertical termina- tion

1.Determine the route your vertical venting will take. If ceiling joist, roof rafters or other framing will obstruct the venting system, consider an offset. Refer to Figure 32 to avoid cutting load bearing members.

NOTE: Pay special attention to these installation instructions for required clearances (air space) to combustibles when passing through ceilings, walls, roofs, enclosures, attic rafters, etc. Do not pack air spaces with insulation. Also note maximum vertical rise of the venting system and any maximum horizontal offset limitations. Offsets must fall within the parameters shown in Page 16, Figure 13.

2.Set fireplace in desired location. Drop a line plumb down from the ceiling to the position of the flue exit. Mark the center point where the vent will penetrate the ceiling. Drill a small locating hole a this point.

Drop a plumb line from the inside of the roof to the ceil- ing locating hole in the ceiling. Mark the center point where the vent will penetrate the roof. Drill a small locating hole at this point.

tion from falling into the required clearance space.

Figure 33. Otherwise, install firestop below the framed

hole. The firestop should be installed with no less than

three nails per side. Figure 33

2. Assemble the desired lengths of pipe and elbows nec-

essary to reach from the burner system flue up through

the firestop. Be sure pipe and elbow connections are

fully twist-locked. Page 17, Figure 15

3. Cut a hole in the roof using the locating hole as a

center point. (Cover any exposed open vent pipes

before cutting hole in roof). The 10Z\x" x 10Z\x" (26 x

267 mm) hole must be measured on the horizontal.

Actual length may be larger depending on the pitch of

the roof. There must be a 1" minimum clearance from

the vent pipe to combustible materials. (Insulation

should be considered a combustible material) Frame

the opening as shown on Page 17, Figure 16

4. Connect a section of pipe and extend up through the

hole.

56D3048

23

Page 23
Image 23
Monessen Hearth HDV500NV/PV manual Flat ceiling installation, Installation for vertical termina- tion

HDV500NV/PV specifications

The Monessen Hearth HDV500NV/PV is a powerful and efficient gas fireplace designed to enhance the warmth and ambiance of any living space. This model is part of Monessen's esteemed lineup of vented gas fireplaces, which are known for their elegant designs and performance. The HDV500NV/PV specifically is designed for those who desire both aesthetic appeal and functional heating.

One of the standout features of the HDV500NV/PV is its versatile installation options. It can be vented vertically or horizontally, providing flexibility for various home layouts. This adaptability makes it an ideal choice for homeowners looking to retrofit an existing space or build a new one. With a powerful input rating of up to 30,000 BTUs, it delivers exceptional heat output and efficiently warms the room, ensuring comfort during colder months.

The fireplace boasts a realistic flame presentation, thanks to its innovative burner technology. The advanced burner system creates flickering flames that mimic traditional wood-burning fireplaces, enhancing the overall aesthetic. Additionally, the HDV500NV/PV is equipped with a ceramic glass front that not only showcases the beautiful flames but also provides a clear view while maintaining safety standards.

For convenience, the HDV500NV/PV features a simple, user-friendly remote control that allows homeowners to adjust the flame height and heat output with ease. This feature adds a layer of comfort, as it eliminates the need to manually operate the fireplace for temperature adjustments. The optional adjustable thermostat enhances this convenience, allowing for automated temperature regulation.

The design of the HDV500NV/PV is equally impressive. Its clean lines and elegant finish make it a striking focal point in any room. Available in various styles and trims, it can seamlessly integrate into various home decors, from modern to traditional.

Safety is also a priority with the HDV500NV/PV. It includes built-in safety features such as a gas shut-off valve and an oxygen depletion sensor, providing peace of mind for users.

In summary, the Monessen Hearth HDV500NV/PV is a versatile, efficient, and aesthetically pleasing gas fireplace that combines advanced technologies with user convenience. Its realistic flame presentation, powerful heating capabilities, and stylish design make it a perfect choice for enhancing any home environment.