DIAGNOSTIC DISPLAY
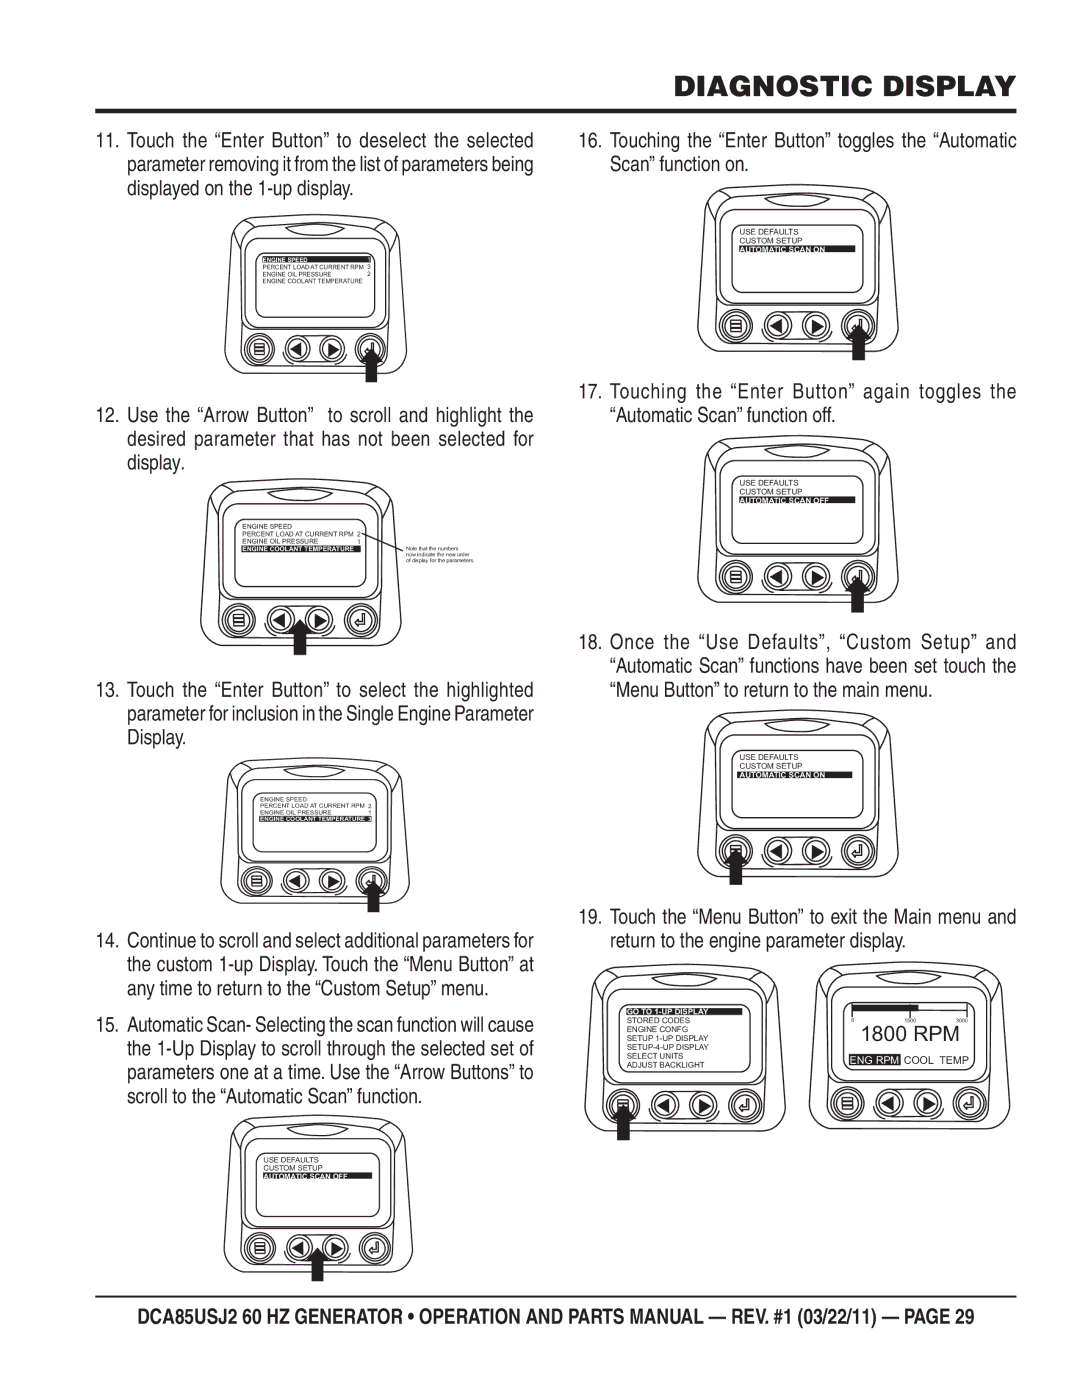
11.Touch the “Enter Button” to deselect the selected parameter removing it from the list of parameters being displayed on the
ENGINE SPEED | 1 |
PERCENT LOAD AT CURRENT RPM 3 | |
ENGINE OIL PRESSURE | 2 |
ENGINE COOLANT TEMPERATURE |
|
12.Use the “Arrow Button” to scroll and highlight the desired parameter that has not been selected for display.
ENGINE SPEED |
|
PERCENT LOAD AT CURRENT RPM 2 | |
ENGINE OIL PRESSURE | 1 |
ENGINE COOLANT TEMPERATURE | Note that the numbers |
| now indicate the new order |
| of display for the parameters. |
16.Touching the “Enter Button” toggles the “Automatic Scan” function on.
USE DEFAULTS
CUSTOM SETUP
AUTOMATIC SCAN ON
17.Touching the “Enter Button” again toggles the “Automatic Scan” function off.
USE DEFAULTS
CUSTOM SETUP
AUTOMATIC SCAN OFF
13.Touch the “Enter Button” to select the highlighted parameter for inclusion in the Single Engine Parameter Display.
ENGINE SPEED
PERCENT LOAD AT CURRENT RPM 2
ENGINE OIL PRESSURE1
ENGINE COOLANT TEMPERATURE 3
14.Continue to scroll and select additional parameters for the custom
15.Automatic Scan- Selecting the scan function will cause the
USE DEFAULTS
CUSTOM SETUP
AUTOMATIC SCAN OFF
18.Once the “Use Defaults”, “Custom Setup” and “Automatic Scan” functions have been set touch the “Menu Button” to return to the main menu.
USE DEFAULTS
CUSTOM SETUP
AUTOMATIC SCAN ON
19.Touch the “Menu Button” to exit the Main menu and return to the engine parameter display.
|
|
|
|
|
|
|
GO TO |
|
|
|
|
|
|
STORED CODES | 0 | 1500 | 3000 | |||
SETUP |
|
| 1800 RPM | |||
ENGINE CONFG |
|
|
|
|
|
|
|
|
|
|
|
| |
SELECT UNITS |
|
|
| COOL TEMP | ||
| ENG RPM | |||||
ADJUST BACKLIGHT |
| |||||
|
|
|
|
|
| |
DCA85USJ2 60 HZ GENERATOR • OPERATION AND PARTS MANUAL — REV. #1 (03/22/11) — PAGE 29
