NTI KEEMUX Series PS/2 KVM Switch
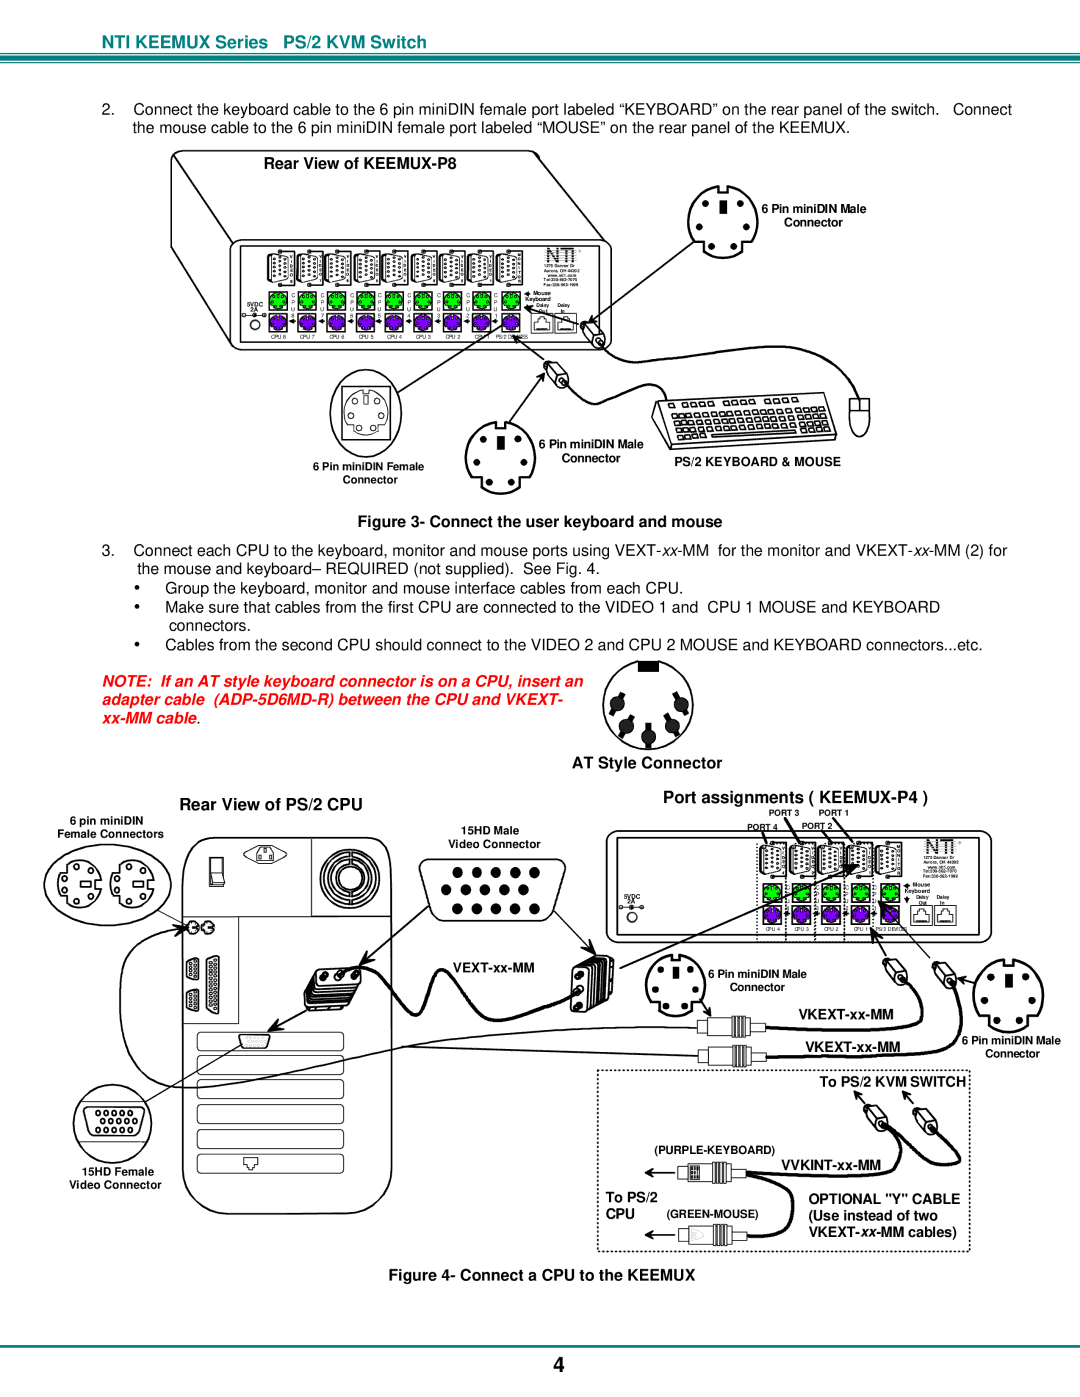
2.Connect the keyboard cable to the 6 pin miniDIN female port labeled “KEYBOARD” on the rear panel of the switch. Connect the mouse cable to the 6 pin miniDIN female port labeled “MOUSE” on the rear panel of the KEEMUX.
Rear View of KEEMUX-P8
6 Pin miniDIN Male
Connector
V | V | V | V | V | V | V | V | M |
O | ||||||||
I | I | I | I | I | I | I | I | N |
D | D | D | D | D | D | D | D | I |
E | E | E | E | E | E | E | E | T |
O | O | O | O | O | O | O | O | O |
8 | 7 | 6 | 5 | 4 | 3 | 2 | 1 | R |
NTI R
1275 Danner Dr
Aurora, OH 44202
www.nti1.com
|
|
|
| C |
|
|
| C |
|
|
| C |
|
|
| C |
|
| C |
| C |
|
| C |
| C |
|
| Mouse | |||||
|
|
|
|
|
|
|
|
|
|
|
|
|
|
|
|
| ||||||||||||||||||
| 5VDC |
|
| P |
|
|
| P |
|
|
| P |
|
|
| P |
|
| P |
| P |
|
| P |
| P |
| Keyboard | ||||||
|
|
|
|
|
|
|
|
|
|
|
|
|
|
|
|
|
|
|
| Daisy Daisy | ||||||||||||||
- | 2A |
|
| U |
|
|
| U |
|
|
| U |
|
|
| U |
|
| U |
| U |
|
| U |
| U |
|
|
|
| In | |||
|
|
|
|
|
|
|
|
|
|
|
|
|
|
| ||||||||||||||||||||
+ |
| 8 |
|
|
| 7 |
|
| 6 |
|
| 5 |
|
| 4 |
|
| 3 |
| 2 |
| 1 |
|
|
|
|
| |||||||
|
|
|
|
|
|
|
|
|
|
|
|
|
|
|
|
|
|
|
|
|
|
|
|
|
|
|
|
|
|
|
|
|
|
|
|
| CPU 8 |
| CPU 7 |
| CPU 6 |
| CPU 5 | CPU 4 |
|
|
| CPU 3 |
| CPU 2 |
| PS/2 DEVICES | |||||||||||||||||
|
|
|
| 6 Pin miniDIN Male |
|
|
|
|
|
| |
6 Pin miniDIN Female |
| Connector | PS/2 KEYBOARD & MOUSE | ||
| Connector |
|
|
| |
Figure 3- Connect the user keyboard and mouse
3.Connect each CPU to the keyboard, monitor and mouse ports using
•Group the keyboard, monitor and mouse interface cables from each CPU.
•Make sure that cables from the first CPU are connected to the VIDEO 1 and CPU 1 MOUSE and KEYBOARD connectors.
•Cables from the second CPU should connect to the VIDEO 2 and CPU 2 MOUSE and KEYBOARD connectors...etc.
NOTE: If an AT style keyboard connector is on a CPU, insert an adapter cable
Rear View of PS/2 CPU
6 pin miniDIN
Female Connectors15HD Male Video Connector
AT Style Connector
Port assignments (
|
| PORT 3 | PORT 1 |
|
|
|
|
| ||
|
| PORT 4 |
| PORT 2 |
|
| NTI |
| ||
|
| I |
| I | I | I | N | R | ||
|
| V |
| V | V | V | M |
|
|
|
|
|
|
|
|
|
| O |
|
|
|
|
| D |
| D | D | D | I | 1275 Danner Dr |
| |
|
| E |
| E | E | E | T | Aurora, OH 44202 | ||
|
| O |
| O | O | O | O | www.nti1.com |
| |
|
| 4 |
| 3 |
| 1 | R |
| ||
|
|
|
|
|
|
|
|
| ||
|
| C |
| C | C |
| C | Mouse |
|
|
|
|
|
| Keyboard |
|
| ||||
| 5VDC |
|
| P | P |
| P |
|
| |
|
|
|
| Daisy | Daisy |
| ||||
- | 2A | U |
| U | U |
| U | Out | In |
|
+ | 4 |
| 3 | 2 |
| 1 |
|
|
| |
|
| CPU 4 | CPU 3 | CPU 2 | CPU 1 | PS/2 |
|
|
| |
6 Pin miniDIN Male
Connector
15HD Female Video Connector
![]() To PS/2
To PS/2
CPU
6 Pin miniDIN Male | ||
Connector | ||
|
To PS/2 KVM SWITCH ![]()
OPTIONAL "Y" CABLE (Use instead of two
Figure 4- Connect a CPU to the KEEMUX
4