Page
Year 2000 Compliance
Important Information
Conventions Used in this User’s Guide
Contents
Interfacing
Service Information
Specifications
Character Sets 112
Command Summary
Hex Dump Mode 111
Index 135
Warranty 133
131
Front Panel
Print Mode Indicator Lights
Press and hold to engage alternate lower button functions
Print Mode Control Panel Buttons
Item Button
Menu Mode Control Panel Buttons
Entering/Exiting the Menu Mode
Menu Mode Configuring Your Printer
Changing the Menu Settings
Saving Configurations
Resetting the Menu
Switching Back and Forth between Configurations
CFG1 Settings as default
CFG2 Settings as default
IBM-PPR, EPS-FX, OKI-ML
Summary of Menu Settings
Group Settings
Group Settings
Group Settings
SSD-, SSD+, DTR, RTS
Description Emulations Groups
Explanation of Menu Settings
Description Emulations Groups
MENU, GROUP, ITEM, Option
Description Emulations Groups
Description Emulations Groups
Remove the Old Ribbon
Maintenance
Replacing the Ribbon
Prepare the New Ribbon
Install the New Ribbon
Front Feed Jams
Clearing Paper Jams
If the paper continues to jam
Rear Feed Jams
Replacing the Power Fuse
Cleaning the Interior
Cleaning the Housing
Cleaning the Exterior
General Troubleshooting
Troubleshooting
Problem
Solutions
Solution
Am continuing to have paper exit jams
Error Message What to Do
Error Messages
Eeprom
Data Remain
Eject JAM
Feed JAM
OKI HSP Connect
Power FAN
OPT Card ROM
OPT Card Connect
SP Thermal
Ribbon JAM
Space FAN
Spacing
Your Dealer
Service Information
Getting Service & Support
Okidata Customer Support Professionals 1-800-OKI-DATA
Latin America Service Location Listings
Okidata Service Locations
U.S. and Canada
Oki Data Americas, Inc
Ways to Purchase
Purchasing Replacement Parts & Accessories
Replacement Parts
Accessories
Tear Bar Cover
General Specifications
Specifications
Graphics Resolution Maximum
Mode Characters per Inch Speed , Characters per Second
Setting, Characters per Inch Characters per Line
Font Specifications
Characters per Line
Interface
Type Weight Thickness Width
Paper Specifications
Reliability
Front Feed
Rear Feed
Physical Specifications
Environmental Specifications
Memory
Electrical Specifications
Power Consumption
Interfacing
Pin No Signal Return Pin Direction
Parallel Interface
Parallel Interface Pin Assignments
Page
Serial Interface Pin Assignments
Pin No Signal Symbol Direction
Serial Interface
IBM 25-Pin Cable Configuration
Commonly Used Serial Cable Configurations
IBM 9-Pin Cable Configuration
Computer Printer
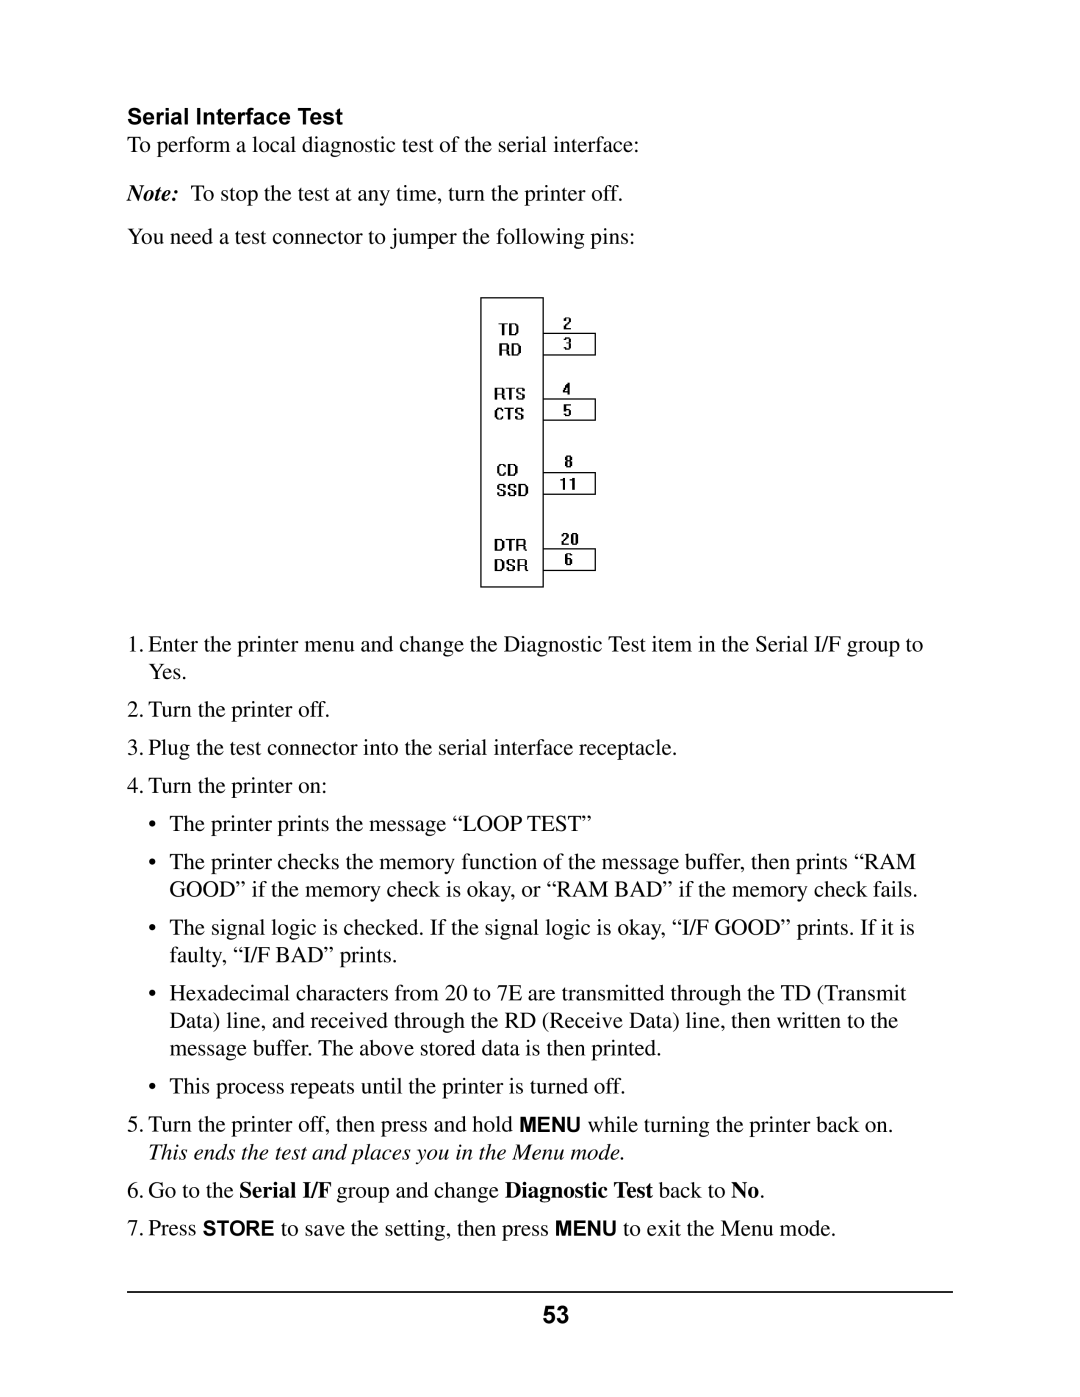
Serial Interface Test
Ethernet 10/100 BaseT Interface
Pin No Signal Description
Ethernet 10/100 BaseT Interface Pin Assignments
TD+
Print Server Parallel Output Pin Assignments
Pin No Signal Source Description
Printer Operation/Data Control
Command Summary
Epson FX Command Summary
Form Feed, Execute Form Length
Vertical Control
Line Spacing
Line Feed
Margins, Bottom Auto Skip
Vertical Tabs
Margins, Set by character Columns
Horizontal Control
Backspace Carriage Return Horizontal Tabs
Character Pitch
Print Position
Print Style/Print Size Control
Print Style / Print Size Control
Character Control
Character Set
Slant Italics/Graphics Character Table
International Language Chararacter Sets
Italic Character Set
Copy Pre-defined ROM Data to RAM
DLL Character Set
Select DLL Font
Graphics Control
Reassign Graphic’s Density
Density
Select 9 pin mode
Reassign as Quadruple
Single Horizontal Density
Select density Enter graphics mode
Bar Code Commands see the end of this Appendix
Printer Operation / Data Control
IBM Proprinter III Command Summary
Print Direction
Reset Clear Print Buffer
Print Stop
Print Suppress
ESC R
Top of Form, Define
Vertical Tab
Print Position, Define
Backspace Carriage Return, Execute Margins, Define Left
Right
Horizontal Tab, Execute Horizontal Tabs, Define
Set print position
Stops by characters
Proportional Printing
Double Height and Width
ESC SI
Select HSD
Double Width
Emphasized
Select Pitch and Point
Overscore
Supercript/Subscript
IBM Code Page, Select
Character Sets
IBM Character Set I, Select
International Language Character Set, Select
Custom Font Command
Slant
Copy ROM Data to RAM
Oki Data Command
Okidata Microline Standard Command Summary
Configuration Group, Select
Bar Code see the end of this Appendix
Paper-Out Sensor Override
Reset
Print Speed
DC1 DC3
Carriage Return and Line
Shift
Feed Control Line Feed, n/144 inch
Form Feed Execute
ESC DC2
ESC LF
ESC ETX X1 Y1 Z1
Backspace Carriage Return, Execute Horizontal Tabs
Ascii
ESC % B
Margins
ESC % R
ESC % E
ESC % F
Proportional Spacing
Custom Fonts
Double Width Printing Print Quality
Select Print Modes
Features
Emphasized/Enhanced
Define the number
1B 21 27 33 British
DLL Character Sets
Define up to 256 ascender
Characters using 11H x 7V matrix
ETX
ESC # Q
Bar Code Type
Select Bar Code Type and Size Command
Ratio between wide and narrow elements
Postnet Bar Code Command
Print Bar Code Data Command
Epson FX Custom Font Command
Custom Font Commands Epson & IBM
Byte b7
Print Quality Horizontal Vertical
IBM Proprinter III Custom Fonts Command
Dot Columns
Meaning
Ignored
Parameter Pno
Select Menu Item 1 Command
Parameter Pa
Parameter Pb
Epson FX
Group Pa b7...b0 Pb b7...b0 Setting
IBM PPR
USA
100
Brascii
6LPI
101
102
15CPI
103
20CPI
104
12CPI
105
Select Menu Item 2 Command
106
107
108
109
110
111
Hex Dump Mode
Running a Hexadecimal Dump
112
Character Sets
Lower Ascii Character Sets
113
114
115
116
Upper Ascii Character Sets
117
118
119
120
121
Microline Standard International Character Substitutions
122
Code Page Character Sets
123
124
125
126
IBM Multilingual Code Page Sets
127
ISO 8859-15 Code Page Character Set
Multilingual 858 Code Page Character Set
Epson Brascii Character Set Epson Abicomp Character Set
128
129
OKI Block Graphics Character Set
EAN Code Interleaved 2 Postnet
Bar Codes
130
Model Name Dot Matrix Printer PM4410 Model Number D21001A
FCC Declaration of Conformity
131
132
Industry Canada Radio Interference Statement
Limited Warranty
Warranty
133
On-Site Repair
Brazil Mexico
134
United States Canada
135
Index
IBM
136
137
138
Print mode
139