Preparation
≥Confirm that the antenna is connected correctly.
≥Turn on the television and select the appropriate video input to suit the connections to this unit.
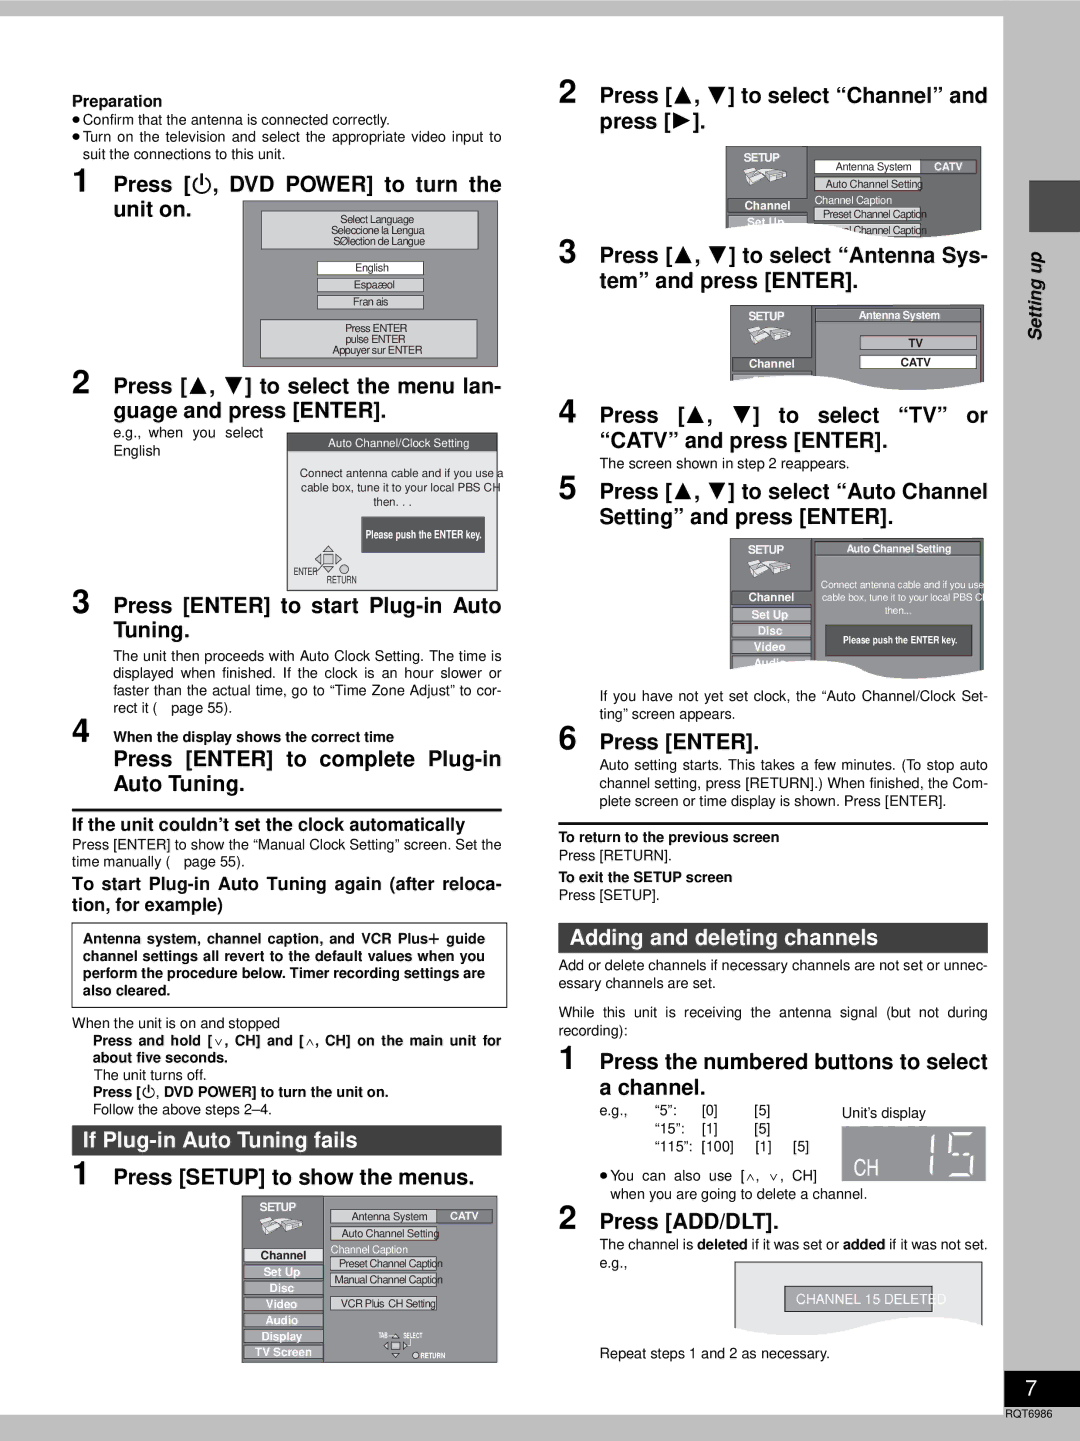
1 Press [Í, DVD POWER] to turn the
unit on. |
|
|
|
|
|
|
| Select Language |
| ||
|
|
| Seleccione la Lengua |
| |
|
|
| Sélection de Langue |
| |
|
|
|
|
|
|
|
|
| English |
|
|
|
|
| Español |
|
|
|
|
| Français |
|
|
|
|
|
|
| |
|
|
| Press ENTER |
| |
|
|
| pulse ENTER |
| |
|
|
| Appuyer sur ENTER |
| |
|
|
|
|
|
|
lan-
ENTER![]()
RETURN
3 Press [ENTER] to start Plug-in Auto Tuning.
The unit then proceeds with Auto Clock Setting. The time is displayed when finished. If the clock is an hour slower or faster than the actual time, go to “Time Zone Adjust” to cor- rect it (➜ page 55).
4 When the display shows the correct time
Press [ENTER] to complete Plug-in Auto Tuning.
If the unit couldn’t set the clock automatically
Press [ENTER] to show the “Manual Clock Setting” screen. Set the time manually (➜ page 55).
To start
Antenna system, channel caption, and VCR Plusr guide channel settings all revert to the default values when you perform the procedure below. Timer recording settings are also cleared.
When the unit is on and stopped
1Press and hold [X, CH] and [W, CH] on the main unit for about five seconds.
The unit turns off.
2Press [Í, DVD POWER] to turn the unit on. Follow the above steps
If Plug-in Auto Tuning fails
1 Press [SETUP] to show the menus.
SETUP | Antenna System | CATV |
| ||
| Auto Channel Setting |
|
Channel | Channel Caption |
|
Preset Channel Caption |
| |
Set Up |
| |
Manual Channel Caption |
| |
Disc |
| |
|
| |
Video | VCR PlusiCH Setting |
|
Audio |
|
|
Display | TAB SELECT |
|
TV Screen | RETURN |
|
2 Press [3, 4] to select “Channel” and press [1].
SETUP | Antenna System CATV |
| |
|
| ||
| Auto Channel Setting |
| |
Channel | Channel Caption |
| |
Preset Channel Caption |
| ||
Set Up |
| ||
Manual Channel Caption |
| ||
Disc |
| ||
3 Press [3, 4] to select “Antenna Sys- | up | ||
tem” and press [ENTER]. | |||
Setting | |||
SETUP | Antenna System | ||
| |||
| TV |
| |
Channel | CATV |
| |
Set Up |
|
| |
4 Press [3, 4] to select “TV” or “CATV” and press [ENTER].
The screen shown in step 2 reappears.
5 Press [3, 4] to select “Auto Channel
Setting” and press [ENTER].
SETUP | Auto Channel Setting | |
Channel | Connect antenna cable and if you use a | |
cable box, tune it to your local PBS CH | ||
Set Up | then... | |
| ||
Disc | Please push the ENTER key. | |
Video | ||
| ||
Audio |
| |
Display |
|
If you have not yet set clock, the “Auto Channel/Clock Set- ting” screen appears.
6 Press [ENTER].
Auto setting starts. This takes a few minutes. (To stop auto channel setting, press [RETURN].) When finished, the Com- plete screen or time display is shown. Press [ENTER].
To return to the previous screen
Press [RETURN].
To exit the SETUP screen
Press [SETUP].
Adding and deleting channels
Add or delete channels if necessary channels are not set or unnec- essary channels are set.
While this unit is receiving the antenna signal (but not during recording):
1 Press the numbered buttons to select a channel.
e.g., | “5”: | [0] ➜ | [5] | Unit’s display |
| “15”: | [1] ➜ | [5] |
|
| “115”: | [100]➜ [1] ➜ [5] |
| |
≥You can also use [W, X, CH] ![]()
![]() when you are going to delete a channel.
when you are going to delete a channel.
2 Press [ADD/DLT].
The channel is deleted if it was set or added if it was not set. e.g.,
CHANNEL 15 DELETED
Repeat steps 1 and 2 as necessary.
7
RQT6986