Example
About descriptions in these operating instructions
Inside of product
If you see this symbol
Table of contents
Remote control information
Included accessories
Safety precautions
Unit care
HDD Hard disk drive handling care
Control reference guide
Remote control
Unit’s display
Main unit
Easy access to various functions Function Menu Display
Connecting to a television with 21-pin Scart terminal
Connecting a television
Other connections Below
Regarding Viera Link Hdavi ControlTM function
Press 3, 4 to select the TV aspect and press OK
When clock setting screen is displayed
Return
HDD and discs you can use for recording and play
HDD and disc information
Recording format
DVD Video Recording format HDD RAM
Play-only discs
USB memory information
Discs that cannot be played
Structure of folders displayed by this unit
Regarding DivX files, Music files and still pictures Jpeg
Structure of WMA/MP3 folders
Still pictures JPEG§2
Inserting discs
Media handling Disc/USB memory
Inserting, removing the USB memory
Disc care
Select the channel
Watching analogue and digital broadcasts
Digital channel information
Press Status to show the information screen
Playing recorded video contents/Playing play-only discs
Press ¥ REC To start recording
Recording television programmes
To specify a time to stop recording- One Touch Recording
Press ¥ REC on the main unit to select the recording time
To cancel a timer recording on the TV Guide Screen
Timer recording
Press Guide
Press OK
Deleting titles
Using the Delete Navigator to delete
Deleting during play
Press Delete ¢ Press 2, 1 to select Delete and press OK
When you want to
When recording a
Speed mode from
When recording
When removing a recorded disc
When the format confirmation screen is displayed
Advanced recording
Recording modes and approximate recording times
Press 3, 4, 2, 1 to select Start and press OK
Flexible Recording
Playing while you are recording
Press 1 Play during recording
Manual recording
Copying from a video cassette recorder
Start play on the other equipment
Press ¥ REC
Manually programming timer
Advanced timer recording
Using G-CODEsystem to make timer
Recordings
To release the unit from recording standby
To cancel recording when recording has already begun
Relief Recording
Auto Renewal Recording
Check, change or delete a programme
To exit the timer recording list
To change a programme
To delete a programme
Press 3, 4, 2, 1 to select the programme and press OK
Operations in the TV Guide system
Press Set
Press Direct Navigator
To return to the previous screen§
During play or while stopped
Operation during play
Advanced playback
Changing audio during play
Press Audio
Press 3, 4, 2, 1 to select the title and press OK
Switching the Direct Navigator appearance
To sort the titles for easy searching
To play grouped titles HDD
Playing DivX, Music files and still pictures Jpeg
Playing DivX video contents
Showing the menu screen
Show DivX Menu screen
Show MP3&WMA Menu screen
Playing Music files
Press 3, 4 to select the track and press OK
Press 3, 4, 2, 1 to select a group and press OK
Show Album View screen
Playing still pictures
Press 3, 4, 2, 1 to select the album and press OK
Press 3, 4, 2, 1 to select the still picture and press OK
Useful functions during still picture play
To play music CD
Playing music
To play music recorded on HDD
Useful functions during music play
Function Menu Display To pause the TV programme you are
Convenient functions
Watching-Pause Live TV
Power off link
Power on link
Linked operations with the TV Viera Link Hdavi ControlTM
Download from the TV§1
Using the Function Menu Display to operate this unit§1
Easy control only with Viera remote control
Using the Option menu window to operate this unit§1
Pause live TV programme§2
Press 3, 4, 2, 1 to select the title
Editing titles/chapters and playing chapters
Press 3, 4, 2, 1 to select the chapter
If you select Chapter View
Divide Title
Title operations
Chapter operations
Combine Chapters
Creating playlists
Creating, editing and playing playlists
Press 2, 1 to select the source title
Press
Press OPTION, then 3, 4 to select
Editing and playing playlists/chapters
Operation and press OK
Playlist operations
Editing still pictures Jpeg
Editing still pictures and music
Album still picture and picture operation
Select the album to be edited and press Option
Editing music
Deleting still pictures and music using Delete Navigator
Album and track operation
Press 3, 4, 2, 1 to select a character and press OK
Entering text
Show Enter Name screen etc
Approximate copying times Max. speed
Copying titles or playlists
HDD DVD DVD HDD
HDD
Press 3, 4 to select the title you want to copy and press
Copy Video HDD to DVD
Press 2, 1 to select Start and press OK
Copying using the copying list- Advanced Copy
To edit the copying list
Set Copy Time
Copy Navigator/Copying list icons and functions
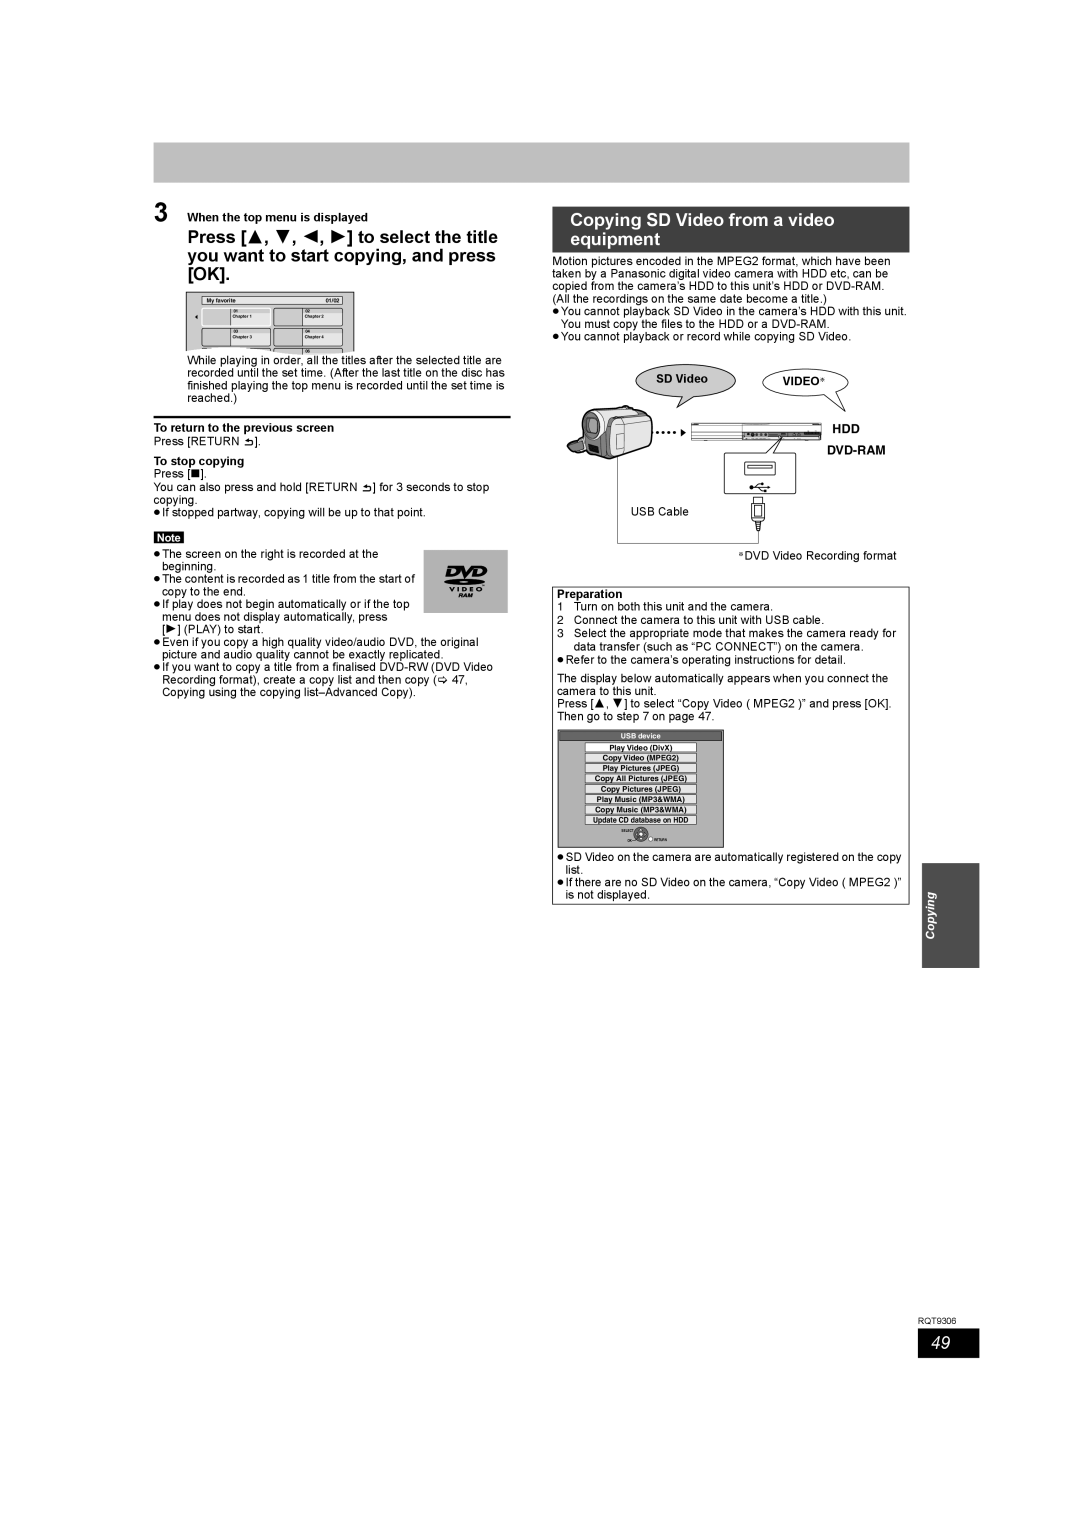
Copying SD Video from a video equipment
When the top menu is displayed
To stop copying
SD Video
Copying still pictures
Copying using the copying list
Perform steps 4 8 on Copying
Copying still pictures on the USB memory
About the Gracenote Database
Copying music to HDD
Copying music from a CD
Preparing the update data
To update the Gracenote Database
Press 3, 4 to select Start
Updating the database on this unit
Using on-screen menus
Using on-screen menus/Status message
Press Display
Press Status
Status messages
Sound menu-Change the DVB multi audio and sound effect
Other menu-Change the display position
Setting the protection
Common procedures
HDD and disc management
Providing a name for a disc
Deleting all titles and playlists-Delete all titles
Deleting all the contents-Format
Enabling discs to be played on other equipment-Finalise
Selecting the background style-Top Menu
RQT9306 4 Press OK
Creating Top Menu-Create Top Menu
Tuning
Changing the unit’s settings
Press 3, 4 to select the tab
Settings for Analogue Channels
Changing the unit’s settings
Signal Condition
Manual Tuning
Picture
Disc
Display
Sound
Connection
Others
Television operation
Other Settings
Test by turning on the television and changing channels
Child Lock
Connecting a television with Component Video terminals
Connecting a television with S Video terminals
Connecting a stereo amplifier
Connecting an amplifier with a digital input terminal
Connecting with an Hdmi compatible television and receiver
Amplifier’s rear panel
Additional connections
Connecting a television and VCR
Other connections
Digital television’s rear panel
To the aerial Aerial cable Splitter
Included Connect only after all other
Connections are complete
Set up
Frequently asked questions
Disc
Recording
Music
TV Guide
TV Channels
Messages On the television
On the unit’s display
Power
Troubleshooting guide
TV screen and video
Displays
Operation
Sound
Recording, timer recording and copying
Edit
Play
Still pictures
Digital broadcast
To reset this unit
Viera Link
Other
Specifications
Glossary
RGB
Glossary
WMA
USE of this Product Implies Acceptance of the Terms below
3DQDVRQLF� DUUDQW\�
Index