Charge the battery for about 6 hours before initial use
Operating Instructions
Accessories included
Before Initial Use
For your future reference
Battery Charge
For Best Performance
Base Unit Location/Noise
Contents
Setting the Unit to Answer Calls
Answering System
How to use the Navigator key
Location of Controls
Handset
Base unit
Displays
Handset display
No items stored Recharge New calls New calls GF H=Directory
Ringer off
Ann Paging Press Intercom 00-00-07 0266667777 Waiting
Displays
Base unit display
Settings
Connections
Battery strength
Display prompt Battery strength
Fully charged Medium Low flashing Needs to be recharged
Settings
Battery information
Standby Mode While the handset is off the base unit
Recharge
Using the Belt Clip
Using an Optional Headset
To attach the belt clip To remove the belt clip
Connection an optional headset to the handset
Selecting the Line Mode
Programmable Functions
Program
LCD contrast............. To select the LCD contrast p
During programming
Setting the Auto Talk Feature
Points to Talk switching
Set line mode HTalk switching
Programmable Functions
Selecting the Ringer Volume
Save directory HRinger volume
To turn the ringer ON, press Ñ or Ö
Ringer
Selecting the LCD Contrast
Points to LCD contrast
Press Ö or Ñ to select the desired
Contrast
Preparing the Answering System
Greeting Message
To record a greeting message
Greeting message sample
Flash Memory Message Backup
Preparing the Answering System
To erase the recorded greeting message
Pre-recorded greeting message
Programming Summary for the Answering System
To select the caller’s recording time , press
Day and Time Adjustment
For Caller ID service users p
To check the time/day
Repeat steps 1 to 6 on
Selecting the Caller’s Recording Time
Press 1, 2 or 3 to select the recording time
Toll saver When set to Auto
Selecting the Number of Rings
Making Calls
If noise interferes with the conversation
To redial the last number dialled
Talk
To dial after confirming the entered number
To redial after confirming the last number dialled
To increase, press Ñ To decrease press Ö
Loud
Answering Calls
Auto Talk
Lighted handset keypad
Backlit LCD display
Caller ID Service
How caller information is displayed when a call is received
Private name display
0244448888
Caller ID Service
To check the number of new calls
For New Zealand Users
While the handset is on the base unit
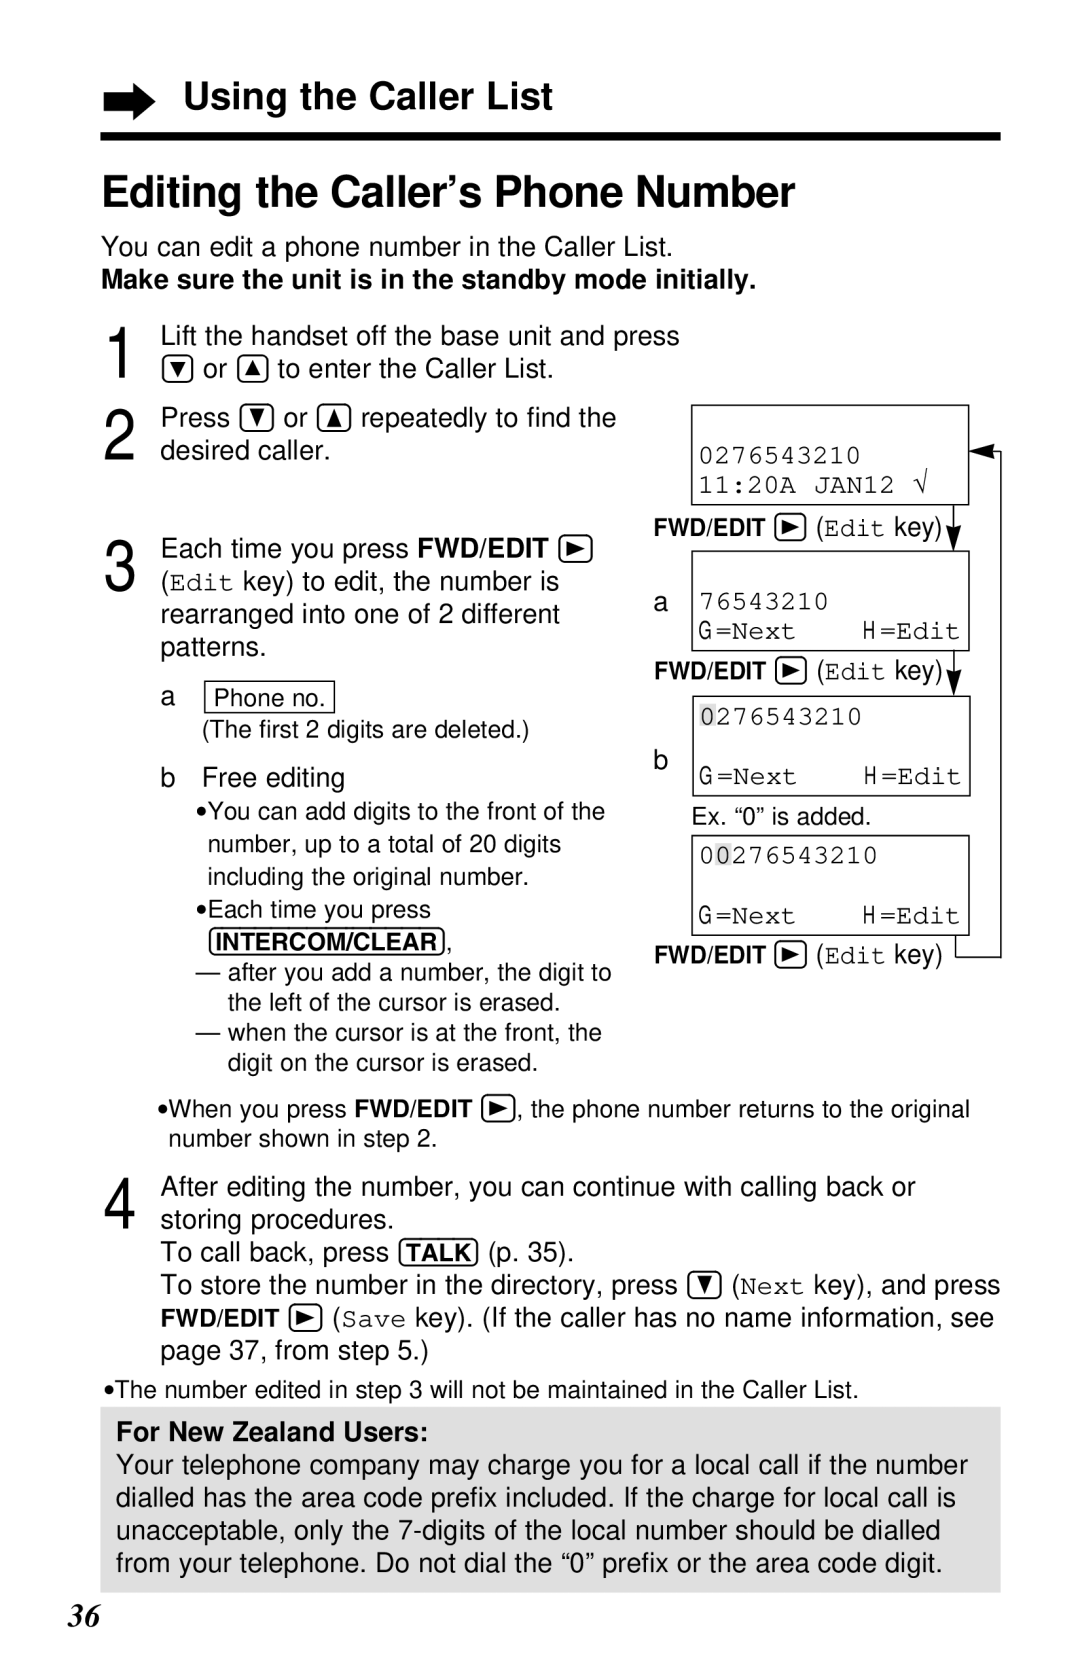
Using the Caller List
Viewing the Caller List
To check who has called, follow the steps below
To exit the list, press
Using the Caller List
Ex. When you search from the most recent call
To return to the previous caller
To exit the Caller List
Calling Back from the Caller List
New calls GF H=Directory 0355566677 1120A JAN12 Talk
Talk 00-00-00
Editing the Caller’s Phone Number
0276543210 1120A JAN12 √
76543210 =Next H=Edit
0276543210 =Next H=Edit
When the caller’s name is not displayed in the Caller List
Storing Caller List Information in the Directory
Press Ö Next key Press FWD/EDIT á Save key
0355566677 =Edit H=Save Enter name IH G=Next
Erasing Caller List Information
To erase a specific caller from the Caller List
New calls GF H=Directory 0246813579 1220A JAN12 √ Clear
To erase all entries in the Caller List
Press Ö or Ñ to select All clear
New call GF H=Directory HExit All clear
Exit HAll clear
One-Touch Dialler
Storing a Phone Number in the Direct Button
IH G=Next 123456789012345
123456789012345 =Edit H=Save Save DIRECT#
Using the Directory
Storing Names and Numbers in the Directory
Using the Directory
Enter a name, up to 15 characters using
Directory= 20 items
Dialling buttons p
Selecting Characters to Enter Names
If you make a mistake while entering a name
Number of times key is pressed Keys
When finished, pressÖ Next key
For example, to enter Tom Jones
Directory , press FWD/EDIT á
Eight times
Finding Items in the Directory
Directory list =Caller’s list
Ann 0312345678
To search for a name by initial
Dialling from the Directory
Index table
Keys Index
Directory list =Caller’s list Frank
Editing an Item in the Directory
Jane Walker 0333444555 F=Edit H=Save
Erasing an Item from the Directory
Directory item you want to erase
Press FWD/EDIT á Yes key or
Directory list =Caller’s list Helen Clear? =No H=Yes
Intercom
Paging the base unit from the handset
Paging the handset from the base unit Handset locator
Handset
Special Features
Automatic Security Code Setting
For Call Waiting Service Users in New Zealand
Call Waiting and Caller ID Compatible
How to Use the Pause Button
Recall Button
For PBX Line/Long Distance Calls
Selecting the recall time
Special Features
Setting the Unit to Answer Calls
Automatic Answering Operation
Monitoring incoming calls
Press ANSWER!ON to turn on the answering system
Listening to Messages
Slow Talk Message Playback
Listening to only new messages
Listening to all recorded messages
During playback
To repeat To repeat from the beginning of the message
To skip To skip to the next message
To stop
From the Handset
Listening to Messages
Erasing Messages
Erasing a specific message
Erasing all messages
Within 5 seconds, press Erase again
Remote Operation from a Touch Tone Phone
Summary of remote operation
Setting the Remote Code
Enter a remote code using a 2-digit
To check the remote code
Number
Voice Menu
Remote Operation from a Touch Tone Phone
Shaded boxes are voice prompts
All Message Playback
New Message Playback
Recording a Memo Message
Erasing All Messages
Direct commands
Direct Remote Operation
Turning on the answering system
Skipping the greeting message
Enter the desired direct commands p
Remote Operation with the Handset
Voice menu
To end remote operation, press RECALL/PLAYBACK
Command within 15 seconds, or
Voice menu will start p
Answer off is heard and the answering
System is turned off
Wall Mounting
Tuck the telephone line cord inside
Wall mounting adaptor, then
Push it in the direction of the arrow
Install screws using the wall template below
To charge the handset battery
Wall Template
Connect the telephone line cord. Mount the unit, then
Battery Replacement
Few minutes
Adding Another Phone
Troubleshooting
Cordless Telephone Problem
Cause & Remedy
Digits long, the number will not be
Troubleshooting
Answering System Problem
General Problem
Hanging up
May have been pressed when you
Back Ü or FWD/EDIT á
Picked up the handset. Press
For Australian Customers
Safety Instructions
Safety
Installations Environment
Placement
Safety Instructions
Medical
Specifications
Installation
Important Information For Australia only
Instructions to customer
Service difficulties
62, 4-chome, Minoshima, Hakata-ku, Fukuoka 812-8531, Japan
PQQX13461ZA-BM S0802-1082