2.3 Names and Locations
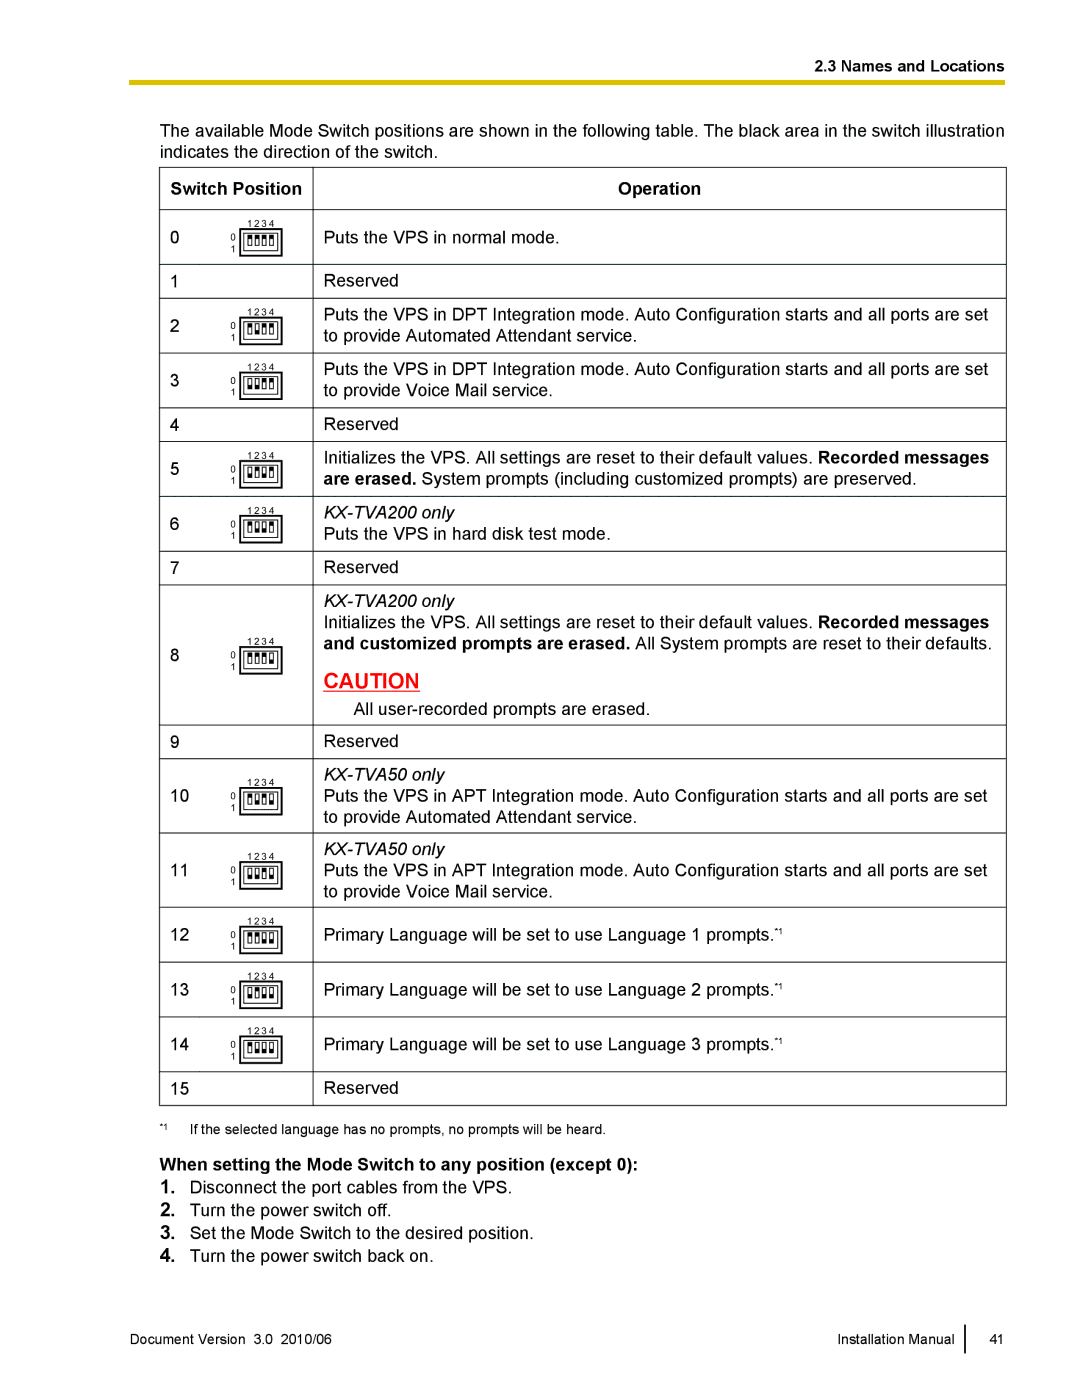
The available Mode Switch positions are shown in the following table. The black area in the switch illustration indicates the direction of the switch.
Switch Position |
| Operation |
| |||
|
|
|
|
|
|
|
0 | 1 2 3 4 |
|
|
| Puts the VPS in normal mode. |
|
0 |
|
|
|
| ||
| 1 |
|
|
|
|
|
|
|
|
|
|
| |
|
|
|
|
|
|
|
|
|
|
|
|
|
|
1 |
|
|
|
| Reserved |
|
|
|
|
|
|
|
|
2 | 1 2 3 4 |
|
|
| Puts the VPS in DPT Integration mode. Auto Configuration starts and all ports are set |
|
0 |
|
|
| to provide Automated Attendant service. |
| |
| 1 |
|
|
|
|
|
|
|
|
|
|
|
|
|
|
|
|
|
|
|
3 | 1 2 3 4 |
|
|
| Puts the VPS in DPT Integration mode. Auto Configuration starts and all ports are set |
|
0 |
|
|
| to provide Voice Mail service. |
| |
| 1 |
|
|
|
|
|
|
|
|
|
|
|
|
|
|
|
|
|
|
|
4 |
|
|
|
| Reserved |
|
|
|
|
|
|
|
|
5 | 1 2 3 4 |
|
|
| Initializes the VPS. All settings are reset to their default values. Recorded messages |
|
0 |
|
|
| are erased. System prompts (including customized prompts) are preserved. |
| |
| 1 |
|
|
|
| |
|
|
|
|
|
| |
|
|
|
|
|
|
|
|
|
|
|
|
|
|
6 | 1 2 3 4 |
|
|
|
| |
0 |
|
|
| Puts the VPS in hard disk test mode. |
| |
| 1 |
|
|
|
|
|
|
|
|
|
|
|
|
|
|
|
|
|
|
|
7 |
|
|
|
| Reserved |
|
|
|
|
|
|
|
|
|
|
|
|
|
| |
|
|
|
|
| Initializes the VPS. All settings are reset to their default values. Recorded messages |
|
8 | 1 2 3 4 |
|
|
| and customized prompts are erased. All System prompts are reset to their defaults. |
|
0 |
|
|
|
|
| |
| 1 |
|
|
| CAUTION |
|
|
|
|
|
|
| |
|
|
|
|
| ||
|
|
|
|
| All |
|
|
|
|
|
|
|
|
9 |
|
|
|
| Reserved |
|
|
|
|
|
|
|
|
| 1 2 3 4 |
|
|
|
|
|
10 | 0 |
|
|
| Puts the VPS in APT Integration mode. Auto Configuration starts and all ports are set |
|
|
|
|
|
|
| |
| 1 |
|
|
| to provide Automated Attendant service. |
|
|
|
|
|
|
| |
|
|
|
|
| ||
|
|
|
|
|
|
|
| 1 2 3 4 |
|
|
|
| |
11 | 0 |
|
|
| Puts the VPS in APT Integration mode. Auto Configuration starts and all ports are set |
|
|
|
|
|
|
| |
| 1 |
|
|
| to provide Voice Mail service. |
|
|
|
|
|
|
| |
|
|
|
|
| ||
|
|
|
|
|
|
|
12 | 1 2 3 4 |
|
|
| Primary Language will be set to use Language 1 prompts.*1 |
|
0 |
|
|
|
| ||
| 1 |
|
|
|
|
|
|
|
|
|
|
|
|
|
|
|
|
|
|
|
13 | 1 2 3 4 |
|
|
| Primary Language will be set to use Language 2 prompts.*1 |
|
0 |
|
|
|
| ||
| 1 |
|
|
|
|
|
|
|
|
|
|
|
|
|
|
|
|
|
|
|
14 | 1 2 3 4 |
|
|
| Primary Language will be set to use Language 3 prompts.*1 |
|
0 |
|
|
|
| ||
|
|
| ||||
| 1 |
|
|
|
|
|
|
|
|
|
|
|
|
|
|
|
|
|
|
|
15 |
|
|
|
| Reserved |
|
|
|
|
|
|
|
|
*1 | If the selected language has no prompts, no prompts will be heard. |
|
When setting the Mode Switch to any position (except 0):
1.Disconnect the port cables from the VPS.
2.Turn the power switch off.
3.Set the Mode Switch to the desired position.
4.Turn the power switch back on.
Document Version 3.0 2010/06 | Installation Manual |
41
