Operating Instructions
FCC Warning
Thank you for choosing Panasonic
Above markings are located on the appliance bottom cover
Important Safeguards
Precautions
Before Using
Camera Mode
VCR Mode
Special Features
Standard Accessories
Quick Guide
To watch the Playback Picture
Controls and Components
Card Access Lamp Access l35
Reset Button Reset l71
Tape/Card Selector TAPE/CARD l35
Card Slot Cover l35
Remote Controller
Inserting a Button-type Battery
Using the Remote Controller
While pressing the Stopper 1, pull out the Battery Holder
Selecting Remote Controller Modes
Power Supply
Using the AC Adaptor
Using the Battery
Attach the Battery to AC Adaptor and charge it
Lens Cap and Grip Belt
Attaching the Shoulder Strap
Inserting a Cassette
Accidental Erasure Prevention
Turning on/off the Palmcorder and selecting Modes
Using the Viewfinder
Using the LCD Monitor
Using the Menu Screen
About the Menu Mode Setting
Press the Menu Button
Rotate the Push Dial to select a desired Sub-Menu
List of Menus
AV IN/OUT Setup Sub-Menu
VCR Mode Main-Menu VCR Functions
Playback Functions Sub-Menu
Camera data will not be recorded in the following cases
Card Playback Mode Main-Menu Card Functions
Short-Cut Menus of the Card Playback Mode a
Delete Card File Sub-Menu
Card Editing Sub-Menu
Setting Date and Time
Internal Lithium Battery Recharge
LP Mode
Audio Recording Mode
Recording
To Check the Recording
Self-Recording
To Finish the Recording
Progressive PhotoShotTM Mode
PhotoShot Recording on the DV Cassette
Zoom In/Out Functions
Continuous PhotoShot
Set Camera Functions Camera Setup D.ZOOM 25t or 200t
Digital Zoom Function
Optical Image Stabilizer Function
Fade In/Out Functions
Recording in Special Situations
Cinema Function
Backlight Compensation Function
Manual Shutter Speed Adjustment
Manual Iris Adjustment F Number
Manual Focus Adjustment
To Resume Automatic Adjustment
Adjusting White Balance Manually
Rotate the Push Dial to set a desired White Balance Mode
Recording in Natural Colors
About White Balance Sensor
Using the Video Flash
Adjusting Brightness of the Video Flash
Press the Still Button
Press the Photo Shot Button or Recording Start/Stop Button
Wipe Mode and Mix Mode
Digital Effect Functions
Multi-Picture Mode
Picture-in-Picture Mode
When pictures were captured in MANUAL)
To Display the Multi-Pictures again
Playing Back
Finding a Scene You Want to Play Back
Slow Motion Playback
Still Playback/Still Advance Playback
Finding the End of a Recording
Jog Playback
Scene Index Search
Index Search Functions
PhotoShot Index Search
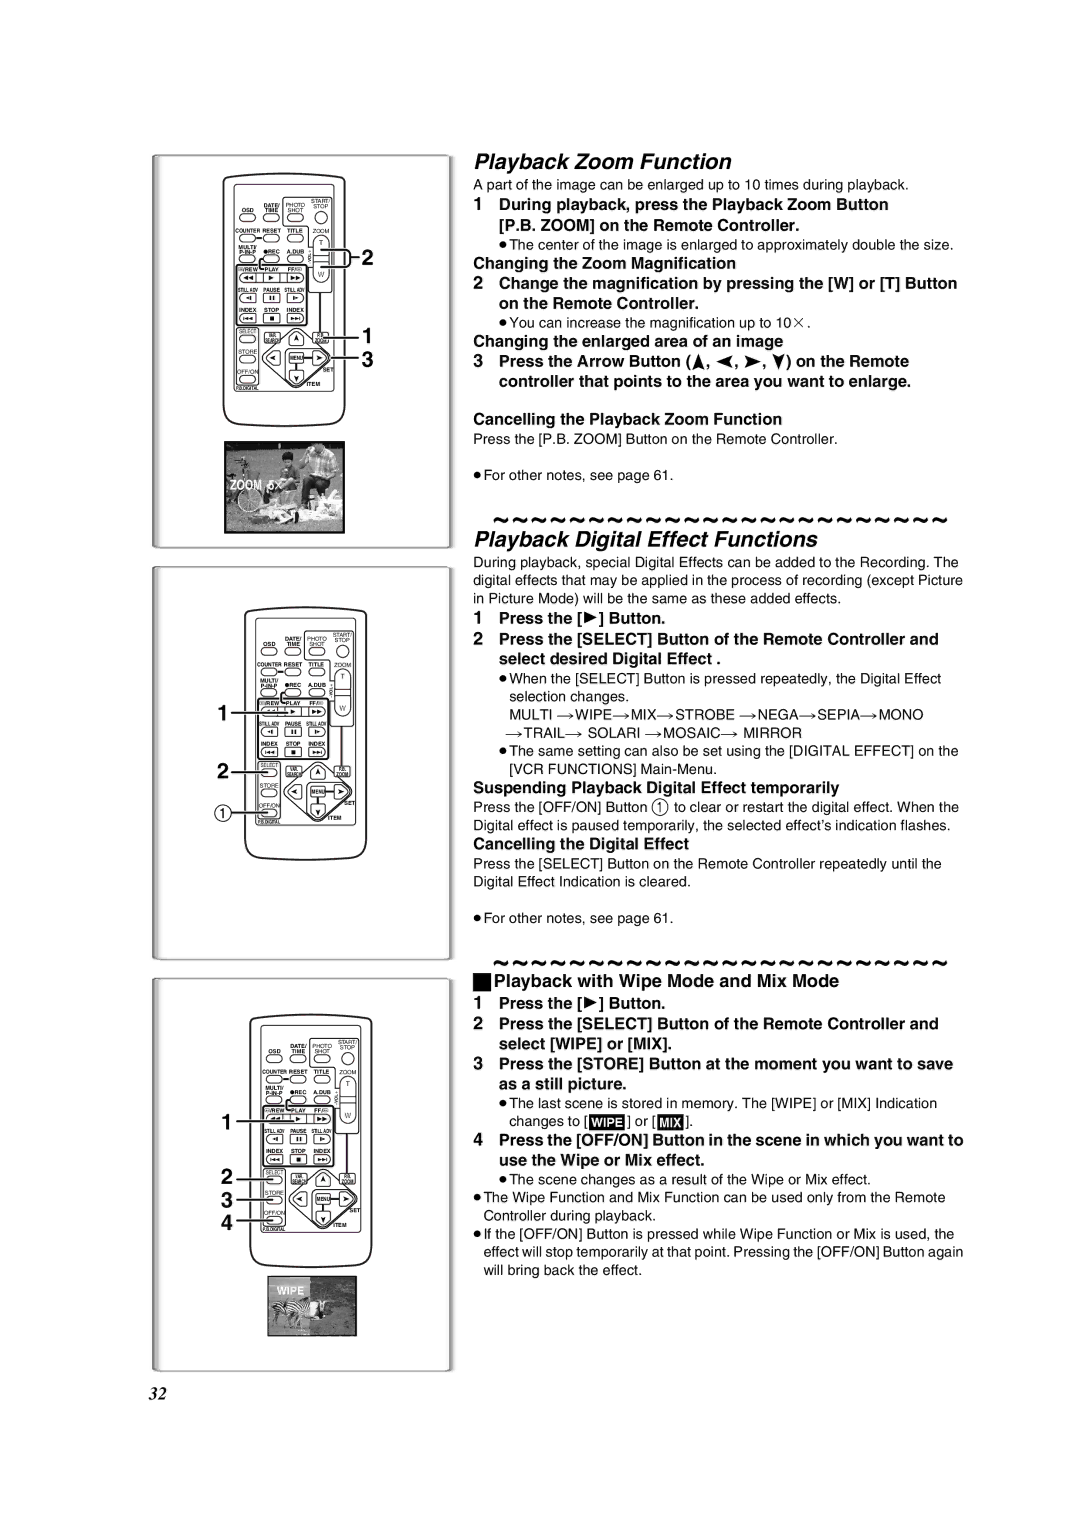
Playback Zoom Function
Playback Digital Effect Functions
Suspending Playback Digital Effect temporarily
≥You can increase the magnification up to 10a
Playing Back with Multi-Picture Mode
Press the Index Button or 9 4 on the Remote controller
Playing Back on Your TV
Audio Dubbing
Making the Indications Appear on the TV screen
To Stop Audio Dubbing
Using a Memory Card
Access Lamp
Recording on the Memory Card
Inserting a Card
After setting the Palmcorder to the VCR Mode l29
Automatically copying still pictures recorded on a Cassette
To Stop the Transfer of Images
Push the Operation Lever towards ≥For other notes, see
Recording the Moving Pictures MPEG4
Recording Voice Voice Recording Function
Maximum recording time on the supplied Card 8 MB
Approximately 6 minutes
Playing Back Files from the Memory Card
Playing back Still Pictures
Playing back Moving Pictures MPEG4
Playing back Voice
To Select a Desired File and Play it Back
Using File Search Mode
Copying pictures on a Memory Card to a Cassette
Slide Show
To Play Back All the Pictures Continuously
To Pause the Slide Show
To Stop the Slide Show
Creating a Title
Inserting a Title
About the Write Protection Switch of the SD Memory Card
Deleting the Files Recorded on a Memory Card
Rotate the Push Dial to select YES and then press it
To Delete all Files Set Card Functions Delete Card File
Formatting a Memory Card
Dpof Setting
To Verify Dpof Setting
Cassette Dubbing
Stopping Dubbing
Using your Palmcorder with Digital Video Equipment Dubbing
Analog-Digital Conversion
Using the Software with a Computer
Software Installation Windows
Software Installation Macintosh
Select the software to be installed from Setup Menu
ArcSoft Software
Using the Supplied USB Connection Kit
Installing USB Driver
Connecting Computer and Palmcorder
Operating environment
Using the G726 Decoder
Installing the G726 Decoder
Install it by following the instructions on the screen
Click Finish when the Setup Complete Dialog appears
Check if Palmcorder is correctly recognized
To disconnect USB cable safely
Verify Removable Disk icon is added in My Computer
Double click the icon in task tray
When the dialog to finish appears, click Finish
Verifying and updating driver
Verifying driver Palmcorder must be connected to computer
Updating driver
Verify driver Palmcorder must be connected to computer
Windows 2000Professional
Windows Me
If you no longer need software or driver uninstall
About the SD Memory Card MultiMediaCard
About the compatibility of the card files
SD Memory Card
MultiMediaCard
Indications
Recording Mode Card File Indications 2 Card P.B. Mode
This appears when Mode Selector
From 1280 to 1600 pixels Portrait Mode l23
MNL EIS ª MF
Changing the Counter Display Mode
Changing the Display Mode
Displaying Date/Time Indication
38, 39
Power-Related Items l12
Alarm Sounds
Progressive PhotoShotTM Mode l21
Fade In/Out Mode l22
Manual Shutter Speed Adjustment l24
Manual Iris Adjustment l24
Cinema Function l23
Program AE l23
Digital Effect Functions Camera Mode
Multi-Picture Mode VCR Mode l33
Listening to Playback Sound Through Headphones l29
Index Search Functions l31
Audio Dubbing l34
Card Functions l35-43
Recording to a Card from other equipment
Card PhotoShot l35
Voice Power Save l38
Dpof setting l43
Using a Card in a Personal Computer
Card Playback l38
About the AC Adaptor
Tips for using your Palmcorder
After Use
Digital Video Head Cleaner
Optimal Use of the Battery
Condensation
Take out the Cassette
LCD Monitor/Viewfinder/Lens Hood
Explanation of Terms
Digital Palmcorder
Palmcorder Accessory System
Includes RS-232C connection cables
Palmcorder Accessory Order Form For USA Customers
Visa
Problems Solutions
Before Requesting Service
Problems and Solutions
Headphones of the Palmcorder
Actual remaining tape time
Is pressed
Mosaic-like noise patterns appear on images during
Request for Service Notice USA only
Limited Warranty Coverage
Parts Labor Service Contact Number
Carry-In, Mail-in or In-Home Service
Limited Warranty Limits And Exclusions
Customer Services Directory
Centralized Factory Servicenter
Panasonic Product Limited Warranty For Canadian Customers
Panasonic Canada Inc
For Canadian Customers
Ambler Drive, Mississauga, Ontario L4W 2T3
Video Head Clogging
Multi-Picture Mode
Index
Spanish Quick Use Guide/Guía española para el uso rápido
Para iniciar
Para grabar
Para comprobar lo que ha sido grabado
Para grabar en una tarjeta de memoria
Para reproducir la imagen en la tarjeta de memoria
Panasonic Canada Inc
LSQT0512B F0102Nm0 700 B
Modèle PV-DV852
Renseignements
Merci d’avoir choisi Panasonic
Directives importantes
Ventilation Le boîtier de
Précautions
≥Éviter les changements subits de température ... Si
Table des matières
Accessoires standard
Adaptateur secteur, câble c.c. et câble c.a. l12
Bloc-batterie l12
Câble USB l48 Bandoulière l13
Guide sommaire
Visionnement de l’enregistrement
Nomenclature Commandes et accessoires
Sélecteur cassette/carte TAPE/CARD l35
STILL/MPEG4/VOICE l35, 36, 37
Couvercle de la fente de la carte l35
Fente de la carte l35
Télécommande
En utilisant la télécommande
Sélection des modes de la télécommande
Mise en place d’une pile de type bouton
Avertissement
Source d’alimentation
Temps de recharge et autonomie d’enregistrement
Utilisation de la batterie
Fixer la batterie à l’adaptateur secteur et la recharger
Capuchon de l’objectif et courroie de la poignée
Fixation de la bandoulière
Mise en place d’une cassette
Prévention d’effacements accidentels
Utilisation de l’écran à cristaux liquides
Mise en marche/arrêt du caméscope et sélection des modes
Utilisation du viseur
Utilisation du menu
Appuyer sur la touche Menu
Pour quitter le menu
Appuyer sur la touche Menu une nouvelle fois
Liste des menus
Sous-menu AV IN/OUT Setup
Menu principal du mode magnétoscope VCR Functions
Sous-menu Playback Functions
Données de la caméra REC Data
Menu principal du mode lecture de carte Card Functions
Menu d’accès rapide au mode de lecture de carte a
Sous-menu Delete Card File
Sous-menu Card Editing
Mode longue durée LP
Mode enregistrement audio
Réglage de la date et de l’heure
Recharge de la pile incorporée au lithium
Enregistrement
Vérification de l’enregistrement
Enregistrement automatique
Pour terminer l’enregistrement
Enregistrement PhotoShot sur la cassette DV
Fonction zoom avant/arrière
PhotoShot progressif
PhotoShot continu
Régler Camera Functions Camera Setup D.ZOOM 25t ou 200t
Fonction zoom numérique
Fonction de stabilisation optique de l’image
Fonctions fondu à l’entrée et fondu en sortie
Enregistrement dans des situations
Fonction cinéma
Fonction compensation de contre-jour
Réglage manuel de la vitesse d’obturation
Réglage manuel de l’iris Nombre F
Réglage manuel de la mise au point
Pour continuer le réglage automatique
Enregistrement avec des couleurs naturelles
Réglage manuel de I’équilibre du blanc
Propos du capteur d’équilibre du blanc
Appuyer sur le cadran Push
Utilisation de la lampe-éclair
Appuyer sur la touche Still
Réglage de la luminosité de la lampe-éclair
Pour réduire l’effet œil rouge
Mode volet et mode mixage
Effets et fonctions numériques
Mode d’écran multiple
Mode image sur image
Lecture
Repérage d’une scène pour la lecture
Lecture au ralenti
Lecture fixe/Lecture avance fixe
Repérage de la fin de l’enregistrement
Lecture avec molette Jog
Fonctions de recherche de l’index
Recherche de l’index PhotoShot
Recherche de l’index de scène
Balayage de débuts
Fonction de lecture zoom
Lecture avec effets numériques
Arrêt temporaire de l’effet numérique à la lecture
≥Le centre de l’image double
Lecture en mode écran multiple
Appuyer sur la touche index ou 9 4 de la télécommande
Sortir du menu en appuyant sur la touche Menu Lire la bande
Effacement de tous les multi-écrans saisis
Affichage des indications sur l’écran télé
Appuyer sur la touche OSD 3 de la télécommande
Lecture sur téléviseur
Voyant Access
Utilisation d’une carte mémoire
Enregistrement sur une carte mémoire
Mise en place de la carte
Carte PhotoShot suite
Transférer l’image provenant d’un autre appareil, puis
Appuyer sur la touche Photo Shot lors du passage de la
Scène désirée
Temps d’enregistrement maximum sur la Carte fournie 8 Mo
Enregistrement d’images animées MPEG4
Enregistrement vocal fonction d’enregistrement Vocal
Lecture des fichiers enregistrés sur carte mémoire
Lecture d’images fixes
Lecture d’images animées MPEG4
Lecture d’enregistrements sonores
Utilisation du mode recherche de fichier
Sélection d’un fichier souhaité et visualisation
Diaporama
Vérification de la sélection des images
Création d’un titre
Insertion d’un titre
Verrouillage de fichier
Formatage d’une carte mémoire
Réglage Dpof
Régler Card Functions Card Editing
Sélectionner YES et appuyer sur le cadran Push
Copie de cassette S-VHS ou VHS sur cassettes
≥L’enregistrement commence
Conversion analogique-numérique
Arrêt du doublage
Configuration minimale requise par le système pour ArcSoft
Installation du logiciel Windows
Installation du logiciel Macintosh
Sélectionner le logiciel à installer à partir du Setup Menu
Tél Téléc Courriel support@arcsoft.com
Logiciel ArcSoft
Pour informations sur le logiciel ArcSoft
Installation du pilote de périphérique USB
Configuration du système
Utilisation de l’ensemble de connexion USB
Connexion du caméscope à un ordinateur
Utilisation du décodeur G726
Installation du décodeur G726
Sélectionner le logiciel à installer à partir de Setup Menu
≥La boîte de dialogue de déconnexion s’affiche
Déconnexion du câble USB
Double-cliquer sur l’icône dans la barre de tâches
Vérification et mise à jour du pilote
Mise à jour du pilote
Cliquer sur Finish dans la boîte de dialogue qui s’affiche
Sous Windows 98 Deuxième Édition
Sous Windows 2000 Professionnel
Sous Windows Me
Désinstallation du pilote ou du logiciel
Carte MultiMediaCardMC
Remarques
Carte mémoire SD
Mode image multiple l28
≥P-IN-P Mode image sur image l28
Mode volet l27
Mode mixage l27
Mode d’enregistrement
Mode d’équilibre du blanc
MANUAL. l23, 24
L25
Signaux d’avertissement/alarme
Modification du mode d’affichage du Compteur
Modification du mode d’affichage
Affichage date/heure
Indications se rapportant aux sources ’alimentation l12
Mise en place/éjection de la cassette l13
Avertisseurs sonores
Enregistrement l20
Mode fondu à l’entrée/en sortie l22
Fonction cinéma l23
Réglage automatique de I’exposition l23
Réglage manuel de la vitesse d’obturation
Fonctions et effets numériques Mode caméra l27
Mode écran multiple Mode magnétoscope l33
Fonctions de recherche de l’index l31
Fonctions de lecture zoom l32
Sélection du son pendant la lecture
Doublage audio l34
Utilisation avec un appareil vidéo Numérique doublage l45
Fonctions de la carte l35-43
Mode économie d’énergie-enregistrement Audio l38
Lecture de la carte l38
Diaporama l40
Fonctions de titre l41
Précautions d’emploi
Après utilisation
Conseils d’utilisation de votre caméscope
Propos de l’adaptateur secteur
Nettoyage des têtes vidéo numériques
Utilisation optimale de la batterie
Précautions de rangement
Écran à cristaux liquides/viseur/parasoleil
Explication des termes
Spécifications
Caméscope numérique
Accessoires
De pièce Illustration Description
Problèmes Solutions
Guide de dépannage
Les images ne peuvent pas être
Touche Des parasites de type mosaïque
Apparaissent sur les images, pendant la
Branché au téléviseur, les images
Certificat de garantie limitée Panasonic
Pour vos dossiers
Panasonic Canada Inc
Caméscopes Un 1 an, pièces et main-d’oeuvre
Mode d’écran multiple
Effets numériques
Page
Page
Imprimé au Japon