Picture Profiles
Saving profiles
Follow these steps to save picture adjustment values as profiles.
Note:
When the settings are locked in “Extended life settings”, profiles cannot be saved.
1 Specify the picture quality in the Picture menu and Advanced settings. (see page 26, 27)
2 | In the Picture menu, select “Memory save”. | select | |||
Memory save | 1 | ||||
| Memory load |
| access | ||
| Memory edit | 2 | |||
3 | Select a profile name for saving the picture adjustment | ||||
values. |
|
|
| select | |
| Memory save |
| 1 | ||
|
|
|
| ||
| 1. [ | ] | MEMORY1 | 2 | set |
| 2. [ | ] | MEMORY2 |
|
|
| 3. [ | ] | MEMORY3 |
|
|
| 4. [ | ] | MEMORY4 |
|
|
“∗” appears for a profile in which the picture adjustments have already been saved.
4 Select “Ok”. |
| 1 | select | |
Memory save |
|
|
| |
Save the adjusted value in ”MEMORY1” | 2 | set | ||
Ok | Cancel | |||
|
| |||
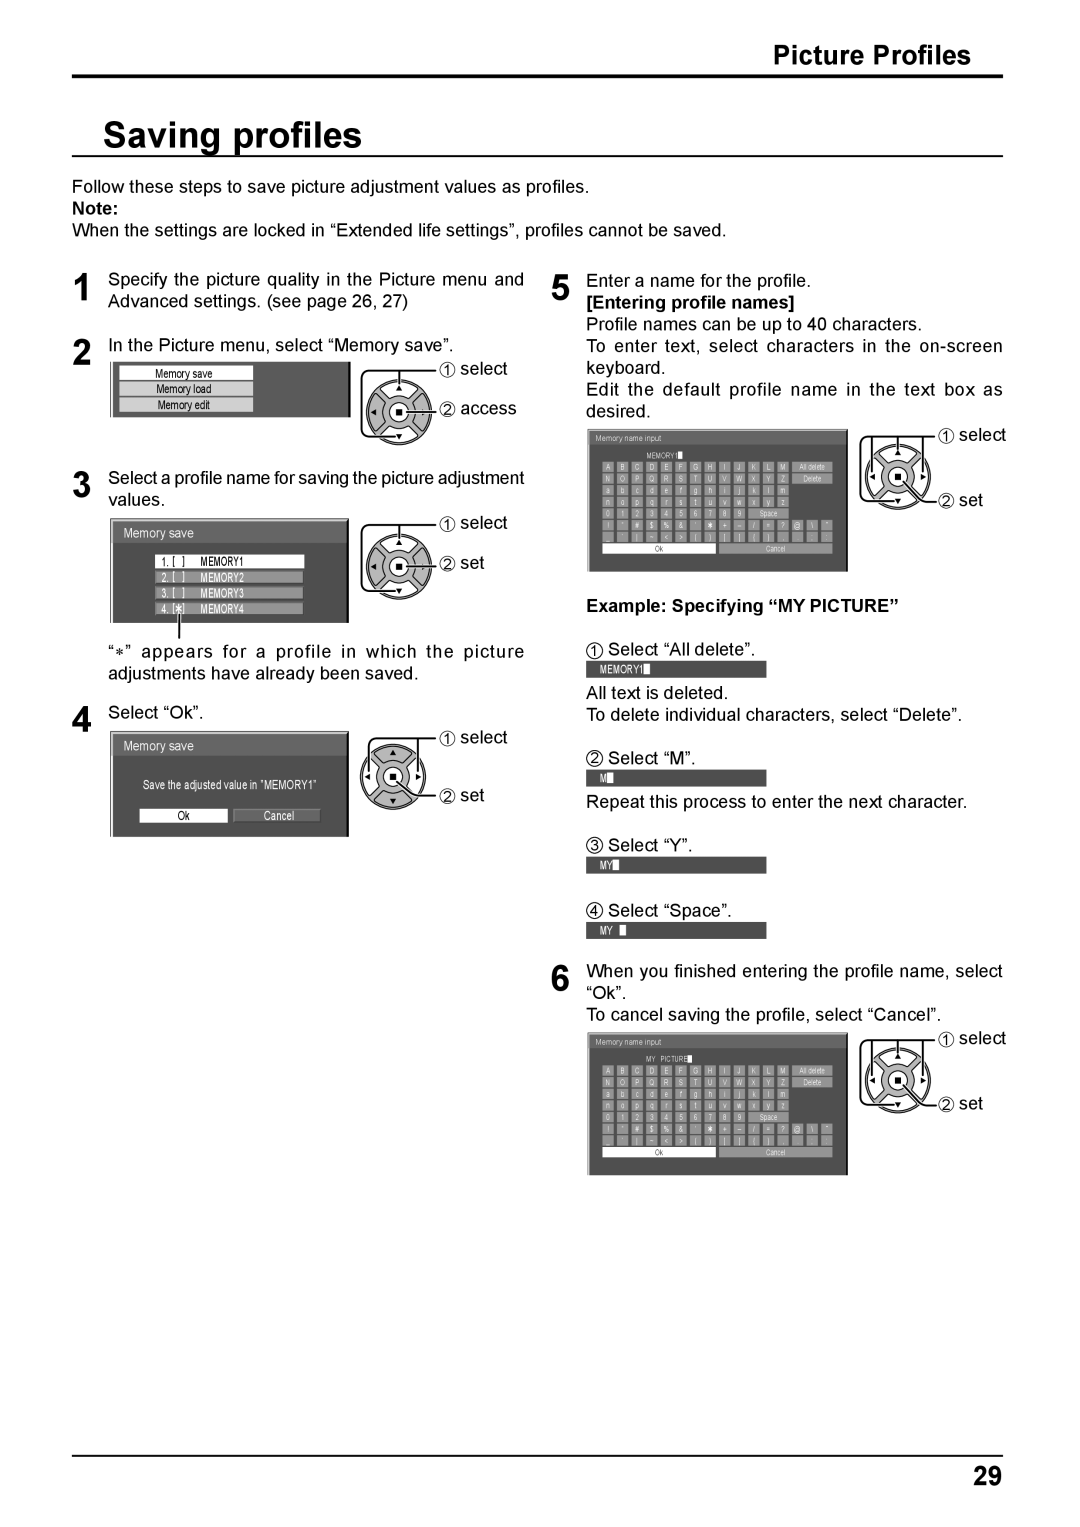
5 | Enter a name for the profile. |
|
|
|
|
| |||||||||||||||||||||||||||||||
[Entering profile names] |
|
|
|
|
|
|
|
| |||||||||||||||||||||||||||||
| Profile names can be up to 40 characters. | ||||||||||||||||||||||||||||||||||||
| To enter text, select characters in the | ||||||||||||||||||||||||||||||||||||
| keyboard. |
|
|
|
|
|
|
|
|
|
|
|
|
|
|
|
|
|
|
|
|
|
|
|
|
|
| ||||||||||
| Edit the default profile name in the text box as | ||||||||||||||||||||||||||||||||||||
| desired. |
|
|
|
|
|
|
|
|
|
|
|
|
|
|
|
|
|
|
|
|
|
|
|
|
|
| 1 select | |||||||||
|
|
|
|
|
|
|
|
|
|
|
|
|
|
|
|
|
|
|
|
|
|
|
|
|
|
|
|
|
|
|
|
|
| ||||
|
| Memory name input |
|
|
|
|
|
|
|
|
|
|
|
|
|
|
|
|
|
|
|
|
|
|
|
| |||||||||||
|
|
|
|
|
|
|
|
|
|
|
|
|
|
|
|
|
|
|
|
|
|
|
|
|
|
|
| ||||||||||
|
|
|
|
|
|
|
|
| MEMORY1█ |
|
|
|
|
|
|
|
|
|
|
|
|
|
|
|
|
|
|
|
|
|
|
|
| ||||
|
|
| A |
| B |
| C |
| D |
| E |
| F |
| G |
| H |
| I |
| J |
| K |
| L |
| M |
| All delete |
|
|
|
|
| |||
|
|
|
|
|
|
|
|
|
|
|
|
|
|
|
|
|
|
|
|
|
|
|
|
|
|
|
|
|
|
|
|
|
|
|
| ||
|
|
| N |
| O |
| P |
| Q |
| R |
| S |
| T |
| U |
| V |
| W |
| X |
| Y |
| Z |
|
| Delete |
|
|
|
|
| ||
|
|
| a |
| b |
| c |
| d |
| e |
| f |
| g |
| h |
| i |
| j |
| k |
| l |
| m |
|
|
|
|
|
|
|
|
| 2 set |
|
|
| n |
| o |
| p |
| q |
| r |
| s |
| t |
| u |
| v |
| w |
| x |
| y |
| z |
|
|
|
|
|
|
|
|
| |
|
|
| 0 |
| 1 |
| 2 |
| 3 |
| 4 |
| 5 |
| 6 |
| 7 |
| 8 |
| 9 |
|
| Space |
|
|
|
|
|
|
|
|
|
|
| ||
|
|
| ! |
| ” |
| # |
| $ |
| % |
| & |
| ’ |
|
|
| + |
| – |
| / |
| = |
| ? |
| @ |
| \ |
| ˆ |
|
|
|
|
|
|
| _ |
| ` |
|
| ~ |
| < |
| > |
| ( |
| ) |
| [ |
| ] |
| { |
| } |
| , |
| . |
| ; |
| : |
|
|
|
| |
|
|
|
|
|
|
|
|
| Ok |
|
|
|
|
|
|
|
|
|
|
|
|
|
| Cancel |
|
|
|
|
|
|
|
|
|
| |||
|
|
|
|
|
|
|
|
|
|
|
|
|
|
|
|
|
|
|
|
|
|
|
|
|
|
|
|
|
|
|
|
|
|
|
|
|
|
Example: Specifying “MY PICTURE”
1Select “All delete”.
MEMORY1█
All text is deleted.
To delete individual characters, select “Delete”.
2Select “M”.
M█
Repeat this process to enter the next character.
3Select “Y”.
MY█
4Select “Space”.
MY █
6 When“Ok”. you finished entering the profile name, select To cancel saving the profile, select “Cancel”.
|
|
|
|
|
|
|
|
|
|
|
|
|
|
|
|
|
|
|
|
|
|
|
|
|
|
|
|
|
|
| 1 select | ||||
Memory name input |
|
|
|
|
|
|
|
|
|
|
|
|
|
|
|
|
|
|
|
|
|
|
| ||||||||||||
|
|
|
|
|
|
|
|
|
|
|
|
|
|
|
|
|
|
|
|
|
|
|
|
| |||||||||||
|
|
|
|
|
|
| MY | PICTURE█ |
|
|
|
|
|
|
|
|
|
|
|
|
|
|
|
|
|
|
|
|
|
|
| ||||
| A |
| B |
| C |
| D |
| E |
| F |
| G |
| H |
| I |
| J |
| K |
| L |
| M |
| All delete |
|
|
|
|
| |||
|
|
|
|
|
|
|
|
|
|
|
|
|
|
|
|
|
|
|
|
|
|
|
|
|
|
|
|
|
|
|
|
|
| ||
| N |
| O |
| P |
| Q |
| R |
| S |
| T |
| U |
| V |
| W |
| X |
| Y |
| Z |
|
| Delete |
|
|
|
|
| ||
| a |
| b |
| c |
| d |
| e |
| f |
| g |
| h |
| i |
| j |
| k |
| l |
| m |
|
|
|
|
|
|
|
|
| 2 set |
| n |
| o |
| p |
| q |
| r |
| s |
| t |
| u |
| v |
| w |
| x |
| y |
| z |
|
|
|
|
|
|
|
|
| |
| 0 |
| 1 |
| 2 |
| 3 |
| 4 |
| 5 |
| 6 |
| 7 |
| 8 |
| 9 |
|
| Space |
|
|
|
|
|
|
|
|
|
|
| ||
| ! |
| ” |
| # |
| $ |
| % |
| & |
| ’ |
|
|
| + |
| – |
| / |
| = |
| ? |
| @ |
| \ |
| ˆ |
|
|
|
|
| _ |
| ` |
|
| ~ |
| < |
| > |
| ( |
| ) |
| [ |
| ] |
| { |
| } |
| , |
| . |
| ; |
| : |
|
|
|
| |
|
|
|
|
|
|
| Ok |
|
|
|
|
|
|
|
|
|
|
|
|
| Cancel |
|
|
|
|
|
|
|
|
|
| ||||
|
|
|
|
|
|
|
|
|
|
|
|
|
|
|
|
|
|
|
|
|
|
|
|
|
|
|
|
|
|
|
|
|
|
|
|
29