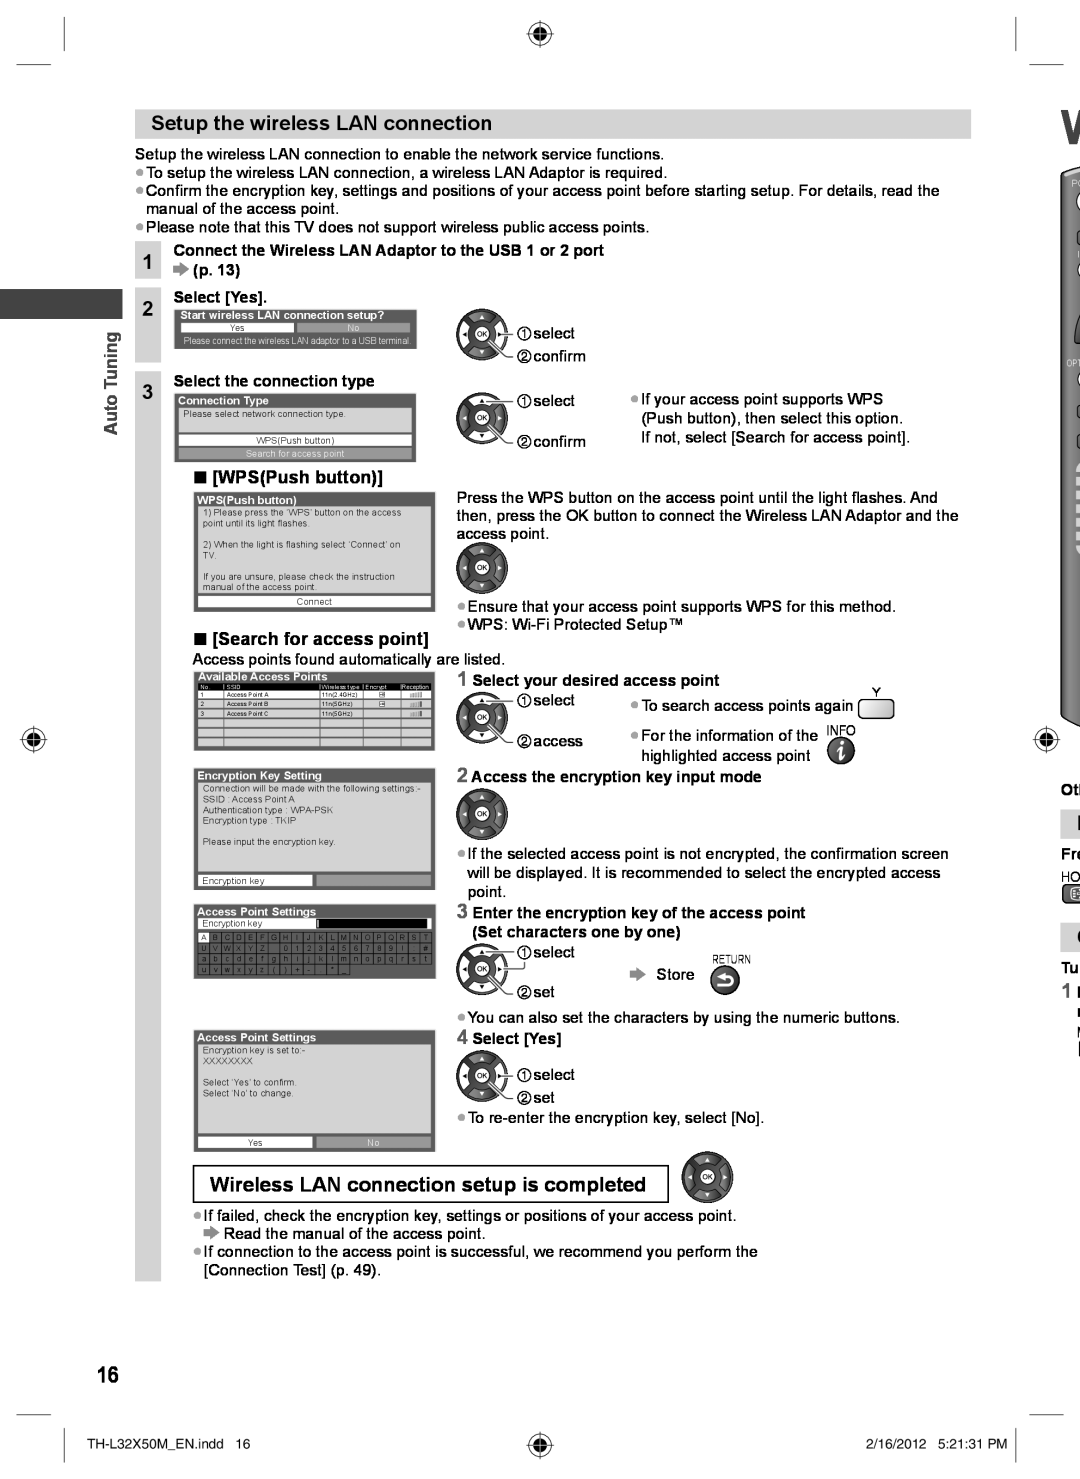
Setup the wireless LAN connection
Setup the wireless LAN connection to enable the network service functions.
●To setup the wireless LAN connection, a wireless LAN Adaptor is required.
●Confirm the encryption key, settings and positions of your access point before starting setup. For details, read the manual of the access point.
●Please note that this TV does not support wireless public access points.
W
PO
1
Connect the Wireless LAN Adaptor to the USB 1 or 2 port  (p. 13)
I
Auto Tuning
2
3
Select [Yes].
Start wireless LAN connection setup?
YesNo
Please connect the wireless LAN adaptor to a USB terminal.
Select the connection type
Connection Type
Please select network connection type.
WPS(Push button)
Search for access point
■[WPS(Push button)]
![]()
![]()
![]()
![]() select
select ![]()
![]() confirm
confirm
![]()
![]() select
select ![]()
![]() confirm
confirm
●If your access point supports WPS (Push button), then select this option. If not, select [Search for access point].
OPT
WPS(Push button)
1)Pleasepresspressthethe‘WPS’‘WPS’buttonbuttontheon theaccessaccess point until its lightt flashes. .
2)Whenthelightisisflashingselectselect‘Connect’‘Connect’ on TV..
If youareunsure,pleasecheckcheckthetheinstruction manualoftheacaccesspointpoint. .
Connect
■[Search for access point]
Press the WPS button on the access point until the light flashes. And then, press the OK button to connect the Wireless LAN Adaptor and the access point.
●Ensure that your access point supports WPS for this method.
●WPS:
Access points found automatically are listed.
Available Access Points | 1 Select your desired access point |
| |||
No. | SSID | Wireless type Encrypt Reception | Y | ||
2 | Access Point B | 11n(5GHz) | select |
| |
1 | Access Point A | 11n(2.4GHz) |
| ●To search access points again | |
3 | Access Point C | 11n(5GHz) |
|
| |
|
|
| access | ●For the information of the INFO |
|
|
|
| highlighted access point |
| |
|
|
|
|
| |
Encryption Key Setting |
| 2 Access the encryption key input mode |
| ||
Connection will be made with the following settings:-
SSID : Access Point A
Authentication type :
Encryption type : TKIP
Ot
H
Please input the encryption key.
Encryption key
Access Point Settings
Encryption key
A | B | C | D | E | F | G | H | I | J | K | L | M | N | O | P | Q | R | S | T |
U | V | W | X | Y | Z |
| 0 | 1 | 2 | 3 | 4 | 5 | 6 | 7 | 8 | 9 | ! | : | # |
a | b | c | d | e | f | g | h | i | j | k | l | m | n | o | p | q | r | s | t |
u | v | w | x | y | z | ( | ) | + | - | . | * | _ |
|
|
|
|
|
|
|
Access Point Settings
Encryption key is set to:-
XXXXXXXX
Select ‘Yes’ to confirm.
Select ‘No’ to change.
●If the selected access point is not encrypted, the confirmation screen will be displayed. It is recommended to select the encrypted access point.
3 Enter the encryption key of the access point (Set characters one by one)
![]()
![]() selectRETURN
selectRETURN
![]() Store
Store ![]() set
set
●You can also set the characters by using the numeric buttons.
4 Select [Yes]
![]()
![]()
![]()
![]() select
select ![]()
![]() set
set
●To
Fre
HO
![]() O
O
Tu
1D m
M
YesNo
Wireless LAN connection setup is completed
●If failed, check the encryption key, settings or positions of your access point. ![]() Read the manual of the access point.
Read the manual of the access point.
●If connection to the access point is successful, we recommend you perform the [Connection Test] (p. 49).
16
2/16/2012 5:21:31 PM
