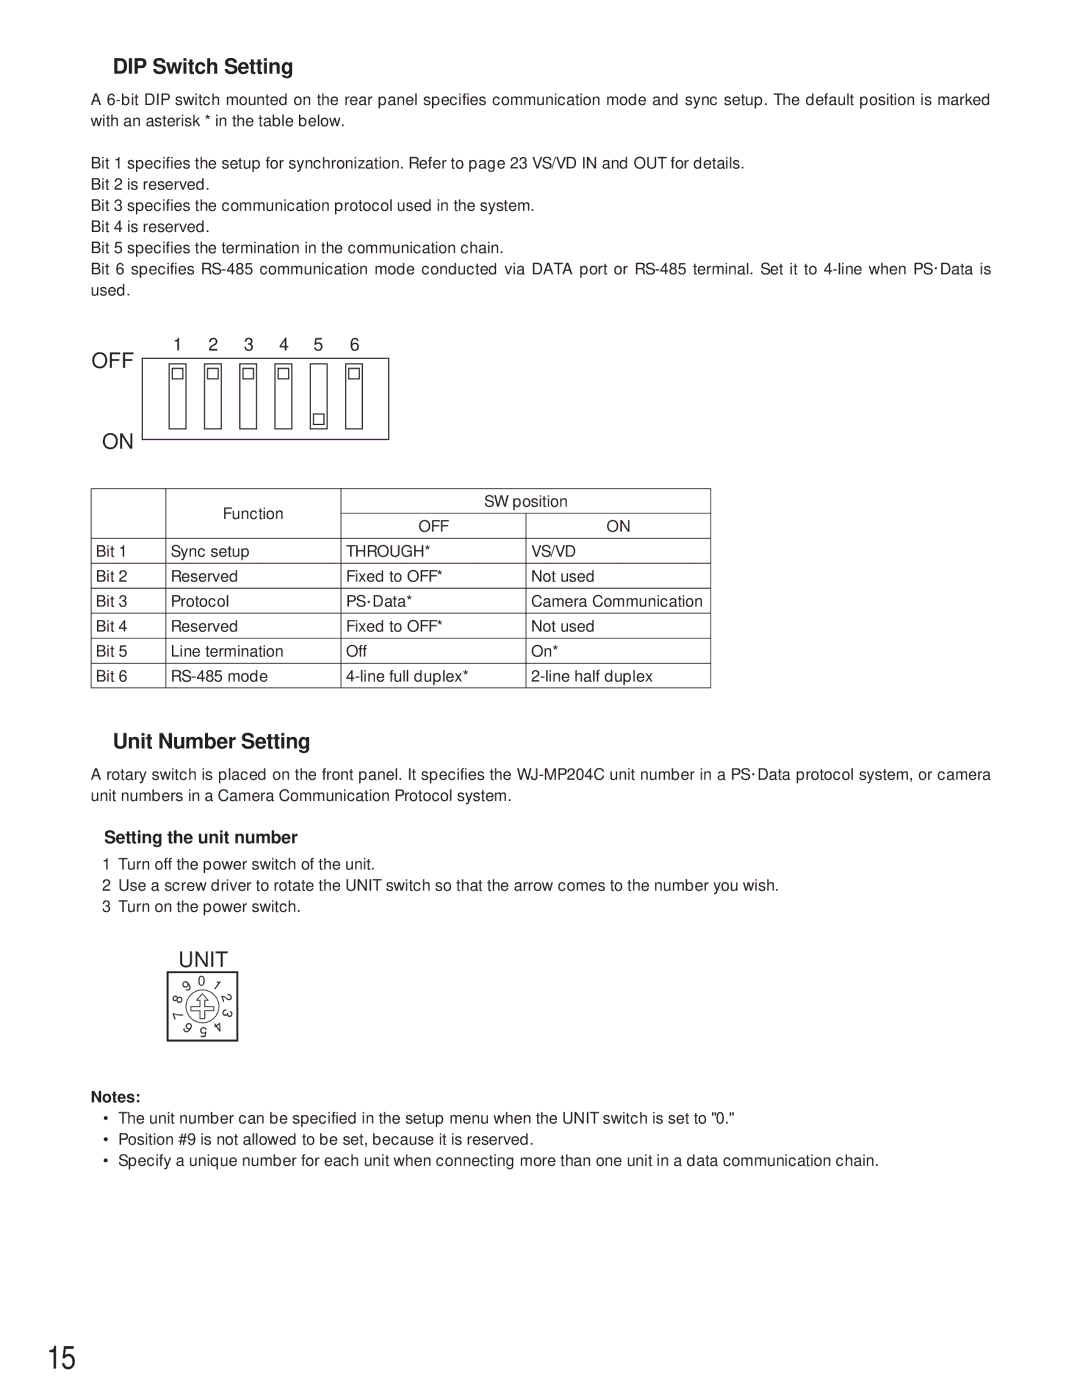
●DIP Switch Setting
A
Bit 1 specifies the setup for synchronization. Refer to page 23 VS/VD IN and OUT for details. Bit 2 is reserved.
Bit 3 specifies the communication protocol used in the system. Bit 4 is reserved.
Bit 5 specifies the termination in the communication chain.
Bit 6 specifies
OFF | 1 | 2 |
| 3 |
| 4 | 5 | 6 |
|
|
|
| |||||
|
|
|
|
|
|
|
|
|
|
|
|
|
|
|
|
| |
ON |
|
|
|
|
|
|
|
|
|
|
|
|
|
|
|
|
|
|
|
|
|
|
|
|
|
|
|
|
|
|
|
|
|
| |
|
|
|
|
|
|
|
|
|
|
|
|
|
|
|
|
| |
|
|
|
|
|
|
|
|
|
|
|
|
|
|
|
|
|
|
|
|
|
|
| Function |
|
|
|
|
|
|
| SW position | ||||
|
|
|
|
|
|
|
|
|
|
|
|
|
| ||||
|
|
|
|
|
|
|
|
|
|
| OFF |
| ON | ||||
|
|
|
|
|
|
|
|
|
|
|
|
|
|
|
| ||
|
|
|
|
|
|
|
|
|
|
| |||||||
Bit 1 |
| Sync setup |
|
|
|
|
| THROUGH* |
| VS/VD | |||||||
|
|
|
|
|
|
|
|
|
|
|
|
| |||||
Bit 2 |
| Reserved |
|
|
|
|
|
|
| Fixed to OFF* |
| Not used | |||||
|
|
|
|
|
|
|
|
|
|
|
|
| |||||
Bit 3 |
| Protocol |
|
|
|
|
|
|
| PS • Data* |
| Camera Communication | |||||
|
|
|
|
|
|
|
|
|
|
|
|
| |||||
Bit 4 |
| Reserved |
|
|
|
|
|
|
| Fixed to OFF* |
| Not used | |||||
|
|
|
|
|
|
|
|
|
| ||||||||
Bit 5 |
| Line termination |
|
|
|
| Off |
| On* | ||||||||
|
|
|
|
|
|
|
|
|
|
| |||||||
Bit 6 |
|
|
|
|
|
|
| ||||||||||
|
|
|
|
|
|
|
|
|
|
|
|
|
|
|
|
|
|
●Unit Number Setting
A rotary switch is placed on the front panel. It specifies the
8Setting the unit number
1Turn off the power switch of the unit.
2Use a screw driver to rotate the UNIT switch so that the arrow comes to the number you wish.
3Turn on the power switch.
UNIT
9
8 7
6
0 | 1 |
| 2 |
| 3 |
5 | 4 |
|
Notes:
•The unit number can be specified in the setup menu when the UNIT switch is set to "0."
•Position #9 is not allowed to be set, because it is reserved.
•Specify a unique number for each unit when connecting more than one unit in a data communication chain.
15
