Transmission Via Networks
International Tel 1-559/292-1981 Fax 1-559/348-1120
D E N D U M
Contents
Typical Session Command Reference
Connection Scenario
List of Illustrations
List of Tables
Unpacking Instructions
Important Safeguards and Warnings
Transmitter
Instructions for the Network Administrator
Minimum Requirements
Browser
HOW do LANs and WANs WORK?
What is the Pelconet NET104A Transmission SYSTEM?
Remember that the IP address must be unique on the network
Description
Overview
Software Version
Package Contents
Models
Front Panel LEDs
Front Panel LEDs
Rear Panel Connectors
Rear Panel Connectors
Connecting a Camera or Monitor
Quick Installation Guide
Connecting to the LAN Port
Connecting Additional Items
Connect any additional items, such as alarms, audio, etc
Key = Transmitter = AC power plug adapter
Connecting Power
Selecting AN IP Address for Your Network
What is NEXT?
Displaying Remote Video on a WEB Browser
Typical Applications
PelcoNet NET104A Home
Displaying Video VIA a TRANSMITTER-TO-RECEIVER Connection
Following explains a box-to-box connection
LAN Box-To-Box Connection Transmitter, Receiver, Spectra
Diagrams of Typical Applications
LAN Browser-To-Box Connection Transmitter, Browser, Spectra
Video Browser Data Genex Spectra
WAN Box-To-Box Connection Transmitter, Receiver, Spectra
WAN Browser-To-Box Connection Transmitter, Browser, Spectra
Video Data Genex Browser Spectra
Up to four video sources can be connected to the NET104A
Hardware Installation
Connecting Video Sources or Displays
Connecting Audio Equipment
Use As Control Terminal Port
Connecting Data Terminals
Use As Transparent Data Port
Data Port Pin Assignments In RS-232 Mode
Push the terminal block back on to the plug-in base
Connecting External Sensors
NET 104A
Highlight Accessories. Click HyperTerminal
Configuration
Connecting to a LAN
Configuration Using a Terminal Program
Set the gateway IP address a set the alarm IP
Connect to alarm IP
Typical Session
PelcoNet disconnects
Command Reference
PelcoNet tries to call the alarm IP host
Cmd Description
Display version information
Closes the connection from the connecting IP address
Toggles the Dhcp Dynamic Host Configuration Protocol on/off
Display the unitÕs MAC address
Web Server Concept
Configuration Using a WEB Browser
NET-Manager
PelcoNet NET104A Menu Tree
Quick Guide To The Menu Structure
PelcoNet NET104A Home
C2900M-B 1/03
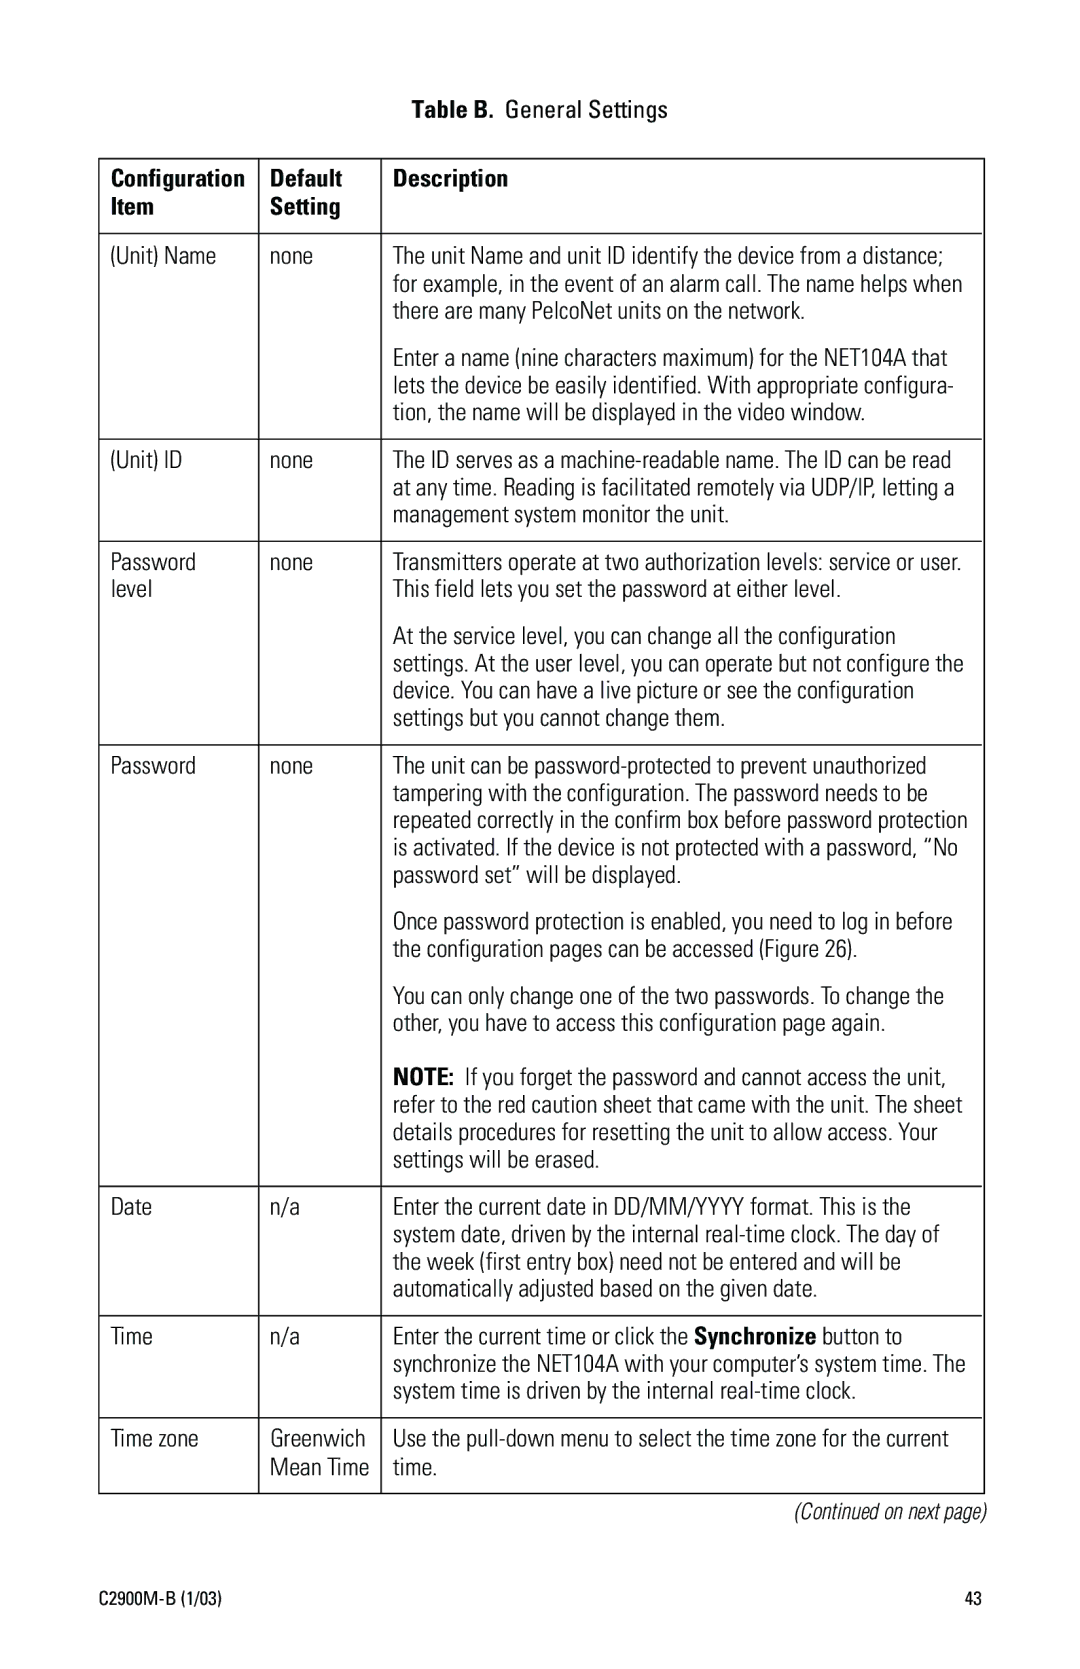
General Settings Configuration
General Configuration
Default Description Setting
Equipment on your network
Update
Upload the firmware and install it on the system
0.0
Screen For Entering The Password
Network Settings Configuration
Base Port 25000
Five simultaneous live video connections Enable Off
Video port Video when using the multicasting protocol
Off
Video Settings Configuration
Video Settings Configuration
Configuration Default Setting Description
1000
Adjusted value
Video Priority ActiveX
Example, the Internet
Time stamping Off
IP address Images will be stored Login name
Password
Partially obscure Time Stamping
Audio Settings Configuration
Audio Settings Configuration
Default Setting Description
Alarm Settings Configuration
Alarm Settings Configuration
Select on to trigger an alarm in the event
Video alarm Off
Triggers the alarm
Motion alarm Off
Alarms
Required to trigger an alarm
Motion detection triggers an alarm
Alarm indicator box lets you set a
Enable all other alarms
Alarm input Off
Alarm input
Master Alarm Off
Live video 0.0
Live video in case of an alarm
Connect
Relay output can open the door remotely
¥ Remote input pin Triggering by switching
Bistable Select an operating mode for each relay
Switched on at the end of the alarm
¥ Motion alarm Triggering by motion alarm
Interface Settings Configuration
Interface Settings Configuration
Baudrate 19200
Com ports Terminal
To program the unit through HyperTerminal
HyperTerminal
ActiveX Dialog Box
Live Video and Server Push Video Pages
Click Control to access the Device Controls
Accessing These Pages
WEB Browser Control Pages
Controlling the Display
Matrix Control Live VIDEO/SERVER Push page Contents
Genex Live VIDEO/SERVER Push page Contents
C2900M-B 1/03
Spectra Live VIDEO/SERVER Push page Contents
Esprit Live VIDEO/SERVER Push page Contents
Automatic Connection Feature
Advanced Features
Video Motion Detection Feature
Record and Play Back the Display on a PC
Alarm Notification by E-MAIL
Clicking the button
Recording The Display
Playing Back The Recording
Click a or button. Click the button to resume playback
Firmware Upload
Green Power LED
Troubleshooting
Basic Functioning
Input LEDs
Ethernet LEDs
Com LED
Output LEDs
Video LEDs
Troubleshooting a TCP/IP Network Using a Ping Utility
Terminal Program
Troubleshooting the Video Connection
Troubleshooting Connection Problems
Test Between NET104A And NET101R-A
Testing the Audio Connection
Test Between NET104A And PC
Specifications
41 to 104F 5 to 40C
Storage Temperature 4to 140F -20to 60C Storage Humidity
Dimensions
LED Displays
Glossary
IP Address
Internet Service Provider
MAC Address Media Access Control/hardware address
See Internet Protocol
See Wide Area Network
Unshielded Twisted Pair
Wide Area Network
Appendix a Connecting Pelconet NET104A to Various Components
Refer to and the instructions that follow
Connection Scenario
C2900M-B 1/03
KBD4000 Connected to a Multiplexer
Refer to and the instructions that follow
C2900M-B 1/03
CM9760KBD Connected to a CM9760-CC1 Controller
C2900M-B 1/03
Create a cable using the above diagram
Connecting PelcoNet to Genex Using the COM in RS-232 Port
Using PelcoNet with CM9505 to Provide Remote Control
Connecting a Pelconet Receiver to a System CM9502
Using PelcoNet with CM9502 to Provide
Connecting Pelconet to a CM9502 Ascii Serial Port
C2900M-B 1/03
CM6700-MXB
Connecting Pelconet to a CM6700 Ascii Port
Pelconet CM9760-DT Setup
Using PelcoNet to Transmit Data and Video Between 9760 Nodes
Using PelcoNet to Receive Data and Video Between 9760 Nodes
Pelco recommends using Port
¥ Port 2 defaults to Ascii and RS-232
Pelconet CM6800 Ascii Setup
Using PelcoNet with CM6800 to Provide Remote Control
Menu Screen
Manager Screen
102 C2900M-B 1/03
Setup
To Provide Remote Control
Part
What software does PelcoNet require?
What TCP/IP ports does PelcoNet use?
Can I view PelcoNet over the Internet?
Can I enlarge the picture size in the browser?
106 C2900M-B 1/03
How much bandwidth does PelcoNet use?
How do I program PelcoNet with HyperTerminal?
Can I use PelcoNet with a DSL or cable connection?
Index
Idle state 59 Input level
IP address set command 35 IP address setting
Select area 55 Send email
Version numbers for hardware/software 42 Video alarm
Video quality 49 Video resolution
Video bandwidth ActiveX 50 Video priority
Warranty and Return Information
ISO9001