Operating Manual
Digital Camera
Thank you for buying the Pentax Optio S4 Digital Camera
Regarding copyrights
Regarding trademarks
FOR SAFE USE OF YOUR CAMERA
not heeded
may experience minor or middling difficulties or
physical difficulties if the warnings are not heeded
Care to be Taken During Handling
To users of this camera
Contents
Powering the Camera
Installing the SD Memory Card / MultiMediaCard
Initial Settings
Recording and Playback
Playback/Erasing/Editing
Adjusting the Color Balance according to Lighting
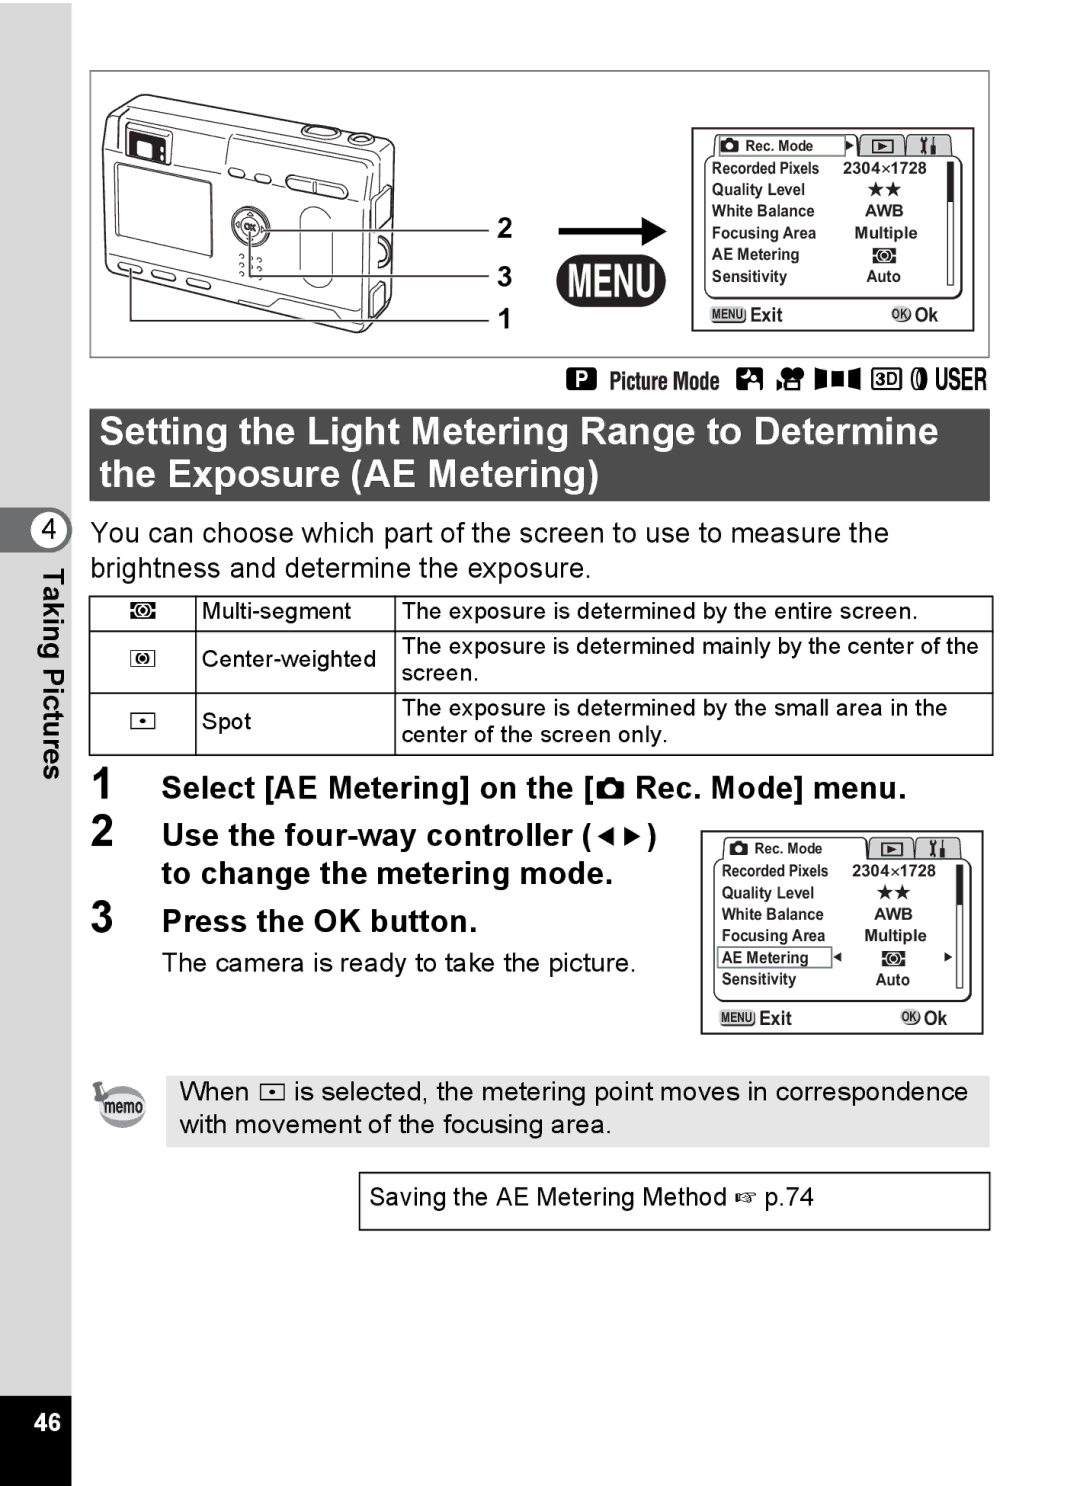
Setting the Light Metering Range to Determine the Exposure
Settings
Appendix
Setting the Alarm
Troubleshooting
Contents of the Operating Manual
7 Settings
This operating manual contains the following chapters
1 Getting Started
Checking the Contents of the Package
∗Type of AC plug cord
Names of Parts
Front
Back
Names of Operating Parts
Guide indications
Attaching the Strap
Getting Started
Powering the Camera
Charging the Battery
1 Connect the AC plug cord to the battery charger
2 Plug the AC plug cord into the power outlet
Installing the Battery
3 Close the battery/card cover
Approximate Operating Time when the D-LI8 battery is fully charged
Battery Level Indicator
Approx. 110 min
Getting Started
Using the AC Adapter optional
1 Make sure that the camera is turned off and open the terminal cover
1 Open the battery/card cover
Installing the SD Memory Card / MultiMediaCard
3 Close the battery/card cover
Data Backup
Precautions When Using a SD Memory Card / MultiMediaCard
Initial Settings
Setting the Display Language
Turn the camera on
Use the four-way controller 45 to select the display language
Setting the Home Town
Setting the D.S.T. Mode
The screen for setting the D.S.T will be
You can change the setting after it has been made. Refer to
Setting the Date and Time
Use the four-way controller
to change the month
to change the day and press the
The camera is ready to take a picture
1 Press the power switch
For the simplest procedure to take still pictures
Taking Still Pictures
Quick Start
Using the Shutter Release Button
3 Press the shutter release button
Press halfway
1. Autofocus frame
Playing Back Still Pictures
Playing Back Images
Playing Back Previous or Next Images
Rotating a Displayed Image
Deleting a Displayed Image
How to View the Recorded Images
Viewing Images on the Camera
Viewing Images on a TV
Quick Start
Printing images by a printing service
Viewing Images on a PC
Playback Only Mode
Voice Recorder Mode
The power switch is illuminated by a green light
Turning the Camera On and Off
Using the Button Functions
Capture Mode
1 b button
2 qsz button
Playback Mode
1 i button
2 Z button
Zoom/f/y button
1 Shutter release button
2 Four-way controller
Voice Recorder Mode
Playback button
Setting the Menus
How to Set the Menus
4 Use the four-way controller 45 to change the setting
1 Press the MENU button
Example of menu operation
MENU button
ARec. Mode Menu
B Setup Menu
A Rec. Mode Menu
···Adjustable × ···Any changes made are invalid
Menu List
Q Playback Menu
B Set-up Menu
Setting the Shooting Functions
Changing the Mode
Capture mode
Move the icon for the desired mode
Selecting the Focus Mode
Press the q s or z button in Capture mode
Focus Mode
In Focusing area mode, press the four-way controller
Changing the Focusing Point
2345 to move the autofocus area
Press the shutter release button
Selecting the Flash Mode
1 Press the b button in Capture mode
Displaying Shooting Information in Capture Mode
Display On
Histogram Display
Display Off
Select Recorded Pixels on the A Rec. Mode menu
Selecting the Recorded Pixels
Use the four-way controller
to change the size
Select Quality Level on the A Rec. Mode menu
The recorded pixels setting also changes the picture volume
Selecting the Quality Levels
Use the four-way controller
Adjusting the Color Balance according to Lighting White Balance
Select White Balance on the A Rec. Mode menu
to select the setting
Press the four-way controller
Manual Setting
Select K manual on the White
Balance screen
Point your camera at a blank sheet
Changing the AF Area Focusing Area
Select Focusing Area on the A Rec. Mode menu
to change the setting
You can change the autofocus area
Select AE Metering on the A Rec. Mode menu
to change the metering mode
Use the four-way controller
Press the OK button
Setting the Sensitivity
Select Sensitivity on the A Rec. Mode menu
Use the four-way controller
to select the sensitivity
Setting the Instant Review time Instant Review
Select Instant Review on the A Rec. Mode menu
Use the four-way controller 45 to select the display time
You can choose the Instant Review time from 0.5sec., 1sec., 2sec
Setting the Image Sharpness Sharpness
Select Sharpness on the A Rec. Mode menu
to change the setting from
Normal to Hard + or Soft
Setting the Color Saturation Saturation
Select Saturation on the A Rec. Mode menu
You can set the color saturation
to change the setting from
Setting the Image Contrast Contrast
Select Contrast on the A Rec. Mode menu
You can set the image contrast
Pictures
Select EV Compensation on the A Rec. Mode menu
EV Compensation
You can take pictures that are intentionally over-exposed or under
4 exposed
Setting the Functions Program Mode
1 Press the four-way controller 3 in Capture Mode
Taking Pictures
Set the functions you want to use
Press the four-way controller 3 in Capture Mode
display the Picture mode H at the
select the desired mode
mode at the top of the dial
Taking Pictures of Dark Scenes Night-Scene Mode
1 Press the four-way controller 3 in Capture mode
Press the OK button
Press the shutter release button
Taking Movie Pictures Movie Picture Mode
Press the four-way controller 3 in Capture mode
Picture mode C at the top of the dial
This mode enables you to take moving images and sound
Keeping the shutter release button pressed
Taking Panorama Pictures Panorama Assist Mode
mode F at the top of the dial
2 Use the four-way controller
to display the Panorama Assist
Take the first picture
Move the camera to the right and
take the second picture
Press the OK button
Taking Pictures with Digital Filters Digital Filter Mode
6 Press the shutter release button
Color Filters
Slim Filter
Setting the slim filter
Use the four-way controller 45 to set the slimness
The camera returns to digital filter mode
The digital zoom cannot be used when the slim filter is selected
Using Preset Function Settings User Mode
Press the OK button Press the shutter release button
Press the four-way controller 3 in Capture mode
Taking
Taking Stereo Pictures 3D Image Mode
Press the four-way controller 23 to select 3D Mode
5 Press the four-way controller 3 in Capture Mode
Select the viewing mode
Take the first image
Move the camera to the right
without changing your stance
Take the second image
How to Assemble the 3D Image Viewer
How to view 3D pictures using the 3D image viewer
Example of a 3D Picture
4 TakingPictures
Continuous Shooting Continuous Shooting Mode
button to display j on the LCD
monitor
A BDE
Using the Self-Timer
2 Press the shutter release button
A B C F GDE
Using the Remote Control Unit optional
in Capture mode to display i on
on the remote control unit
You can take pictures using the remote control F optional
Using the Zoom
You can use the zoom to take pictures in Tele or Wide mode
1 Press the Zoom button in Capture
mode
1 Press the MENU button in Capture mode
2 Press the four-way controller 23 to select Digital Zoom
3 Use the four-way controller 45 to select On 4 Press the OK button
Enabling the Digital Zoom Function
1 Press the MENU button in Movie Picture mode
Taking Time-lapse Movie Pictures Fast Fwd Movie
2 Press the four-way controller 3 to select Fast Fwd Movie
Use the four-way controller 45 to
Saving the Settings Memory
Saving the Menu Items Memory
Register Functions in User Mode
Press the MENU button in Capture mode
Functions registered in User mode
to select Memory
Recording Sound Voice Recorder Mode
1 Press the power switch for more than 2 seconds
Recording and Playback
4 To exit Voice Recorder mode, turn the camera off
1 Enter the Voice Recorder Mode and press the Playback button
You can play back the recording you made in Voice Recorder Mode
Playing Back Sound
4 Press the OK button
Setting the Record Voice Memo to Off
1 Enter the playback mode and
Adding a Voice Memo
choose the image to which you
Playing Back Images
Playing Back Still Pictures
Zoom Display
Playback/Erasing/Editing
Playing Back Movie Pictures
4 Press the Playback button
The following operations can be
performed during playback
Displaying shooting information in Playback mode
2 1 3 4
Playback/Erasing/Editing
Display On
Nine Image Display
2 Press w/f on the Zoom button f/ y
3 Press w/f on the Zoom button f/y
2, 3
Slideshow
Select Slideshow with the four
to change the playback interval
1, 3, 4 5
Erasing Images
Erasing a Single Image or Voice Memo
Press the i button
Select Delete with the four-way controller Press the OK button
Select Sound Delete with the four-way controller Press the OK button
Erasing a Voice Memo only
Sound Delete Delete Cancel
Press the i button
1 Enter the Playback mode and press the i button twice
Erasing All Images
Select Delete All with the four-way controller 2. Press the OK button
You can erase all the images and sound at once
1 Enter the Playback mode 2 Press the Z button twice
Protecting Images / sound from Deletion Protect
Press the Z button
Select Protect with the four-way controller Press the OK button
Viewing Images on a TV
1 Open the terminal cover and connect the AV cable
3 Turn the TV and camera on
Setting the Printing Service DPOF
Printing Single Image
2 Press the four-way controller 2 button
Copies
to select the number of prints
then press the four-way controller
to select whether to insert the date or not
The frame will move to Date
1 Enter the Playback mode and press the four-way controller
Printing All Images
Use the four-way controller 45 to select the number of prints
5 Press the four-way controller 45 to select O On or P Off
Editing Images
Changing the Image Size
1 Press the MENU button 2 Press the four-way controller
Press the four-way controller 23 to select Resize
7 Press the four-way controller 45 to select Recorded pixels
8 Press the four-way controller
9 Press the four-way controller 45 to select Quality Level
10 Press the OK button
Trimming Images
3 Press the four-way controller 23 to select Trimming
4 Press the four-way controller
5 Choose the image you want to trim with the four-way controller
Copying Files
Press the MENU button Press the four-way controller
Press the four-way controller 3 to select Copy Image & Sound
5 Select the copying method
Camera Settings
Settings
How to recall the B Set-up menu
Formatting a SD Memory Card / MultiMediaCard and the Built-in memory
Changing the Sound Settings
Select Playback Volume on the Set-up menu
Use the four-way controller 45 to change the volume
Select Start-up Sound on the Set-up menu
Changing the Start-up Screen
1 Select Start-up Screen on the B Set-up menu
2 Press the four-way controller 3 Press the Display button
6 Use the four-way controller 45 to select O On or P Off
Setting the Date Style
Select Date Style on the B Set-up menu
Use the four-way controller 45 to change the date style
7 Settings
Setting the World Time
Changing the Date/Time
1 Select World Time on the B Set-up menu
How to recall the B Set-up menu
3 Switch O and P with the four-way controller
5 Use the four-way controller 45 to select the World
Time city and press the four-way controller
4 Press the four-way controller
Changing the Display Language
Select Language on the B Set-up menu
Use the four-way controller 45 to select the language
How to recall the B Set-up menu
Changing the Video Output Format
Select Video Out on the B Set-up menu
Use the four-way controller 45 to change the video output format
7 Settings
Sleep Timeout
Setting Auto Power Off
1 Select Sleep Timeout on the B Set-up menu
1 Select Auto Power Off on the B Set-up menu
Setting the Quick Delete Function
Setting the Quick Zoom Function
1 Select Quick Delete on the B Set-up menu
1 Select Quick Zoom on the B Set-up menu
1 Select Fn Setting on the B Set-up menu
Registering Functions
Registering a function
Retrieving a function
Resetting to Default Settings Reset
Use the four-way controller 2 to select Reset. Press the OK button
7 Settings
Setting the Alarm
Checking the Alarm
Setting the Alarm
Press the four-way controller 23 to select Alarm
Turning the Alarm Off
to select alarm
7 Press the Display button
9 Press the OK button 10 Press the OK button 3 times
List of City Names
Appendix
Optional Accessories
A number of dedicated accessories are available for this camera
Strap O-ST5 Remote control E Remote control F
Rechargeable lithium-ion battery D-LI8 Battery charger D-BC8
Messages
Deleting
Troubleshooting
Problem
Cause
Remedy
Problem
Cause
Remedy
Subject is not
Main Specifications
Single-frame, 9-frame index, enlargement max. 4´, scroll, slideshow
movie playback, histogram display, image/sound copying, trimming
TTL contrast detection system by sensor 7-point
TTL metering by sensor multi-segment, center
WARRANTY POLICY
Procedure During 12-month Warranty Period
This warranty policy does not affect the customers statutory rights
The CE Mark is a Directive conformity mark of the European Community
For customers in USA STATEMENT OF FCC COMPLIANCE
For customers in Canada
Pour les utilisateurs au Canada
Contact person Customer Service Manager
According to 47CFR, Parts 2 and 15 for
PENTAX U.S.A., Inc
Located at 600 12th Street, Suite 300 Golden, Colorado 80401 U.S.A
PENTAX Europe GmbH European Headquarters
PENTAX Benelux B.V. for Netherlands