DVDR80
Dear Philips product owner
Remember, to get the most from your Philips prod
Card within 10 days. So please mail It to us right now
For Customer Use
Contents
Safety Information
Safety Information cont’d
Example of Antenna Grounding per National Electrical Code
Introduction
Playable Discs
Discs for Recording and Playing
Discs Unsuitable for Recording or Playing
Discs for Playing Only
General Information
Hookups
Determining the best possible connection
Before you begin
Remember
Connecting to a TV Only TV has only an Antenna In jack
Hookups cont’d
Connecting to a TV and a Cable Box or Satellite Receiver
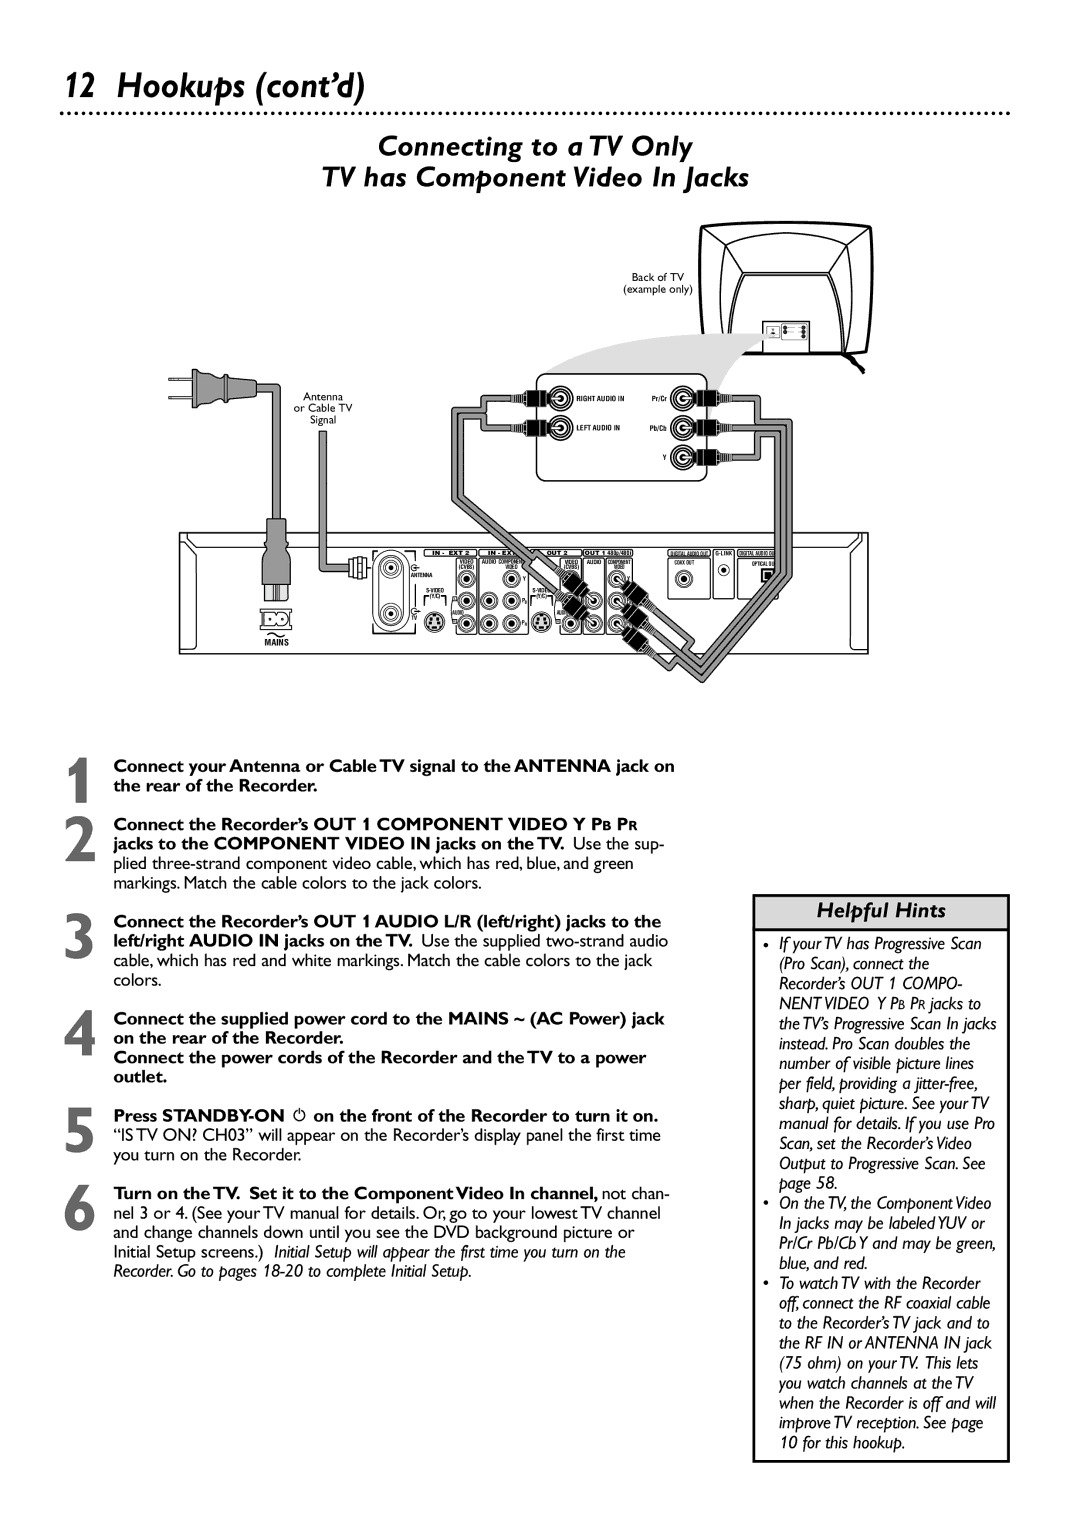
Connecting to a TV Only TV has Component Video In Jacks
Connecting to a TV Only TV has an S-Video In Jack
Connecting to a TV Only TV has a yellow Cvbs Video In jack
Connecting to a TV A Stereo with red/white Audio In jacks
Stereo
DV S-VIDEO Video Audio Left Right
Initial Setup
Instructions continue on the next
Initial Setup cont’d
Helpful Hint
Guide Plus+ System Setup
Press OK to continue
Press Standby y to turn off the Recorder later.
Leave the Cable Box turned on
Quick Recording
Press Monitor to see TV channels through the Recorder
To select an item, then press OK. Continue until you set up
Quick Disc Play
Press OPEN/CLOSE a again to close the tray
Play may start automatically. If not
Title/Disc menus
Chapter/Track Selection
Press Disc Menu during Disc play
Remote Control
Play Mode Button
TV Volume +/- Buttons
Disc Manager Button
Standby y Button
Front Panel
Rear Panel
98 symbols in the Menu Bar mean more items are available
Menu Bars
Menu Bar
On-screen Symbols, Status Box
On-screen Symbols
Status Box
Disc status icons
Timer Information box
Information Boxes
Tuner Information box
Title Settings Menu
Index Picture Screen
Titles
Disc Bar
Clock
Press System MENU. Press to select
Press 9CH- repeatedly to select
Press 9CH- repeatedly to select Time/Date, then press
Channel Programming
One-Touch Recording
To erase a recording, see Erase this title details on
Title or erase the chosen Title from the Disc
Press OK to start Disc play at the Title you selected
Erase this title
Press to return to the Index Picture Screen if necessary
Append recording
Record One Channel/Watch Another
Record Settings
Mode Picture quality Recording time per Disc
Chapter Markers
Recordings and the maximum recording time for a Disc
Editing Disc Information Screen
Editing
This option is not always available
Press FSS $ to remove the menu if necessary
Finalize Disc
Disc Manager
Add current disc
Remove disc
Press Play to close the disc tray and remove the Disc
Disc Manager cont’d
Find title
Browse discs
SETUPReview
Guide Plus+ System cont’d
Change Channel Display
Review Options
Press GUIDE/TV
Listings
Sort
Timer Recordings
Timer Recording Tips
Press Timer X to access the Record screen in the Guide
Plus+ System
Schedule
Messages and Promotions
Audio Language, Subtitles
Audio Language
Subtitles
Zoom, Camera Angle
Zoom
Camera Angle
During DVD play, press the Green Angle Button to Select
Sound, Still Picture
Sound
Still Picture
Press System Menu to remove the Menu Bar
Slow Motion
Searching
Pause k on the remote to pause the picture
Time Search, Scan
Time Search
Scan
Press the Number buttons to enter the time at which you
Repeat, Repeat A-B
Repeat
Repeat A-B
Access Control
Change Code
Twice.This will set your code for the first time
Press System Menu to remove the menu
Child Lock
Locking or Unlocking Specific Discs
Access Control cont’d
Parental Level
Change Country
Enter the four-digit code to play the Disc
See the Status boxes. Choose Off if you do not want to see
Status boxes. See
Picture Settings
Analog Output, Digital Output
Analog Output
Digital Output
Press 9CH- repeatedly to select G, then press
Language Settings
SAP
Night Mode
Remote Control Used
Auto Resume, Playback Control
Auto Resume
Playback Control
Glossary
Helpful Hints
Helpful Hints contd
Diagnostic Test, Specifications
Diagnostic Test
Specifications
Renewed
Information Index
Component video
24-25
Video cvbs

![]() PB
PB![]() PR
PR