Part Names and Functions
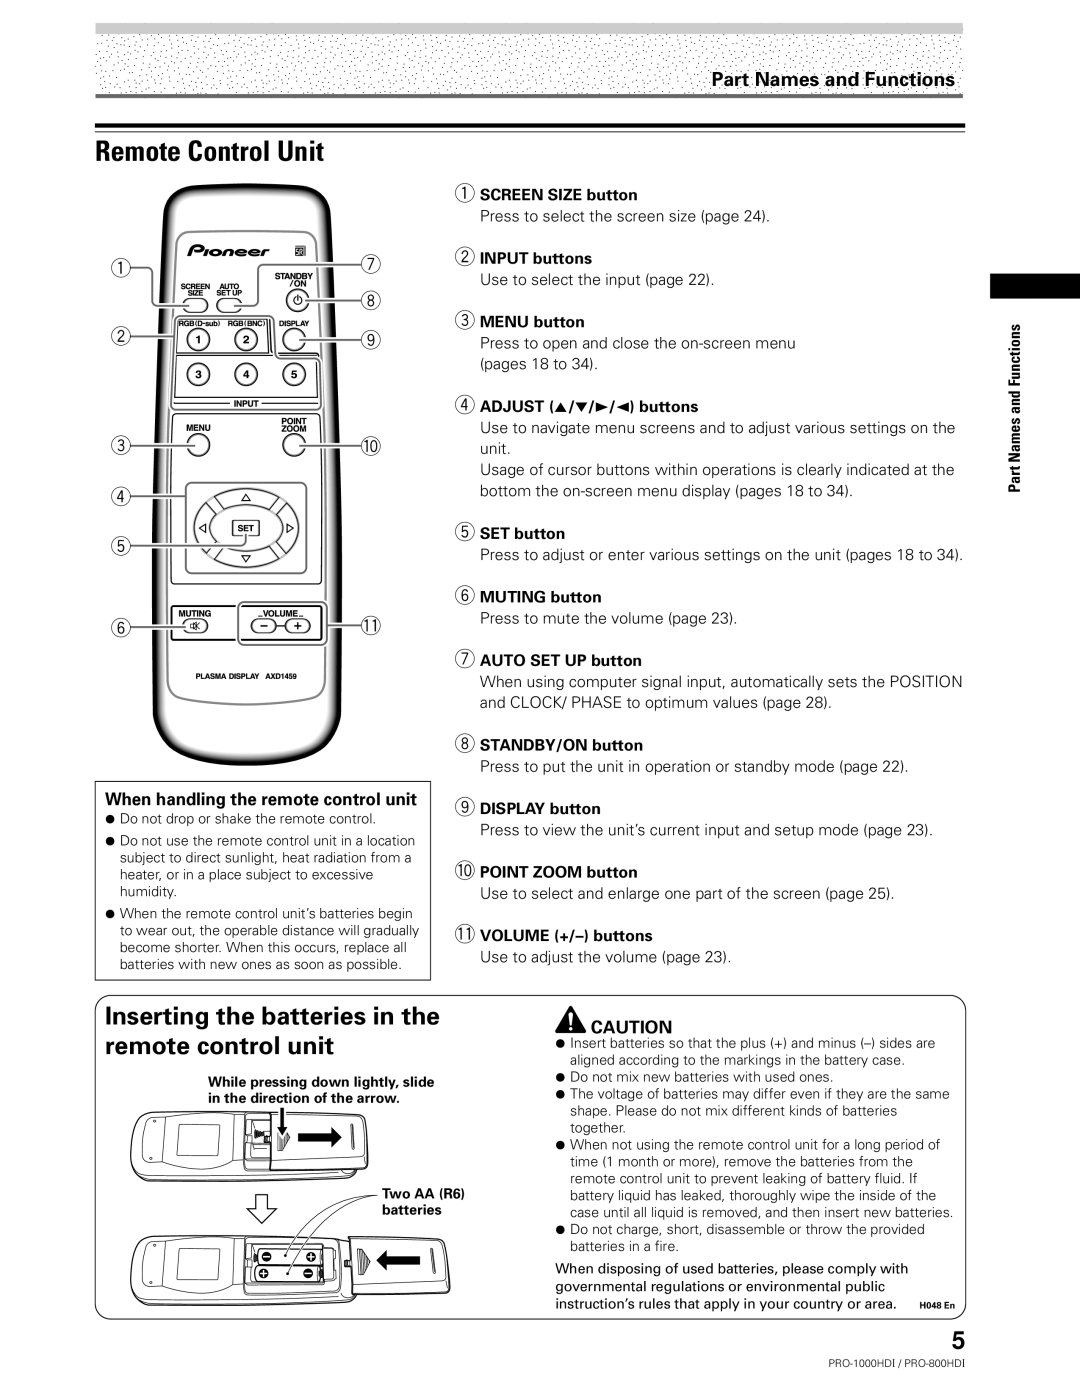
Remote Control Unit
1SCREEN SIZE button
Press to select the screen size (page 24).
1 |
|
|
|
| 7 | 2 INPUT buttons | ||
|
|
|
| Use to select the input (page 22). | ||||
|
|
|
|
|
|
|
| |
2 |
|
|
|
|
|
| 8 | 3 MENU button |
|
|
|
|
|
| |||
|
|
|
|
| 9 | |||
|
|
|
|
| ||||
|
|
|
|
| ||||
|
|
|
|
| Press to open and close the | |||
|
|
|
|
| ||||
|
|
|
|
|
|
|
| (pages 18 to 34). |
|
|
|
|
|
|
|
| 4 ADJUST (5/∞/3/2) buttons |
|
|
|
|
|
|
|
| |
|
|
|
|
|
|
|
| |
3 |
|
|
|
| 0 | Use to navigate menu screens and to adjust various settings on the | ||
|
|
|
| |||||
|
|
|
| |||||
|
|
|
| unit. | ||||
| Usage of cursor buttons within operations is clearly indicated at the | |
4 | bottom the | |
| ||
5 | 5 SET button | |
Press to adjust or enter various settings on the unit (pages 18 to 34). | ||
|
6MUTING button
6 | - | Press to mute the volume (page 23). |
|
7AUTO SET UP button
When using computer signal input, automatically sets the POSITION and CLOCK/ PHASE to optimum values (page 28).
| 8 STANDBY/ON button | |
| Press to put the unit in operation or standby mode (page 22). | |
When handling the remote control unit | 9 DISPLAY button | |
¶ Do not drop or shake the remote control. | Press to view the unit’s current input and setup mode (page 23). | |
¶ Do not use the remote control unit in a location | ||
| ||
subject to direct sunlight, heat radiation from a | 0 POINT ZOOM button | |
heater, or in a place subject to excessive | ||
humidity. | Use to select and enlarge one part of the screen (page 25). | |
¶ When the remote control unit’s batteries begin |
| |
to wear out, the operable distance will gradually | - VOLUME | |
become shorter. When this occurs, replace all | Use to adjust the volume (page 23). | |
batteries with new ones as soon as possible. | ||
|
Inserting the batteries in the | CAUTION | |
remote control unit | ||
¶ Insert batteries so that the plus (+) and minus | ||
| ||
| aligned according to the markings in the battery case. | |
While pressing down lightly, slide | ¶ Do not mix new batteries with used ones. | |
¶ The voltage of batteries may differ even if they are the same | ||
in the direction of the arrow. | ||
| shape. Please do not mix different kinds of batteries | |
| together. | |
| ¶ When not using the remote control unit for a long period of | |
| time (1 month or more), remove the batteries from the | |
Two AA (R6) | remote control unit to prevent leaking of battery fluid. If | |
battery liquid has leaked, thoroughly wipe the inside of the | ||
batteries | case until all liquid is removed, and then insert new batteries. | |
| ¶ Do not charge, short, disassemble or throw the provided | |
| batteries in a fire. | |
| When disposing of used batteries, please comply with | |
| governmental regulations or environmental public | |
| instruction’s rules that apply in your country or area. H048 En |
5
Part Names and Functions
