8VHU¶V*XLGH
37Œ7RS*XQŒ
3RUWDEOHDWD7HUPLQDOV
959 Terry Street Eugene, Oregon Telephone 541 Fax
PSC Inc
Disclaimer
Preface
CONTENTS
Chapter
User’s Guide
Chapter 4 Programming the PT2000 and TopGun
Chapter 3 Using the PT2000 and TopGun with PALPRO
Contents
PT2000 & TopGun
Transferring Data With PSC Utilities
Appendix F
Programming Parameters
Full Keyboard Support
Appendix J
Appendix
Appendix K Programming Bar Codes
PREFACE CONTENTS
Preface About this Guide
Document Conventions
Style Conventions
Keys and Keystroke Conventions
PT2000TM & TopGunTM
Radio Frequency Interference
Technical Support
PSC Solutions Group
PSC Website Technical Support
Reseller Technical Support
CHAPTER CONTENTS
Introduction & Quick Start Guide
Overview
Getting Started Quickly
before using the portable
Overview
settings in the portable
Themanual contains the following sections
cables or make custom ones
one type of battery with another in the portable
Refer to the Index to find specific topics in this user’s guide
Overview
Getting Started Quickly
9. Then select F3 from the PALPRO Options menu. Refer to
Page
C HAPTER C ONTENTS
About the PT2000 and TopGun
The PT2000
Note Please contact a PSC dealer for more information about
TopGun
PAL or PPG
For complete information about the TopGun module, refer to
The Keypad
Figure 2-1 The TopGun Module
The Keypad Figure 2-2 The PT2000 and TopGun keypads
Data Keys
Function keys Action Data keys Action keys
Action Keys
Function Keys
The Virtual Display
The Display Screen
REC#12 OF
F1=NEXT F2=PRE
F3=REV F4=EXIT
REC#13 OF
Displaying Information about the Portable
The Beeper
PT2000 Vers. 4.0 128k
The PT Dock
The Auto-Off Feature
Getting Started
Using the PT2000 and TopGun with PALPRO
Collecting Data
Reviewing the Collected Data
Attaching an Input Device to the PT2000
Getting Started
Bar Code Scanner Magnetic Stripe Reader
Turning On the Portable
Setting the Time and Date
Current Date 02/01/02 Enter New Date
Current Time 091732 Enter New Time
ENTER CURRENT OR NEW PASSWORD
Setting a Password
F-KEY=SET TIME
PSC PALPRO 081804¤ 03/01/98 F-KEY=CONTINUE
Installing the Keyboard Wedge
Using the Portable as a Keyboard Wedge
Collecting Data
PALPRO OPTIONS F2=SELECT PROG F3=WEDGE F4=PASSWORD¤
Using the Keyboard Wedge
AT or PS/2 models
keyboard IBM 3151 terminal *$+$-D2C015EE
PT2000 WEDGE
Using PALPRO
F5=EXIT
Selecting a PALPRO Application
CHANGE PROMPTS? F3=YES F4=NO¤
F1=ASSET MGMT F2=INV MGMT F3=ITEM TRACKING F4=EXIT¤
Figure 3-10 Selecting a PALPRO application
Figure 3-11 Changing Prompts Menu
ENTER APPL TITLE FIXED ASSETS¤
Changing Program Titles and Prompts
ENTER PROMPT BUILDING ID ¤
ENTER PASSWORD
Switching to Another
ENTER PROMPT ASSET NO.¤
ASSET MGMT¤ F2=COLLECT F3=FILE OPTIONS F5=EXIT
LOCATION ID
ASSET MGMT¤ F2=COLLECT F3=FILE OPTIONS F4=EXIT
To use ASSETPRO, complete the following steps
WH3E F3=REV F4=EXIT
ITEM ID
WH3E,004322 F3=REV F4=EXIT
7. Press the F4 key to return to the first prompt
USE 2 PROMPTS? F3=YES F4=NO¤
Using INVPRO
Using One Prompt
QUANTITY
Using Two Prompts
Using TRACKPRO
ITEM TRACKING¤ F2=COLLECT F3=FILE OPTIONS F5=EXIT
ADD DATE/TIME STAMP? F3=YES F4=NO¤
F1=CHECK IN F2=CHECK OUT F4=EXIT¤
IN MAIN F3=REV F4=EXIT
IN F3=REV F4=EXIT
IN MAIN,P203 F3=REV F4=EXIT
DESCRIPT
00-629-02
F1=DESCRIPT F2=WEDGE F4=EXIT
F-KEY=CONTINUE
F1=COLLECT F2=RECEIVE LISTS F3=FILE OPTIONS F4=EXIT
DESCRIPT 081732 05/01/02
ERASE F2=PICKLIST F3=COLLECT F4=EXIT
FILE NOT EMPTY F2=ERASE F3=APPEND F4=EXIT
RECEIVE LISTS F2=RECEIVE ITEM F3=RECEIVE DESC F4=EXIT
CONNECT FOR REC ITEM LIST F3=CONTINUE F4=EXIT
Using DESCRIPT
RESULTS RECORDS=16 F4=CONTINUE
Note To set a new date or time, see page
3. From the application menu, select F1
ITEM ID 00-693-00 F3=REV F4=EXIT
ENTER DESCRIPT
QUANTITY BCBASICS MANUAL F3=REV F4=EXIT
Note For information about using the application, see page
Using the Modem Feature
INVMODEM
INV W/MODEM F2=COLLECT F3=FILE OPTIONS F4=EXIT
SELECT BAUD RATE F2=2400,N,8,1 F3=9600,N,8,1 F4=EXIT
SEND FILE* F2=SERIAL F3=MODEM F4=EXIT
NUMBER TO DIAL F4=EXIT
FILE OPTIONS* F2=SEND FILE F3=ERASE FILE F4=EXIT
F3=UPLD F4=EXIT
TIMESTMP
UPLOAD COMPLETE F4=EXIT
TIMESTMP key
TIME STAMP F2=COLLECT F3=FILE OPTIONS F4=EXIT
F1=TIME STAMP F2=WEDGE F3=SET TIME F4=EXIT
F1=TIMESTMP F2=WEDGE F3=SET TIME F4=EXIT
Date and Time Setting
CURRENT DATE 05/01/02 ENTER NEW DATE
CURRENT TIME ENTER NEW TIME
Reviewing the Collected Data
If the record includes a quantity, the quantity is given after a
Uploading Data to the Host PC
Serial Configuration
INV MGMT¤ F2=COLLECT F3=FILE OPTIONS F5=EXIT
SEND FILE* F2=SERIAL F3=WEDGE F4=EXIT¤
Keyboard Wedge Configuration
FILE OPTIONS* F2=SEND FILE F3=ERASE FILE F4=EXIT¤
Removing Collected Data from Memory
Figure 3-74 File Options Menu
Figure 3-75 Send File Menu
ERASE FILE F3=ERASE F4=EXIT¤
Turning Off the Portable
Resetting the Portable
Caution Do not use any abrasive cleaners on the display screen
Care and Cleaning
Caution Do not immerse the portable in liquid
Care and Cleaning
Page
CHAPTER CONTENTS
Programming the PT2000 and TopGun
PT2000 and TopGun recognize the following commands at all times
+* */-* *--* *-+* */.* *.-* *.+* *+ $$
Programming the PT2000 and TopGun
PERCPROG
Using Programming Utilities
The Program File window will open refer to Figure
4. Select the desired serial port. Then select OK
5. From the PSC Portable Programmer menu, select File Open
progresses
Using Programming Utilities Figure 4-3 The Program File window
PDPROG
$+$-D0EE* *$+$-D1EE* *$+$-D2EE
Using Predefined Defaults
D0 D1 D2
$+$-0010235EE
Using Bar Codes
Guidelines for Creating Programming Bar Codes
$+$ EE
Using Multiple Bar Codes
$+$-001* *0235EE
Table 4-1 Selected Programming Parameters
General Programming Parameters
3B-3E
$+$-D80EE* *$+$-D81EE* *%-* *% $+$-D90EE* *$+$-D91EE
Setting the Hour Format, Time, and Date
12-Hour Format 24-Hour Format Time Date U.S. Format
International Format
Xmodem Protocol
Serial Parameters
protocol
XModem *$+$-CA02EE
Serial Parameters
Table 4-3 Code 39 and ASCII Equivalents for Serial Characters
Code 39 and ASCII Equivalents for Serial Characters
Character
Code
C HAPTER C ONTENTS
Transferring Data With PSC Utilities
PTFER Windows application. Refer to page
Installing & Setting up PTFER
Using Portable File Transfer Program PTFER
Uploading a File
$+$-C8EE
Note If no success message appears, select a different port
Downloading a File
Changing Settings
Note Refer to the information about the DESCRIPT application on Page
2. To use a different COM port, select it in the Port options group
ptferfilename-/PnBnDnaction
Setting Command Line Options
The port, baud rate, timeout, and action parameters are optional. If using one or more parameters, precede them with a hyphen - or a slash /. Enter parameters either before or after the file name
Note Files must be transferred to or from the current DOS directory
Using PDTFER
Note Copy received data to other applications using the Edit
Using MACTFER
Copy command
$+$-C8EE
Transferring Data With PSC Utilities
Using UPDTFER
h displays help on program usage and options
A PPENDIX C ONTENTS
Programming Parameters
Note For information about programming, refer to Chapter
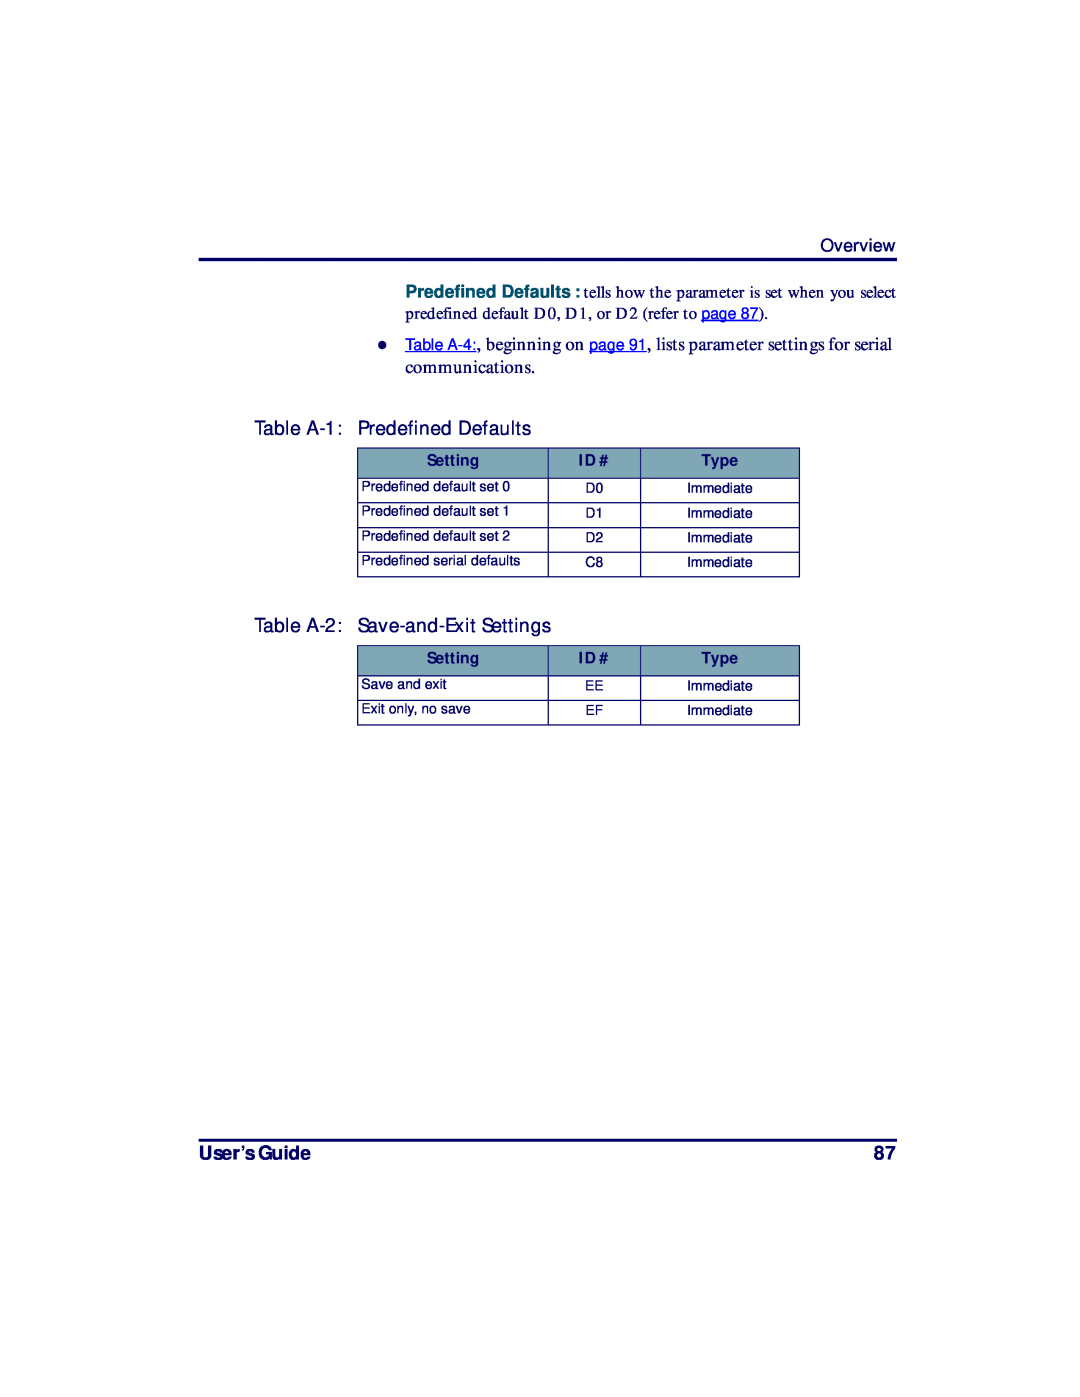
Table A-2 Save-and-Exit Settings
Table A-1 Predefined Defaults
Predefined Defaults tells how the parameter is set when you select
predefined default D0, D1, or D2 refer to page
Enter 1 for On and 0 for Off
Table A-3 General Programming Parameters
Overview
milliseconds
minutes
10-millisecond units
Valid for CA = 00 only
Table A-4 Serial Programming Parameters
Page
APPENDIX CONTENTS
Full Keyboard Support
Ctrl key on downC Ctrl key off up
Note Full ASCII mode for Code 39 must be enabled in the portable
Code
Table B-1 Common Keyboard Keys
Full Keyboard Support
Table B-2 IBM or Compatible PC Keyboard Keys
Page
The TopGun Module
The TopGun Module
Attaching the TopGun Module to the PT2000
Figure C-1 The back of the PT
Figure C-2 Attaching the TopGun module
Attaching the TopGun Module to the PT2000
5. Tighten the screws until the metal plate is secure
Figure C-4 Switching the Direction of theTopGun Module
Changing TopGun to a Left-Handed Model
1. Remove the two screws from the top of the TopGun module
Changing TopGun to a Left-Handed Model
5. Insert and tighten the two screws. Do not over tighten them
4. Replace the top of the module
Laser Specifications and Labeling
Laser Specifications and Labeling
Figure C-5 Product labeling for the TopGun module
Eugene, OR March
Page
C HAPTER C ONTENTS
The PT Dock
Attaching the Dock Adapter to the Portable
About the PT Dock
Setting Up the Dock
Attaching the Dock Adapter to the Portable
Caution Be careful not to overtighten the screws
Figure D-1 The PT2000, PT Dock, and adapter
Setting Up the Dock
Figure D-2 Attaching the adapter
Base of PT2000 or TopGun with keypad side up
Keyboard Wedge Configuration
Configuration
Caution Do not attempt to connect a PT Dock to a PC using an
Attaching the PT Dock to a Computer
Cable input jack
Power input jack
The PT Dock Figure D-4 Sample PSC Keyboard wedge
About the Power Adapter
Maintenance
Using the PT Dock
Recharging the Portable’s Batteries
Page
Batteries
ON K40
Alkaline Batteries
NiCd Battery Pack
NiCd Battery Pack
00-862-00 NiCd BATTERIES
Caution Use only a power adapter supplied by a PSC dealer
Recharging the NiCd Battery Pack
Using another adapter can damage the unit
Storing the NiCd Battery Pack
Lithium Backup Battery
NiCd Battery Pack or Alkaline Batteries
Low Battery Indication
Backup Battery
PLEASE WAIT CHARGING BACKUP BATTERY
Use the PT Dock to recharge the lithium backup battery in the portable. The battery will be recharged while the READY light is on. Make sure the switch in the portable’s battery compartment is in the correct position for the type of batteries being used
Connector Configurations
Connector Configurations
Bar Code & Magnetic Stripe Reader Connector
Figure F-1 Bar Code & Magnetic Stripe Reader Pinouts
Table F-1 Bar Code & Magnetic Stripe Reader Pinouts
Interface Cable Connector
Interface Cable Connector
Figure F-2 Interface Cable Connector Pinouts
Table F-2 Interface Cable Connector Pinouts
Figure F-3 PT Dock Pinouts
PT Dock
Table F-3 PT Dock Pinouts
Pin #13 Pin #25
Programming Bar Codes
Serial defaults
Predefined Defaults
On *$+$-001EE* Off *$+$-000EE
00 *$+$-0100EE 10 *$+$-0110EE 20 *$+$-0120EE 30 *$+$-0130EE
On *$+$-041EE
On *$+$-031EE
On *$+$-051EE
On *$+$-061EE
On *$+$-081EE* Off *$+$-080EE
On *$+$-071EE* Off *$+$-070EE
2 *$+$-0902EE 6 *$+$-0906EE 10 *$+$-0910EE 20 *$+$-0920EE
$+$-0930EE* *$+$-0940EE* *$+$-0950EE* *$+$-0960EE
2 *$+$-09020A02EE 4 *$+$-09040A04EE 6 *$+$-09060A06EE
10 *$+$-0A10EE 20 *$+$-0A20EE 30 *$+$-0A30EE
8 *$+$-09080A08EE 10 *$+$-09100A10EE
$+$-0A40EE* *$+$-0A50EE* *$+$-0A60EE
On *$+$-0C1EE* Off
On *$+$-0B1EE* Off
On *$+$-0D1EE* Off
On *$+$-201EE* Off *$+$-200EE
$+$-230EE
On *$+$-231EE
04 *$+$-2104EE 10 *$+$-2110EE 20 *$+$-2120EE 30 *$+$-2130EE
10 *$+$-2210EE 20 *$+$-2220EE 30 *$+$-2230EE
On *$+$-2C1EE* Off *$+$-2C0EE
On *$+$-241EE* Off *$+$-240EE
2 *$+$-2D02EE 10 *$+$-2D10EE 20 *$+$-2D20EE
$+$-2D30EE* *$+$-2D40EE* *$+$-2D50EE
On *$+$-301EE* Off *$+$-300EE
2 *$+$-2E02EE 10 *$+$-2E10EE 20 *$+$-2E20EE
On *$+$-311EE* Off
On *$+$-321EE* Off
On *$+$-341EE
On *$+$-331EE* Off *$+$-330EE
On *$+$-351EE
On *$+$-361EE
On *$+$-3A1EE* Off
On *$+$-391EE* Off
On *$+$-3B1EE* Off
On *$+$-3F1EE* Off
On *$+$-3D1EE* Off
On *$+$-3C1EE* Off
On *$+$-3E1EE* Off
On *$+$-401EE* Off *$+$-400EE
On *$+$-431EE
10 *$+$-4110EE 20 *$+$-4120EE 30 *$+$-4130EE
$+$-430EE
2 *$+$-4102EE
Off *$+$-B200EE
On *$+$-B01EE
10 *$+$-B210EE
$+$-B00EE
Low *$+$-B800EE* Medium
On *$+$-B51EE* Off
Medium *$+$-B802EE* High
$+$-B50EE
On *$+$-DD1EE* Off
Low *$+$-BD01EE* High Medium *$+$-BD04EE
$+$-BD07EE $+$-DD0EE
$+$-BC08EE* *$+$-BC09EE* *$+$-BC00EE
300 *$+$-C100EE 600 *$+$-C101EE
$+$-D81EE $+$-D91EE
$+$-C015EE
$+$-C011EE
None *$+$-C300EE* Even Odd *$+$-C303EE
7 *$+$-C207EE
1 *$+$-C401EE
On *$+$-C51EE* Off
$+$-C602EE
0 *$+$-CD00EE 10 *$+$-CD10EE 25 *$+$-CD25EE
$+$-CA02EE* *$+$-CA01EE $+$-CD50EE* *$+$-CD75EE* *$+$-CD99EE
None
Page
INDEX
Index
reviewing
collecting
Index
see programming parameters
serial configuration
keyboard wedge configuration
default communications settings
see also file transfer, utilities for predefined defaults
see ASSETPRO
4-66, A
4-66 , A
updtfer 5-72, 5-83 to
PSC Inc. hereby declares that the equipment specified below
DECLARATION OF CONFORMITY
Italy
Asia Pacific
Australia
Japan