1822-I Pipe and Bolt Threading Machine

Depress and hold the foot switch. Inspect the mov- ing parts for misalignment, binding, odd noises or any other unusual conditions that may affect the safe and normal operation of the machine. If such conditions are present, have the machine serviced.

Flip the control switch to OPEN. Press and release the foot switch. Check that the Threading Machine rotates in a clockwise direction as you are facing the chuck.

Release the foot switch and flip the control switch to OFF.

Operation Using Machine-Mounted Tools

WARNING

Do not wear gloves or loose clothing when oper- ating Threading Machine. Keep sleeves and jack- ets buttoned. Do not reach across the machine, pipe, or inside chuck openings.

Do not use this Threading Machine if the foot switch is broken or missing. Always wear eye protection to protect eyes from dirt and other foreign objects.

Keep hands away from rotating pipe and fittings. Stop the machine before wiping pipe threads or screwing on fittings. Allow the machine to come to a complete stop before touching the pipe.

Do not use this machine to “make-on” or “break off” fittings. This practice is not an intended use of this Threading Machine.

Installing and Chucking Pipe In Threading Machine:

1.Check to insure the cutter, reamer and die head are in the UP position.

2.Mark the pipe at the desired length if it is being cut to length.

3.Place speed selector in 45 RPM position.

4.Insert the pipe into the Threading Machine so that the end to be worked or the cutting mark is located a suf- ficient distance to complete desired operation.

5.Insert workpieces less than 2 feet long from the front of the machine. Insert longer pipes through either end so that the longer section extends out the rear of the Threading Machine.

WARNING To avoid equipment tip-overs, position the pipe supports under the workpiece.

6.Place the control switch in the CLOSE position and step on machine’s foot switch. The machine will au- tomatically center and grip the pipe or bolt stock.

NOTE! If pipe is chucked off-center, run the machine in the OPEN switch position to release pipe and rechuck. Slight off-center chucking can be cor- rected with a normal ream or cut-off operation.

Cutting Pipe with No. 364 Cutter

1.Swing reamer and die head to UP position.

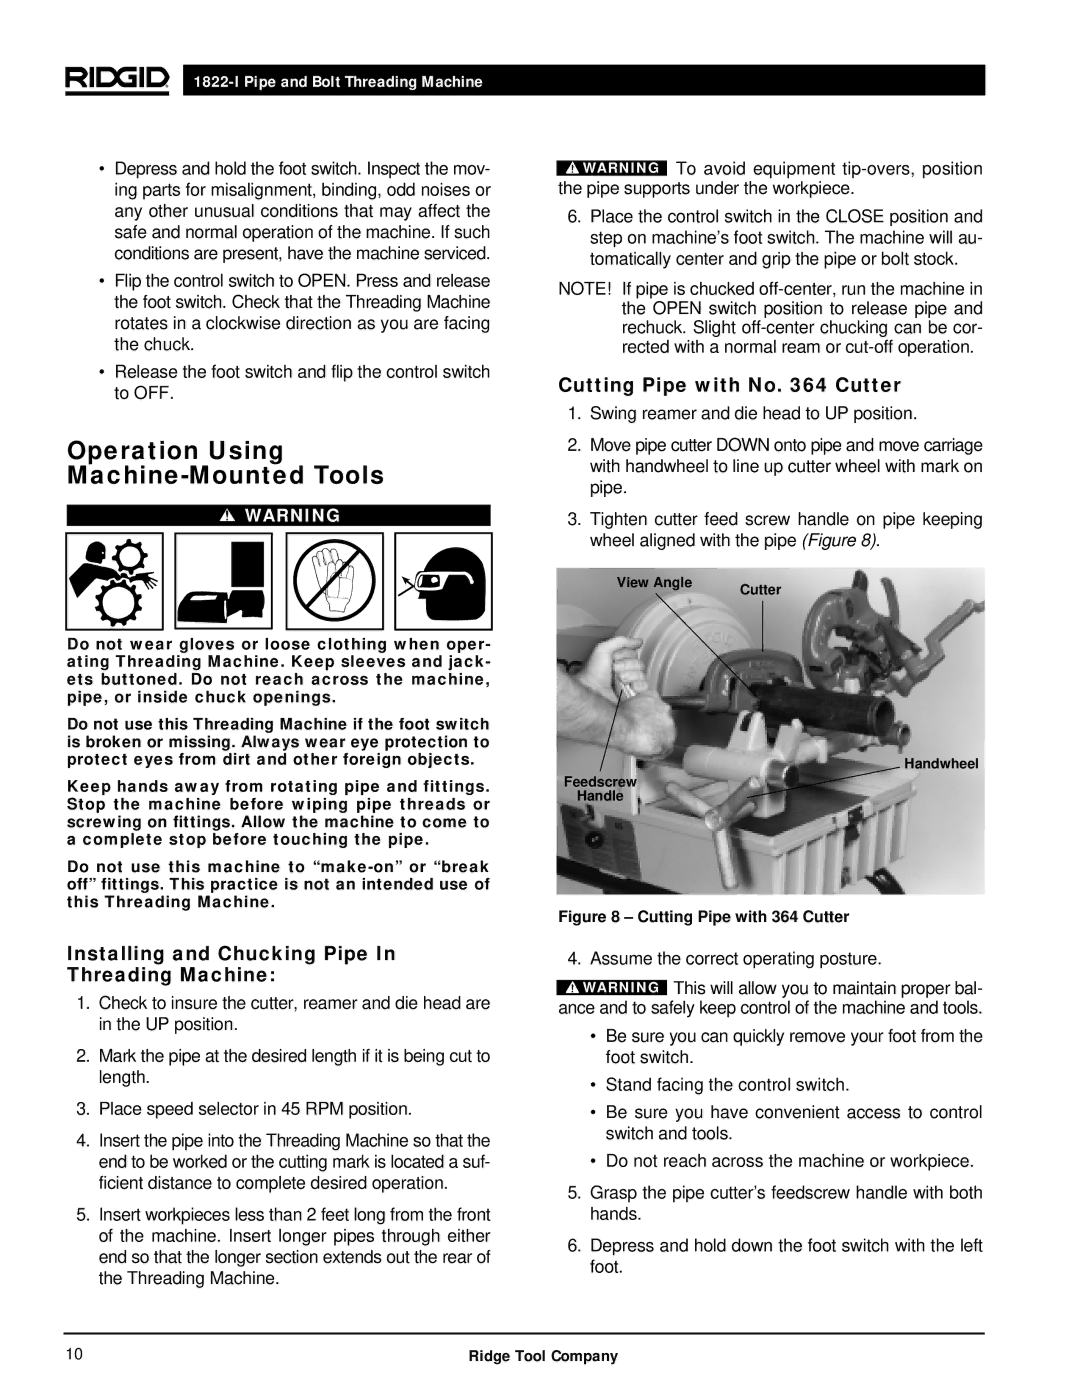
2.Move pipe cutter DOWN onto pipe and move carriage with handwheel to line up cutter wheel with mark on pipe.

3.Tighten cutter feed screw handle on pipe keeping wheel aligned with the pipe (Figure 8).

View Angle

Cutter


Handwheel

Feedscrew

Handle

Figure 8 – Cutting Pipe with 364 Cutter

4. Assume the correct operating posture.

WARNING This will allow you to maintain proper bal- ance and to safely keep control of the machine and tools.

Be sure you can quickly remove your foot from the foot switch.

Stand facing the control switch.

Be sure you have convenient access to control switch and tools.

Do not reach across the machine or workpiece.

5.Grasp the pipe cutter’s feedscrew handle with both hands.

6.Depress and hold down the foot switch with the left foot.

10

Ridge Tool Company

Page 12
Image 12
RIDGID 1822-I manual Operation Using Machine-Mounted Tools, Installing and Chucking Pipe In Threading Machine, View Angle

1822-I specifications

The RIDGID 1822-I is a powerful and versatile compact pipe threading machine that is widely recognized for its reliability and innovative design. This electric threading machine is specifically engineered for both professional and DIY users, ensuring high productivity in pipe fitting and fabrication tasks.

At the core of its engineering, the RIDGID 1822-I features a robust motor that delivers high torque, allowing for efficient threading of a variety of pipe sizes up to 2 inches in diameter. This machine is equipped with a quick-release pipe clamp that securely holds the workpiece in place, providing enhanced stability and safety during operations. The user-friendly controls enable seamless operation with minimal setup time, making it an ideal choice for contractors and plumbing professionals.

One of the standout technologies integrated into the RIDGID 1822-I is its automatic shut-off feature that enhances safety while prolonging the lifespan of the machine. It also boasts an adjustable threading stop, allowing operators to maintain consistent thread lengths and ensuring precision in their work. This machine is compact in design, enabling easy portability and storage, which is especially beneficial for jobs in confined spaces or on construction sites.

The RIDGID 1822-I is constructed using durable materials and comes with a sturdy frame that minimizes vibration, significantly reducing user fatigue during extended use. Additionally, it features an integrated oil reservoir that simplifies the process of threading pipes, ensuring proper lubrication and ensuring smoother cuts.

Another characteristic that sets the RIDGID 1822-I apart is its versatility. It is compatible with various RIDGID threading dies and accessories, allowing for customization based on the specific requirements of each job. Furthermore, the machine's exceptional threading speed leads to increased efficiency, enabling users to complete projects more quickly without compromising on quality.

In conclusion, the RIDGID 1822-I is an indispensable tool for professionals looking for a reliable, efficient, and versatile pipe threading solution. Its combination of advanced features, durability, and user-friendly design make it a top choice for those in the plumbing and construction industries, as well as for DIY enthusiasts seeking a dependable machine for their pipe threading needs. With the RIDGID 1822-I, users can achieve high-quality results with ease and confidence.