DVD-VR330,VR331 DVD-VR335,VR336
Getting Started
DVD-Video, Audio-CD
Precaution
Holding discs
DVD-Video
Audio CD
DVD-R Disc Playback and Recording
DVD-RW Disc Playback and Recording
DVD-RWVR mode
DVD-RWV mode
DVD-RAM Disc Playback
Do not use the following discs
Contents
Disc Manager
Before Recording
Advanced Editing Playlist
General Features
Before Reading User’s Manual
Using a DVD-RW
Using a DVD-R
Creating a playlist DVD-RW in VR mode
Recording mode XP high quality mode, SP
Unpacking
Accessories
If the remote control does not operate properly
Setting the Remote Control
Description
Front Panel DVD-VR330
Front Panel DVD-VR335
Fan
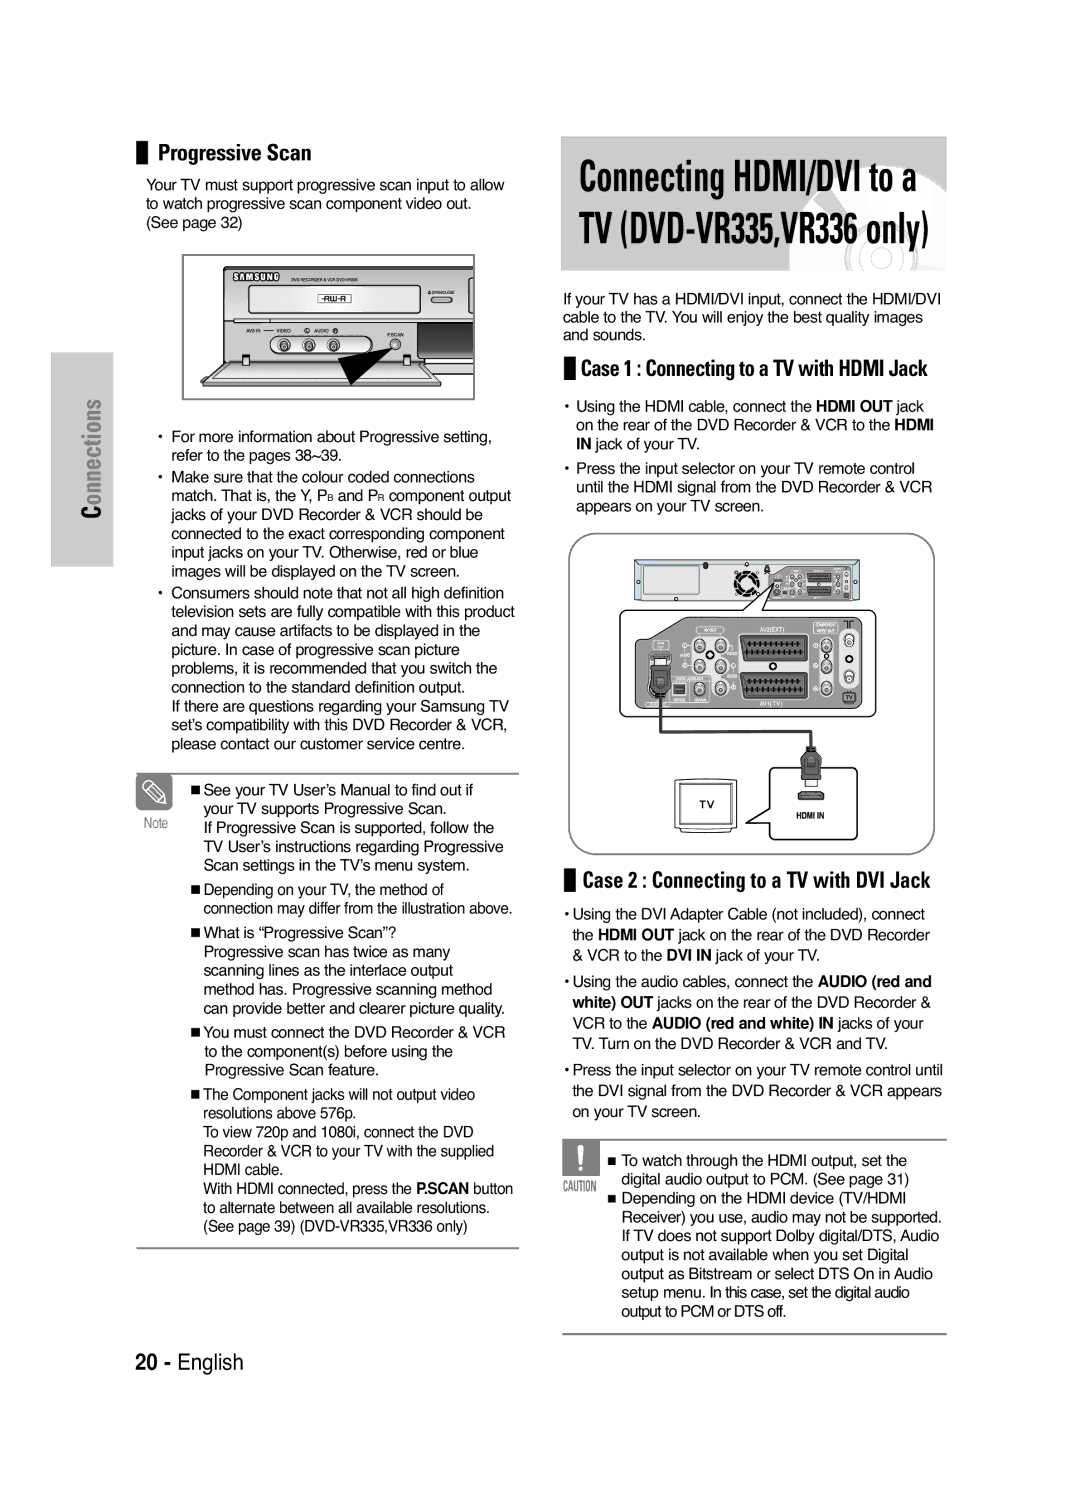
Hdmi Output DVD-VR335,VR336 only
Volume Button
Cancel Button Play LIST/TITLE Menu Button
Timer REC Button
DVD Button
Connecting & Setting Up
Quick Overview
Connecting the Scart Cable
Remove the aerial or network input cable from
Television
Connect this cable to the 75Ω aerial jack marked
AV1 TV By means of 21-pin Scart Cable
Connecting Audio/Video Cable
AV2 in EXT By means of 21-pin Scart Cable
Connecting Video Cable
VCR to the Audio red and white in jacks of your
To change Hdmi output resolution, see
Why does Samsung use HDMI?
What is the HDCP?
AV Receiver Connections
Audio
If the input is not selected automatically, use
Input SEL. button to select proper input
On-Screen Menu Navigation
… / †, œ / √ Buttons
OK Button
Menu Button
Plug & Auto Setup
Setting the Date and Time
Setting the clock Automatically
With the unit in Stop mode/No Disc mode, press
OK or √ button
With the unit in Stop mode/No Disc mode, press
Menu Button
Then press
Or √ button
Menu is displayed
Manual Setup
Press the …† buttons to select Edit , then press
Clearing a Preset Station
Press the …† buttons to select Decoder
Press the œ √ buttons to select On or Off
If you Then
OK or √ button
Message Do you want to delete ‘PR.01’? is
Press the …† buttons to select Swap
To change the programme number assigned to a
Setting Up Language Options
Then
Setting Up the Audio Options
Or √ button Audio setup menu will be displayed
Digital Output
Dynamic Compression
Component mode
TV Aspect
3D Noise Reduction Motion adaptive noise reduction
Video Output
Setting Up the Parental Control
HDMI/DVI Resolution DVD-VR335,VR336 only
Button on the remote control
Press the …† buttons to select Setup , then press
About the Change Password
About the Rating Level
Then press the OK or √ button
Press the …† buttons to select the rating level
Auto Repeat
VCR Setting
Auto Play
Colour System
DVD EP Mode Time
IPC Intelligent Picture Control
Automatic Chapter Creator
Ered off
Setting up the progressive scan
Quick Recording
Output selection DVD-VR335,VR336 only
Canceling the progressive scan
Set your TV to Interlace input using TV remote
Before Playing
Region code DVD-Video only
Disc types that can be played
Discs that cannot be played
Playing a Disc
Press OPEN/CLOSE
For DVD-VIDEO disc
Searching through a Chapter or Track
For DVD-RAM/-RW/-R disc
Skipping Chapters or Tracks
Moving to a scene directly using the Anykey
Slow Motion Play Step Motion Play
About Anykey
Slow Motion Play
Repeat Play
Playing Repeatedly Repeat Playback
Press the …† buttons to select Time
Or Return
Using the Subtitle button
Using the Anykey button
Playing a Certain section Repeatedly A-B Repeat Playback
Selecting the Subtitle language
Using the Angle button
Using the Audio button
Changing the Camera Angle
Selecting the Audio language
OK button Will be displayed
Using the Bookmarks
Zooming-In
Clearing a Bookmark
Using the Markers
Playing back a Bookmark
Playing back a Marker
Clearing a Marker
Playing back an Audio CD CD-DA
Audio CD CD-DA Screen Elements
Playing back an MP3 Disc
Playing back an MP3 Disc
MP3 Screen Elements
Œœ /√√ buttons
Mode you want to play repeatedly, then press
Press the Cancel Button to return to normal Playback
Audio/MP3 Disc
Press the œ √ buttons to select the desired repeat
Play Option Mode
Album screen and select a display mode
Or Zoom Using the œ √ Buttons, then press the OK
Playing back a Picture Disc
Insert a Jpeg Disc into the disc tray
Insert an MPEG4 Disc into the disc tray
Playing back a MPEG4 Disc
MPEG4 Function Description
Tracking
Tape VCR Features
Playing back a VHS
Where you want to set the counter to
Variable Search System
Button at the point on the tape
While a cassette is stopped, press the Anykey
Compatibility between Samsung Other Company’s Recorder
Before Recording
Recordable discs
Recording Mode
DVD-RWVR mode
Recording Formats
Unrecordable video
Concerning Copy Control Signals
Pausing / Resuming
With Cprm VR mode
Content Protection for Recordable Media Cprm
Recording From External Devices
Timer counter decreases by
Making a One Touch
Recording OTR
To stop recording
If the timer settings overlap
To exit without saving the current setting
Recording Speed DVD
Recording Speed VCR
Press the OK button to confirm the edited setting
Press the …† buttons to select the number
OK or √ button Edit and Delete items are displayed
Menu screen will disappear
Press the …† buttons to select the number
Edit and Delete items are displayed
Press Info button on the remote control
Maximum Recording Time SP vs. LP
Before starting
Following information will be displayed
Special Recording
To copy from DVD to VCR
Add Recording Time
Watch a different media during recording
To copy from VCR to DVD
Direct copy DVD to VCR
Press the …† buttons to select desired copylist
Press the …† buttons to select Copy , then press
Direct copy VCR to DVD
You can use the √ II, I œœ or √√ I , œœ or √√
Buttons to search for the end position
Press the OK button at the end point
Playing the Title List
Using the Title List button
Using the Menu button
Pressing the Anykey Button
Title List Screen Elements
Title List screen is displayed
Renaming Labeling a Title
Press the …† buttons to select a title you want to
Rename from the Title List, then press the OK or √
Press the OK Or √ button Rename screen is displayed
Press the …† buttons to select Protection
Locking Protecting a Title
Deleting a Title
OK or √ button Edit Title List screen is displayed
Deleting a Section of a Title
Delete from the Title List, then press the OK or
Press the œ √ buttons to select Yes
Image and end point time is displayed
Section deletion ending point window
Creating a Playlist
Button at the end point
Or √ button Make Scene screen is displayed
Button at the start point
Playing Titles in the Playlist
Renaming a Playlist Title
Editing a Scene for the Playlist
Press the OK button at the end point of the scene
Press the …† œ √ buttons to select the scene you
Want to modify, then press the OK button
Image and ending point time are displayed
To setup, follow steps 1 to 3 on
Press the …† buttons to select Add , then press
Press the œ √ buttons to select Add , then press
To setup, follow the steps 1 to 3 on
Copying a Playlist to the VCR
Deleting a Playlist from the Playlist
Message ‘Do you want to delete?’
Disc Manager
Editing the Disc Name
With the unit in Stop mode, press the Menu Button
Disc Protection
Formatting a Disc
Button. The disc is finalised
Finalising a Disc
OK button Disc is formatted
Disc is unfinalised
Want to unfinalise disc?’
Lists , then press the OK or √ button
Delete All Title Lists
All title lists are deleted
Reference
Troubleshooting DVD
Problem Explanation/Solution Icon appears on
Play mode settings are
Tings configured with Setting menu Cannot change
Remote control
Troubleshooting VCR
Check if the safety tab is intact on the cassette
Check the DVD Recorder & VCR antenna connections
Is the DVD Recorder & VCR tuner properly set?
Specifications
General
Input
Audio Output
Unit C, Stafford Park Telford, Shropshire
United Kingdom Tel 0870 242 Fax 01952
Contact Samsung World Wide
Comment contacter Samsung dans le monde
Contact Samsung wereldwijd
Region Country Customer Care Center Web Site
AK68-01010C-00
Manuel d’instructions
Avertissement
Précautions
Comment tenir les disques
DVD-Video, Audio CD
Remarques importantes sur la sécurité
DVD vidéo
CD audio
CD-R et CD-RW
Lecture et enregistrement de disques DVD-R
DVD-RW mode VR
DVD-RW mode
Lecture du DVD-RAM
’utilisez pas les disques suivants
Table des matières
Connexions du récepteur AV Connexion des périphériques
Connexion d’un périphérique aux
Cas
Avant d’enregistrer
Modifications avancées Liste de Lecture
Gestionnaire de Disque
Dépannage Fiche technique
Terme Définition Indique qu’une fonction est
Disponible sur les disques DVD
RW/-R qui ont été enregistrés en
Indique une fonction disponible
Utilisation d’un DVD-R
Création d’une liste de lecture DVD-RW en mode VR
Utilisation d’un DVD-RW
Déballage
Accessoires
En cas de dysfonctionnement de la télécommande
Réglage de la télécommande
Plateau de disques DVD
Boutons Prog
Affichage en façade
Ventilateur
Uniquement
Touches Volume
Bouton Cancel Touche PLAYLIST/TITLE Menu
Touche Timer REC
Touche TV
Raccordement et configuration
Bref aperçu
Connexion du câble
Assurez-vous que le téléviseur et l’enregistreur
Avant de procéder au branchement
Si tel n’est pas le cas, aucune image n’apparaît
Entree AV2 EXT Au moyen d’un câble
Péritel à 21 broches
AV1 TV Au moyen d’un câble Péritel à
Broches
Connexion du câble S-Vidéo
Connexion du câble Composant Vidéo
Connexion du HDMI/DVI
Qu’est-ce que le HDCP?
Description de la connexion Hdmi
Pourquoi Samsung utilise-t-il le HDMI?
Connexion des périphériques
Si l’entrée n’est pas sélectionnée automa
Bouton Menu
Boutons
Bouton OK
Boutons Return
’affichent automatiquement
SSweden PLPoland BBelgium IItaly CHSwiss
Attendez que l’heure et la date exactes
Avoir l’horloge automatique. Voir RF Cable
Réglage automatique de l’horloge
Appuyez sur les boutons pour sélectionne
Appuyez sur le bouton MENU, appareil en mode
Appuyez sur les boutons pour sélectionner
Appuyez sur les boutons pour sélectionner
FFrance DDeutschland ESpain
Installation Manuelle
Nom
Oui ou Non
Modification du Tableau des chaînes réglées manuellement
Le menu Configuration de la langue s’affiche
Langue, puis appuyez sur le bouton OK ou
’option de la langue souhaitée, puis appuyez surle
Bouton OK ou
Sortie Numérique
Compression dynamique
Configuration des options d’affichage Vidéo
Format Écran
Sortie Vidéo
Réduction bruit 3D réductiondu bruit adaptée au mouvement
Configuration du contrôle parental
Résolution HDMI/DVI DVD-VR335,VR336 uniquement
Enregistrement DivXR
576p 720 x 720p 1280 x 1080i 1920 x
Votre mot de passe. voir
Propos de la fonction Changer le mot de passe
Quitter le menu
Dureé de la cassette
Lecture automatique
Répétition automatique
Système, puis appuyez sur le bouton OK ou
Temps DVD en Mode EP
IPC Contrôle Intelligent de l’Image
Syst. Couleur
PAL Système vidéo PAL
Modes LP et EP, 15 minutes
Appuyez sur le bouton Stop Arret pour
Le bouton Title Menu
Tension Le disque DVD-R ne peut pas être non-finalisé
Configuration du balayage progressif
Enregistrement rapide
Balayage progressif
Le réglage progressif n’est disponible que
Annulation du balayage progressif
Sélection de la sortie DVD-VR335,VR336 uniquement
Logo
Code de région pour DVD-Vidéo seulement
Disques non compatibles
Lecture d’un disque
RAM de version
Utilisation des fonctions de recherche et de saut
Lecture au ralenti
Lecture par sauts
Accéder à une scène directement avec Anykey
Titre ou Chapitre
Lecture à répétition
Lecture d’un disque en boucle lecture à répétition
Sélectionnez Répétition déplaçant la barre de
Sélection à l’aide des touches
Pour retourner en mode de lecture normale
Sélection de la langue et du sous-titrage
Utilisation de la touche Subtitle
Utilisation de la touche Anykey
Sélection de la langue de sous-titrage
Utilisation de la touche Audio
Utilisation de la touche Angle
Appuyez sur la touche Audio durant une lecture
Zoom avant
Suppression d’un signet
Utilisation des repères
Lecture à partir d’un signet
Lecture à partir d’un repère
Suppression d’un repère
Lecture d’un CD audio CD-DA
Audio CD CD-DA Screen Elements
Boutons de la télécommande servant à la lecture de CD
Lecture d’un disque MP3
Lecture d’un disque MP3
Éléments du menu MP3
Répéter la lecture dun disque audio/MP3
Boutons de la télécommande ser- vant à la lecture MP3
Le mode Répétition est mis en surbrillance
Mode Options de lecture
Programmation des pistes
Lecture d’un disque image
Insérez un disque Jpeg dans le tiroir disque
Photo, puis sur le bouton OK ou
Appuyez sur les boutons pour sélectionner une image
Lecture d’un disque MPEG4
Description de la fonction MPEG4
Alignement
Lecture d’une cassette VHS magnétoscope
Lecture image par image
Saut
Aller à 00000, puis sur le bouton OK
Système de recherche variable
Che Anykey
Avant d’enregistrer
Disques inscriptibles
Mode d’enregistrement
Formats d’enregistrement
Vidéo ne pouvant être enregistrée
DVD-RAM/-RWmode VR
Avec Cprm Mode VR
Pause et reprise d’un enregistrement
Propos des signaux de protection contre la copie
Que vous souhaitez enregistrer
Enregistrement à partir d’un périphérique
La prise Péritel
Le compteur de la minuterie décroît par
Enregistrement Enregistrer par Immédiat OTR Minuterie
Pour arrêter l’enregistrement
Retour au menu précédent
Vitesse d’enregistrement DVD
Vitesse d’enregistrement magnétoscope
Edition de la liste d’enreg- istrement programmée
Suppression de la liste d’enregistrement pro- grammée
Vérification de la durée restante
Avant de commencer l’enregistrement
Durée d’enregistrement en SP
Fonction n’est pas disponible s’affiche à l’écran
Copie du DVD au magné- toscope et inversement
Copie du DVD au magnétoscope
Regarder un autre canal
DVD et sur bande vidéo
La liste des copies souhaitées puis appuyez sur le
Copie du magnétoscope au DVD
Copie directe du DVD au magnétoscope
Copie directe du magnétoscope au DVD
Lecture de la Liste de
Avec la touche Title List
Avec la touche Menu
Appuyez sur Menu
Enregistré en appuyant sur la touche Anykey
Éléments de l’écran de la Liste de Titres
’écran Liste de Titres s’affiche
Fonctions de modifications
Modification du nom d’un titre
Utilisation du bouton Menu
’écran Renommer apparaît
Verrouillage d’un titre par mesure de protection
Suppression d’un titre
Suppression d’une partie d’un titre
Sélectionnez le titre dont vous souhaitez supprim
Er une partie en déplaçant la barre de sélection à
’aide des touches puis appuyez sur OK ou
Éléments de l’écran Éditer la Liste de Titres
Modifications avancées Liste de Lecture
Création d’une Liste de Lecturet
’écran Faire une Scène s’affiche
Création d’une nouvelle liste de lecture
Modification du nom d’un titre dans la Liste de Lecture
Lecture de titres dans la Liste de Lecture
Avec la touche Menu
Renommer, puis appuyez sur le bouton OK
Édition d’une scène pour la Liste de Lecture
’affiche
Appuyez sur la touche OK lorsque vous avez
Identifié la nouvelle position de fin de la scène
Effectuez d’abord les étapes 1 à 3 de la
Ner la scène que vous souhaitez modifier, puis
Effectuez d’abord les étapes 1 à 3 de la
La scène sélectionnée est déplacée à la posi- tion choisie
Vous ne pouvez pas déplacer la scène
Née à cet endroit
’aide des touches , puis appuyez sur OK ou
Copie d’un titre de la Liste de Lecture
Bande vidéo en déplaçant la barre de sélection à
Touche Play List
Suppression d’un titre de la Liste
De Lecture
Lorsque l’appareil est en mode Arrêt, appuyez sur
Modification du Nom du Disque
La touche Menu
Gestion. de Disque, puis appuyez sur le bouton
Protection du Disque
Formatage du disque
DVD-VR mode DVD-V mode
Finalisation du disque
Annulation d’une finalisation de disque modes V et VR
Suppression de toutes les Listes de Titres
Outils de référence
Dépannage DVD
Problème Cause possible et solution ’icône Est
La télécommande ne
Affichée à l’écran
Ne fonctionnent pas correctement
Dépannage Magnétoscope
Peut endommager les têtes vidéo de façon permanente
Fiche technique
Sortie audio
France
Samsung Electronics France
800-10-7267 Latin America
800-6225
01805 121213 € 0,12/Min
06 40 985 Europe
Cet appareil est distribué par
Pour toute information ou tout
Gebruiksaanwijzing
AK68-01010C-00
Waarschuwing
Schijven vasthouden
DVD-video, audio-CD
Waarschuwingen voor het gebruik van schijvena
Gebruik alleen schijven met een normale vorm
DVD-Video
Audio-CD
DVD-R’s afspelen en opnemen
DVD-RW’s afspelen en opnemen
DVD-RAM-schijf afspelen
Gebruik de volgende schijven niet
Beveiliging
DVD-RW VR modus
Overzicht De DVD- en videorecorder op de
Allen DVD-VR335,VR336
VR335,VR336
Tv aansluiten met de RF-kabel De SCART-kabel aansluiten
Problemen oplossen Specificaties
Voordat u begint
Geavanceerd bewerken Playlist Een playlist maken
Schijfbeheer
Voordat u de gebrui- ksaanwijzing leest
Woord Definitie
Een playlist maken DVD-RW in VR modus
Een DVD-RW gebruiken
Een DVD-R gebruiken
Als de afstandsbediening niet correct werkt
Een DVD-RW-schijf in de VR modus gebruiken
Een DVD-RW-schijf in de V modus gebruiken
Een DVD-R-schijf gebruiken
De afstandsbediening instellen
TV +32 TV +02, +30
Daarna kunt u de televisie met de volgende toetsen regelen
Functie
Voorpaneel DVD-VR330
Prog / -KNOPPEN
Voorpaneel DVD-VR335
Display voorpaneel
Achterpaneel DVD-VR330, DVD-VR331
Achterpaneel DVD-VR335, DVD-VR336
Ventilator
HDMI-UITGANG alleen DVD-VR335,VR336
De toetsen van de afstandsbediening
Aansluiten en instellen
De SCART-kabel aansluiten
Als de televisie de juiste ingang bevat, kunt u de
Betere kwaliteit van geluid en beeld
Sluit de antennekabel aan
SCARTkabel
AV2 in EXT met behulp van 21-pins
AV1 TV met behulp van 21-pins SCARTkabel
De S-videokabel aansluiten
De componentvideoka- bel aansluiten
Situatie 1 Aansluiten op een tv met een Hdmi aansluiting
Progressieve scan
Situatie 2 Aansluiten op een tv met een DVI- aansluiting
Aansluiten op de AV- ontvanger
Situatie 1 Externe apparaten aansluiten
Externe apparaten aansluiten
Op AV3-uitgangen
Menunavigatie op het tv-scherm
De toetsen
Inschakelen en automa- tisch instellen
Gebruik de toetsen om de keuzebalk te
Wacht totdat de huidige tijd en datum
Automatisch worden weergegeven
Druk op de toetsen om Setup te selecteren
De klok automatisch instellen
En druk op OK of op de toets
Druk op de toetsen om de waarden te verhogen of te verlagen
Automatisch instellen
Als u Dan…
Drukt u op de toetsen
Vorige teken wilt
Gaan Druk op de toets OK om de naam op te slaan
Kanaal te selecteren
Als u… Dan… Het weergegeven
MFT te selecteren
De lijst met zenders aanpassen
Druk op de toets Menu om het menu af te slui- ten
De taalopties instellen
Dynamische compressie
De geluidsopties instellen
Digitale uitgang
Breedte/hoogte TV
3D-ruisonderdrukking
Video uitvoer
Componentmodus
Parental Control Kinderslot instellen
HDMI/DVI-resolutie alleen DVD-VR335,VR336
M 9 op de afstandsbediening
Het bericht ‘Toegangscode bevestigen’ ver- schijnt
Het classificatieniveau
De Toegangscode wijzigen
En druk op OK of op de toets
Toets Menu om het menu af te sluiten
Automatisch herhalen
Lengte cassette
Automatisch afspelen
Kleurensysteem
Zwart-wit
Automatisch hoofdstuk- ken maken
Progressieve scan instellen
De instelling voor progressief scannen is
Progressieve scan annuleren
Uitgangsselectie alleen DVD-VR335, VR336
Regiocode alleen DVD-video
Schijven die kunnen worden afgespeeld
Schijven die niet kunnen worden afgespeeld
Stereo
Een schijf afspelen
Het schijfmenu en het titelmenu gebruiken
De functies Zoeken en Overslaan gebruiken
Vertraagd afspelen en stap voor stap afspelen
Vertraagd afspelen
Stap voor stap afspelen
Rechtstreeks naar een scène gaan met Anykey
Selecteren
Herhaaldelijk afspelen Herhalen
Druk op de toetsen om Herhalen te
Taal van ondertiteling en geluidsspoor kiezen
Taalkeuze voor ondertiteling
De toets Subtitle gebruiken
De toets Anykey gebruiken
De toets Angle gebruiken
Taalkeuze voor Geluid
De toets Audio gebruiken
Inzoomen
RW/-R
Een bladwijzer afspelen
Een bladwijzer wissen
Een markering afspelen
Een markering wissen
Een audio-CD CD-DA afspelen
Onderdelen van het AUDIO-CD- scherm CD-DA
Toetsenop de afstandsbedien- ingvoor het afspelen van CD’s
Een MP3-schijf afspelen
Onderdelen van het MP3-scherm
De modus Herhalen wordt gemarkeerd
Toetsenop de afstandsbedien- ingvoor het afspelen van MP3’s
Druk tijdens het afspelen op de knop Anykey
Selecteren. Druk op de knop Cancel
Druk op Anykey in de stopstand
De optie Afspeeloptie. wordt gemarkeerd
En druk op OK Het scherm Playlist wordt weergegeven
Een beeldschijf afspelen
Keert terug naar het Albumscherm
Functiebeschrijving MPEG4
Stoppen
Volgende frame
Overslaan
Tracking handmatig instellen
While a cassette is stopped, press the Anykey button
Wanneer de videocassette is gestopt, drukt u op
De toets Anykey
Voordat u begint
Opneembare DVD’s
Met deze recorder kunt u op de volgende schijven opnemen
Typen
Opname-indelingen
Opnamemodus
Videoband die tegen opnemenbev- eiligd is
DVD-RW V modus/-R
Kopieerbeveiligingssignalen
Opname onderbreken/hervatten
Met Cprm VR modus
Inhoudbeveiligingvoor opneembare media Cprm
Opnemen van externe- apparaten
Stopt de DVD- en videorecorder de opname
Maken
De opname beëindigen
Opnamesnelheid VCR
Als de timer-instellingen elkaar overlappen
Opnamesnelheid DVD
Druk op de knop OK
Druk op OK om de bewerkte instelling te bevestigen
Een timer-opname verwijderenwissen
Voordat u begint
De resterende tijd con- troleren
Maximale opnametijd SPen LP
Kopiëren naar DVD of video
Van de DVD-recorder naar de videorecorder kopiëren
Van video naar DVD kopiëren
Rechtstreeks van de DVD- naar de video- recorder kopiëren
Druk op de toetsen om VCR -- DVD tes
Electeren en druk op OK of op de toets
Direct van video naar DVD kopiëren
De kopieerlijst kan in de videomodus niet worden opgeslagen
De toets Menu gebruiken
De titellijst afspelen
De toetsTITLE List gebruiken
Elementen van het titellijstscherm
Title List te drukken
Basisbewerking
Titellijst
De naam van een titel wijzigen
De knop Menu gebruiken
Een titel vergrendelen beveiligen
Een titel wissen
Een deel van een titel wissen
Elementen van het scherm Titellijst bewerken
Naar het menu Playlist bewerken terugkeren
Een playlist maken
Een nieuwe playlist maken
Titels in de playlist afspelen
De naam van een playlisttitel wijzige
De toets Menu gebruiken
De toetsMENU gebruiken
Een scène uit de playlist bewerken
Selecterendie u wilt wijzigen en druk op OK
Druk op de toetsen om de scène te
Selecteren die u van positie veranderen en druk
Op OK
Druk op om Verpl. te selecteren en druk ver- volgens op OK
Een playlist naar de videorecorder kopiëren
Druk
Druk op de toetsen om uit de playlist de titel
Op de toets . Het menu Playlist bewerken wordt
Een titel uit de playlist verwijderenwissen
Druk op de toetsen om Afspeellijst te
Druk op de toetsen om Afspeellijst bewerken
Te selecteren en druk op OK of op de toets
Om de schijfnaam te bewerken, moet u de
Schijfbeheer
De naam van de schijf bewerken
Schijfbeveiliging
Een schijf formatteren
‘Wilt u deze schijf afsluiten?’ verschijnt
Een schijf sluiten
DVD-VR modus DVD-V modus
Sluiten van een schijf ongedaan- maken V/VR modus
Kan ongedaan worden gemaakt in deV modus
Alle Titellijsten Verwijderen
Naslag
Problemen oplossen DVD
Zijn geconfigureerd Ik kan de beeldver
Overige problemen
Probleem Verklaring/oplossing Het pictogram
Wordt op het scherm
Is de DVD- en videorecorder-tuner correct ingesteld?
Problemen oplossen Video
Probleem Verklaring/oplossing
Specificaties
Ingang
Uitgang
Audio-uitgang
Nederlandbelgië
Voor Nederland tel 20 200 88 € 0.10/Min Voor België tel 201
Luxembourgbelgique
Pour la Belgique tel 201 Pour le Luxembourg tel 261 03
Contact Samsung World Wide
English Français