Visit us at
Page
Contents
Maintaining Your Printer
Specifications
Using Your Printer with Macintosh
Using Windows PostScript Driver
Setting Your Printer with the PS Option --------------E.1
Using Your Printer on Network
Installing Software from Diskettes
Printer Options
Memory and PostScript SIMMs -----------------------H.2
Environmental and Safety Consideration
Laser Safety Statement
Ozone Safety
Power Saver
Radio Frequency Emissions
Product Name Laser Printer Model Number
Environmental and Safety Consideration
Party Responsible for Product Compliance
Information to User
EC Declaration of Conformity
Page
Special Features
Prints at 1200 dots per inch dpi. See
Prints 12 pages-per-minute
Special Features
One-touch last page printing is allowed in the ready mode
On ML-6060N and ML-6060S
Prints in Windows, DOS, and Macintosh Supports Linux
Printer Components
Page
Unpack Your Printer
Carefully remove all packing tapes from the printer
Install the Toner Cartridge
Install the Toner Cartridge
Load paper with the print side facing down
Make sure it is flat in the tray at all four corners
To Change Paper Size in Tray
Load Paper
Paper overloading may cause paper jams
Slide the tray back into the printer
Pointer
Go to Appendix B, Using Your Printer with a USB Cable
Go to Appendix F, Using Your Printer on Network
Turn on the power
Turn on the Printer
Print a Demo
Install the Printer Software
CD-ROM shipped with your printer contains the following
Before Installing the Printer Software
Install the Printer Software
Verify the following
If the CD-ROM drive does not automatically run
Click Install the Samsung Software-I on your PC PCL/USB
Printer Driver Features
PCL
Software Installation Tips
Starting the Uninstaller
Samsung ML-6060 Driver Uninstall
Samsung ML-6060 Series Program group, select
Control Panel Buttons Control Panel Lights
Control Panel Buttons
Toner Save
Cancel job
Control Panel Buttons
Reprint last page of the job
Print demo page and configuration sheet
Cleaning the inside of the printer
Start manual feeding
Ready Mode
Control Panel Lights
Light status legend
Processing
Manual feed mode
Paper out in the manual feed mode
Printing in the manual feed mode
Control Panel Lights
Chapter
When you choose print media, consider the followings
Choosing Paper and Other Media
Media Sizes and Capacities
Choosing Paper and Other Media
Paper Guidelines
Selecting the Output Tray
Printing to the Top Output Tray Face down
Printing to the Rear Output Tray Face up
Over 250 sheets of paper, continuously
Selecting the Output Tray
To open the rear output tray
Using Tray 1 or the Optional Tray
Loading Paper
Using the Multi-Purpose Tray
Loading Paper
To load paper in the Multi-Purpose Tray
Stack height limit mark
Using the Manual Feed
Print the document
Sheet of paper is loaded and printed
Repeat this step for every page to be printed
Printing on Envelopes
Open the rear output tray and pull the extender
Adjust the guide to the left edge of the envelope stack
Printing on Envelopes
Printing on Labels
Open the Multi-Purpose Tray and the rear output tray
Printing on Transparencies
Printing on Preprinted Paper
Adjust the guide to fit the width of the media
Printing on Card Stock or Custom-sized Media
Printing Multiple Pages on One Sheet of Paper N-Up Printing
Printing a Document
Open the document you want to print
Printing a Document
You can also see the printable area
Select the Samsung ML-6060 Series PCL
Canceling a Print Job
Printing Help
To stop a print job from the ML-6060 series printer
To stop a print job from the Printers folder
Using Toner Save Mode
To enable this feature from the ML-6060 series printer
To enable this feature from the software application
There are two ways to enable the Toner Save mode
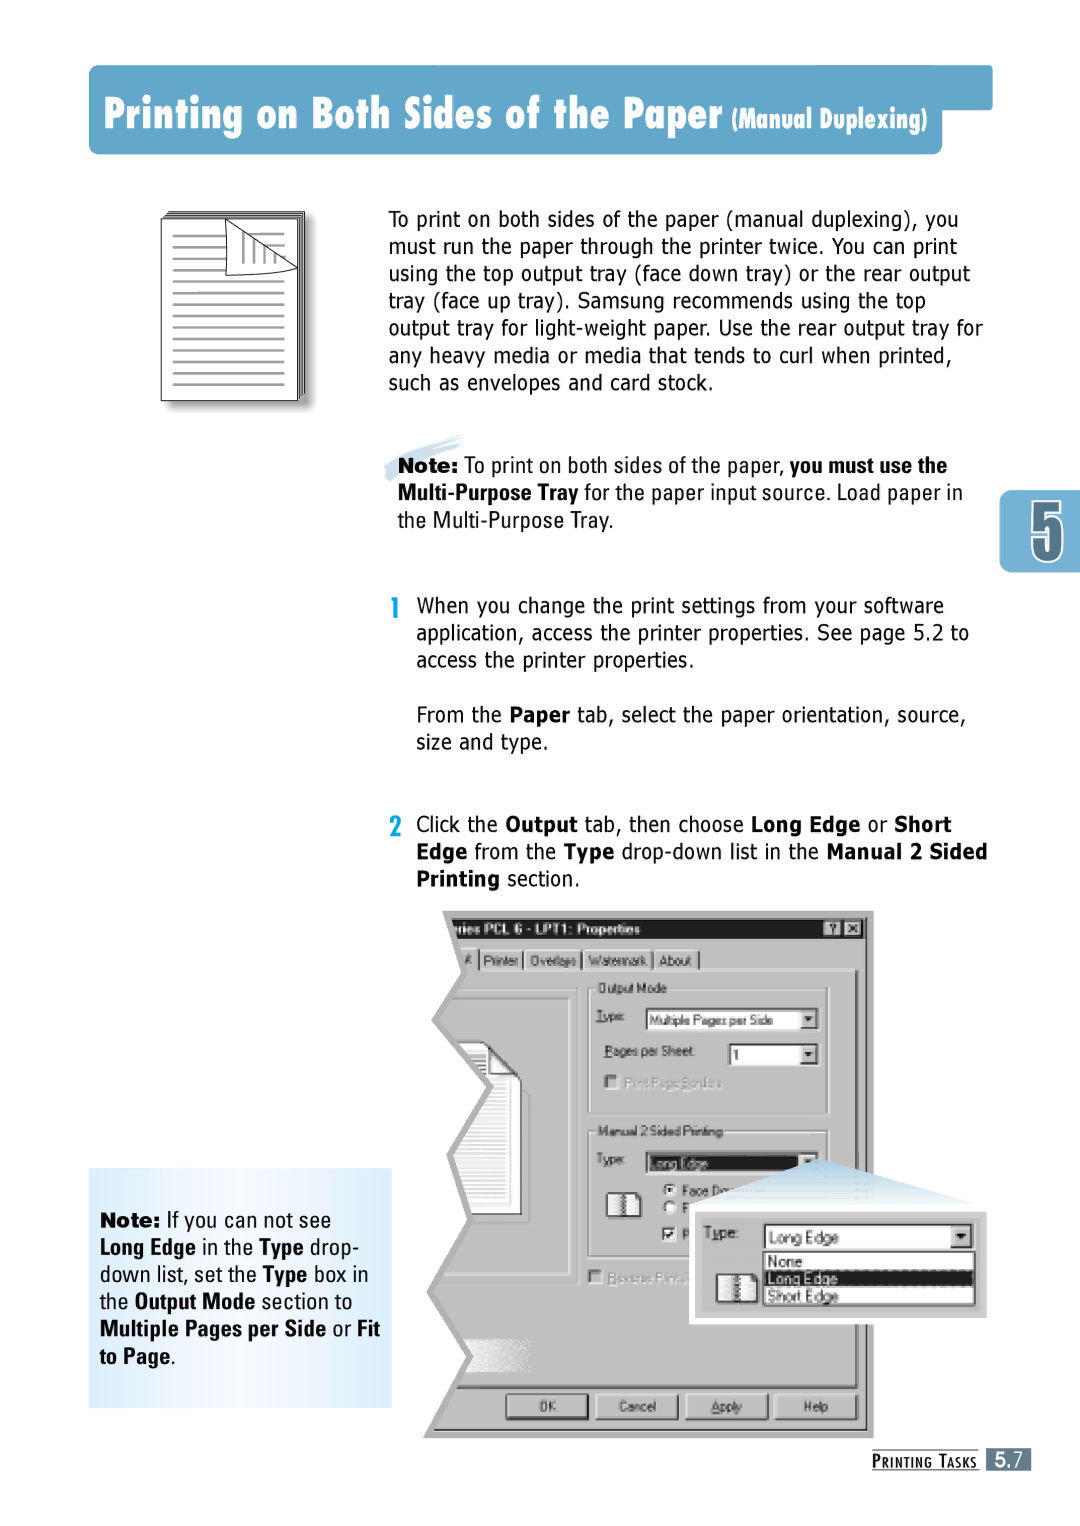
Printing on Both Sides of the Paper Manual Duplexing
Printing on Both Sides of the Paper Manual Duplexing
Printing on Both Sides of the Paper Manual Duplexing
Printing Multiple Pages on One Sheet of Paper N-Up Printing
Click OK, then start printing
Printing Booklets
Supported Letter, A4, Legal, and Executive
Printing Booklets
Fold and staple the pages
Printing on Different Paper for the First
Fitting Your Document To a Selected Paper Size
Printing Posters
Printing Poster
Setting Graphic Properties
Setting Graphic Properties
At each setting and choose the one you like best
This setting provides solid lines and sharp
Vector graphics
Raster images
Printing Watermarks
To use an existing watermark
Printing Watermarks
Access the printer properties
Click Delete Click OK
Using Page Overlay
Click the Overlays tab, and click Create Overlay
Using Page Overlay
Create or open the document you want to print
Overlay List box
Using Page Overlay
You can delete page overlays that are no longer used
List box
Click Delete Overlay
Click OK until you exit the Print dialog box
Chapter
Maintaining Toner Cartridge
Saving toner
Redistributing Toner
Toner Cartridge
Firmly close the cover
If the print remains light
Cleaning the Printer
Cleaning the Outside
Cleaning the Inside
Cleaning the Printer
Turn the printer on
With toner debris, which should be discarded
There is paper loaded in the paper tray
Chapter
Troubleshooting Checklist
Control panel is on
See
Solving General Printing Problems
PCL 6 or Samsung ML-6060
Print Configured incorrectly
Uninstall the printer driver, then
System error
When more memory is Added
Solving General Printing Problems
Exit Windows and reboot
Contact a service representative
Try a print job that you know
Check the application’s printer
Configuration Sheet
Cleaning Sheet
Printing Special Pages
Demo
Clearing Paper Jams
Output Area
Clearing Paper Jams
Remove the jammed paper
Replace the exit roller
Replace the stopper and close the rear output tray
Input Area
Slide out Tray 1 to expose the jammed paper
Clearing Paper Jams
Inside the Printer
Clearing Paper Jams
Optional Tray
Pull the option Tray 2 out of the printer
If you see the jammed paper, remove the paper from the tray
Tips for Avoiding Paper Jams
Do not mix paper types in the paper tray
Keep print media stored in an acceptable environment
Do not load wrinkled, creased, damp or highly curled paper
Solving Print Quality Problems
Print Quality Checklist
Solving Print Quality Problems
Light or feded print
Solving Print Quality Problems
Clean the LSU see
If white vertical streaks appear on
Install a new toner cartridge
Increase the amount of background shading
New toner cartridge
Correct itself after a few more pages
Can cause this problem
Moisture from the air
Against the paper stack
Printed
Humidity will cause paper curl. See Paper
Rotating the paper 180 in the paper tray
Output tray
Make sure that paper is loaded properly
Clean the inside of the printer
Try installing a new toner cartridge
Contact a service representative
Check the paper type and quality. See Paper
Troubleshooting Error Messages
Power off
Printer Light Patterns
System error
Paper jam
Door open, or no toner cartridge
Memory out Insufficient Memory
Common Windows Problems
Before Printing box and click OK. From Spool
Common Macintosh Problems
Problems in the Chooser
Chooser
Zones box in the Chooser
Printing Errors
Common Macintosh Problems
Troubleshooting PS Errors
Installed
Appendix a
Printer Specifications
Paper Specifications
Overview
Paper Specifications
Supported Sizes of Paper
Guidelines for Using Paper
Paper Output Capacity
Paper should be stored at or near room temperature
Printer and Paper Storage Environment
Envelopes
Minimum Maximum
Paper Specifications
Return address
Labels
Transparencies
See Printing on Labels on
See Printing on Transparencies on
Appendix B
Installing the Printer Software
Plug the other end into the USB port on the computer
Add New Hardware Wizard dialog box appears. Click Next
Installing the Printer Software
Set your PC printer port
Windows 98, select Start Settings Control Panel
Double-click the System icon
Click the Device Manager tab
Frequently Asked Questions About USB
QHow can I increase printing speed and quality?
Appendix C
Macintosh Installation
System Requirements
Connecting To Macintosh
Macintosh Installation
USB 1.0 compliant cable Turn off the printer and computer
Connector on the back of the printer
10/100Base-T Ethernet
Connect the other end to the network hub
Macintosh Installation
Click Install After installation is complete, click Quit
Using PCL Driver
Choosing PCL Driver
Printing from a Macintosh
From the Apple menu, select Chooser
Using PCL Driver
Click Print when you are finished checking your settings
Advanced Printing
Layout
Color
Using PS Driver
Installing PPD file on the USB-connected Macintosh
Installing PPD file on the network-connected Macintosh
Using PS Driver
Appendix D
About Remote Control Panel for DOS
Installing the Remote Control Panel for DOS Users
Selecting Print Settings
To install the DOS Remote Control Panel
Language Codes
Selecting Print Settings
To access the Remote Control Panel
Config
Valid range is 0 to 300 seconds
Test
Appendix E
Setting Your Printer with the PS Option
Installing PPD Files
Connecting with parallel interface, see
Installing PPD Files
Click Install the Samsung Software-II on your PC PostScript
Click on HaveDisk, click Browse, then choose
To open the properties window from the Printer folder
Select Samsung ML-6060 Series PS
To open the properties window from inside an application
Click Properties to open the properties window
Appendix F
About Sharing the Printer on a Network
Setting Up a Locally Shared Printer
Select Properties in the Printers menu
Setting Up a Network-Connected Printer
Appendix G
Making Installation Diskettes
Click Make your own Diskette set of software
Making Installation Diskettes
Click Copy all disk images
Installing Software from Diskettes
Appendix H
Precautions
Disconnect the Power Cord
Memory and PostScript SIMMs
To install the memory SIMM, continue with Step
Memory and PostScript SIMMs
Rotate it up until it snaps into place
Reconnect the power cord and turn the printer on
Network Interface Card
Remove the two screws, then remove the plate
Network Interface Card
Paper Tray
Turn off the printer and unplug all cables from the printer
Reconnect the cables, then turn the printer on
Appendix
Linux Driver Installation
Installation
Install Setup Script file configuration
Mount -t iso9660 /dev/cdrom /mnt/cdrom
Linux Driver Installation
Device option
Cancel, print job
Access Features Install Remove
Error messages
Face-up tray Features
Install PPD file
Paper source setting Manual light
Paper source setting
Network interface Install network card
Problem solving Print media
Character voids Checklist
Printing Booklets Cancel
Configuration
Setup printer
Specifications Paper
Cleaning sheet Install
Save toner