Free Standing Appliance
This manual is made with 100 % recycled paper
Critical Installation Warnings
Safety information
Safety Information
Important safety symbols and precautions
Refrigerator must be safely grounded
Installation Cautions
Critical Usage Warnings
Ground
Do not store articles on the top of the appliance
Recommended by the manufacturer
If the product is equipped with LED Lamps, do
Cleaning Cautions
Usage Cautions
There is a risk of electric shock or fire
Critical Disposal
Do not re-freeze frozen foods that have thawed completely
Saving Energy Tips
Contents
Selecting the best location for the refrigerator
Setting up your French Door Refrigerator
Getting Ready to Install the Refrigerator
Choose
Removing the Refrigerator Doors
Accessories Required Tools
When moving your refrigerator
Required Tools Not provided
CA Utio N scratching surface
With the door opened
Place the door, inside facin g up, on a non
Lower left and right door hinges
Lift up the Flex door from the rails
RE-ATTACHING the Refrigerator Doors
Disassembling the Flex Door
Build-up
Disassembling Freezer Door
Adjusting the Level
RE-ASSEMBLING the Flex Door
RE-ASSEMBLING Freezer Door
Making Minor Adjustments to the Doors
Installing the Water Dispenser Line
How to adjust the level
First, shut off the main water supply
Connecting to the water supply line
Connecting the water supply line to the refrigerator
Use Copper Tubing Use Plastic Tubing
Setting up
Water Line Hookup
Installing a Cylinder into the Refrigerator
Purchasing CO2 Cylinders 60L
Open the Cylinder Cover
Completing the Set Up
Using the Control Panel
Operating your French Door Refrigerator
For Sparkling model Only
Sec for ºC
Ice Off
Sparkling Water
Produces sparkling water at
To activate the Cylinder Reset Function
Sparkling water, the refrigerator
Previous carbonation level
Cubed Ice
Water filter usage
Filter
Ice
Off Mode
Reset
For Ice/water model Only
Saver
Lock
Touch the Alarm/hold Sec for Filter Reset
Changing the Water Filter
Temperature
Controlling Temperature
Basic temperature of Freezer and fridge compartments
Controlling the Freezer
Controlling the fridge temperature
Will move sequentially from -8F to 5F or from -23C to -15C
Using the Cold Water Dispenser
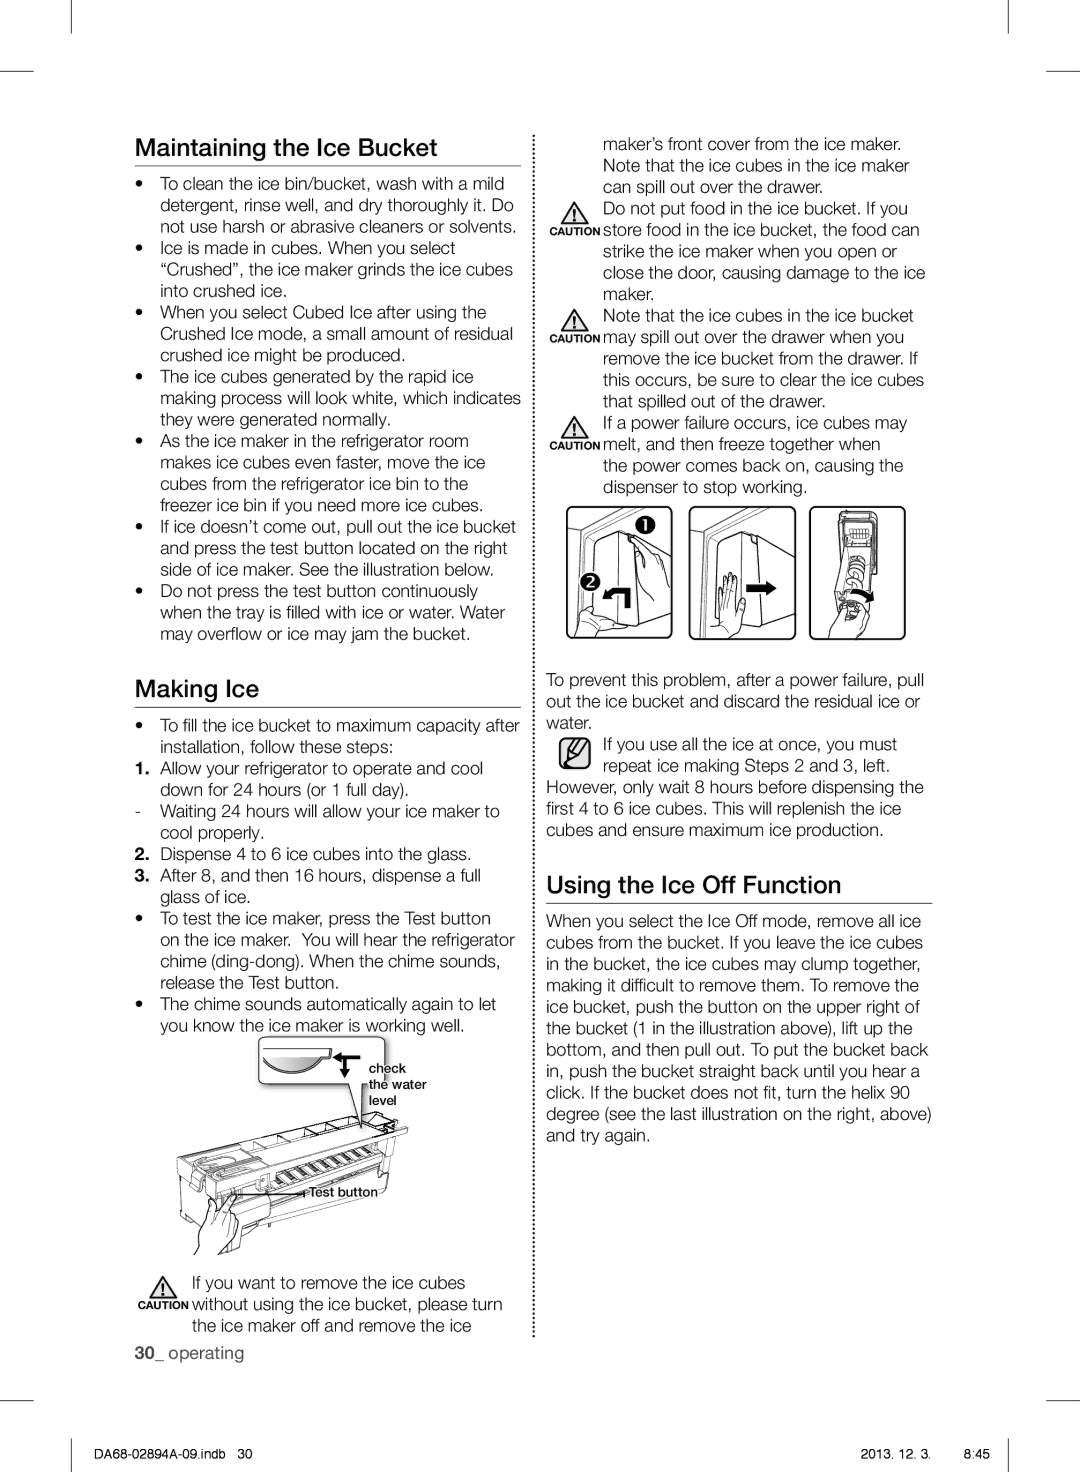
Making Ice
Using the Ice Off Function
Maintaining the Ice Bucket
Ice maker off and remove the ice
Water clouding phenomenon
Going on vacation
Ice Maker Do’s and Don’ts
Entrance Otherwise, the tray may get stuck
Dispensing Sparkling Water
Making Sparkling Water
Sparkling Water Production Time
Water Dripping
Controlling the Carbonation Level
Turning Off the Sparkling Water Function
Replacing a Cylinder
Operating
Parts and Features
Using Flex Zone
Temperature Selection Button
Wine Deli Cold Meat Party Snacks Drinks Fish Dishes
Removing Refrigerator Accessories
Recommended Location for the Foldable Shelf
Tempered Glass shelves
Vegetable & Fruit Drawers
To re-install
Foldable Shelf
Flex Zone
Super Extended Drawer
Removing the Freezer Accessories
Using the doors
Freezer Drawer
Cleaning the Exterior
Cleaning Refrigerator
Cleaning the Interior
Cleaning the Ice / Water Dispenser
Storing Extra Cylinders
Installing and Using CO2 Cylinders
Installing a Cylinder in the Fridge
Purchasing CO2 Cylinders 60L
Operational Notes
Food Storage Tips
Cream Dips opened Week Not recommended
Sources
Proof and vapor-proof container for freezing
Ham Weeks Months
Troubleshooting
Freezer
Frost forms on
Walls
Water
Warranty USA
Warranty on Samsung Refrigerator
Customer Care Center 1-800-SAMSUNG Customer Care Center fax
Limited Warranty for Original Purchaser
Exclusions of the Warranty
Obligation to the Original Owner
Memo
Memo
726-7864 07660
726-7864
Electrodoméstico independiente
Este manual está impreso en papel 100 % reciclado
Advertencias MUY Importantes Para LA Instalación
Información sobre seguridad
Información Sobre Seguridad
Símbolos y advertencias de seguridad importantes
Esto podría causar una descarga eléctrica o un incendio
Como conexión a tierra
Eléctrica
Precauciones Para LA Instalación
Advertencias MUY Importantes Para EL USO
Manos mojadas Puede provocar congelación
Precauciones DE USO
Servicio más cercano
Garantía de servicio y modificación
Precauciones Para LA Limpieza
Potable agua mineral o agua purificada
Advertencias MUY Importantes Para Desechar EL Producto
Recomendaciones Adicionales Para EL USO Correcto
Solución DE Problemas ……………………………………………………………………………
Contenido
Recomendaciones para el ahorro de energía
Elija
Preparación Para LA Instalación DEL Refrigerador
Selección de la mejor ubicación para el refrigerador
Una ubicación con fácil acceso a un suministro de agua
Herramientas necesarias no suministradas
Cómo Retirar LAS Puertas DEL Refrigerador
Cuando mueva el refrigerador
Desarmado de las puertas del refrigerador
Con la puerta abierta
Cómo Volver a Colocar LAS Puertas DEL Refrigerador
Cómo Desarmar LA Puerta DEL Cajón Flex
Levante la puerta del cajón Flex de los rieles
Cómo Volver a Armar LA Puerta DEL Congelador
Cómo Volver a Armar LA Puerta DEL Cajón Flex
Cómo Desarmar LA Puerta DEL Congelador
Ajuste DEL Nivel
Cómo ajustar el nivel
Cómo Hacer Pequeños Ajustes a LAS Puertas
Instalación DE LA Tubería DEL Dispensador DE Agua
Abra el cajón del congelador y extraiga la cesta inferior
Conexión a la tubería de suministro de agua
Uso de la tubería de Cobre Plástico
Férula Tuerca de compresión De ¼
Puesta a punto
Compra de cilindros de CO2 60L
Conexión a la tubería de agua
Instalación de un cilindro en un refrigerador
Finalización de la instalación
Alarma Hold 3 sec For Filter Reset Presionar
Restablecer El filtro
Niños
Funciones
Encender y apagar la fábrica de hielo
Función de Hielo desactivado
Carbonatación anterior
Gas, el refrigerador produce agua
Con gas de acuerdo con el nivel de
Después de cambiar los cilindros de CO2
10 Cómo se usa el filtro de agua
Filtro
Íconos del Nivel de
Si la alarma de la puerta está activada
Comida, active la función Power Freeze
El botón Alarm Alarma tiene dos funciones
De tres minutos, sonará una alarma. El
Cubed Ice Hielo en Cubos
Refrigerador Samsung
Cambio DEL Filtro DE Agua
Para reducir el riesgo de daños
Otros, daños materiales causados por
Control de la temperatura del congelador
Suministro de agua por ósmosis inversa Importante
Control de la temperatura del refrigerador
Uso de la palanca de agua
USO DEL Dispensador DE Agua Fría
Uso de la palanca de hielo
Uso simultáneo del dispensador de hielo y agua
Mantenimiento de la cubeta de hielo
Fábrica de hielo
Recomendaciones acerca de la fábrica de hielo
Uso de la función Ice Off Hielo desactivado
Durante las vacaciones
El fenómeno de turbidez del agua
Cómo dispensar agua con gas
Cómo hacer agua con gas
Tiempo de producción del agua con gas
Goteo de agua
Cómo controlar el nivel de carbonatación
Cómo apagar la función de Agua con gas
Cómo reemplazar el cilindro
Notas
Piezas Y Funciones
USO DEL Cajón Flex Zone
Botón de selección de la temperatura
Vino Piñas Agua Bistec
Estantes de vidrio templado
Levántelo en forma vertical 2 . Extraiga el estante
Estante plegable
Cajones de vegetales y frutas
Para volver a colocarlos
Cajón superextensible
Uso de las puertas
Cajón Flex Zone
Cajón del congelador
Limpieza DEL Refrigerador
Almacenamientos de cilindros extra
Cómo instalar y usar los cilindros de CO2
Cómo instalar un cilindro en el refrigerador
Compra de cilindros de CO2 60L
Notas sobre el funcionamiento
Recomendaciones DE Almacenamiento DE Alimentos
Fuentes
Pescados Y Mariscos
Solución de problemas
Escarcha en
Hay mal olor en
Se forma
Las paredes del
Garantía USA
Garantía DEL Refrigerador Samsung
Centro DE Asistencia AL Cliente DE Samsung
Memo
Memo
Questions or COMMENTS?
Appareil amovible
Ce guide est en papier recyclé à 100 %
Consignes de sécurité
Avertissements Importants Concernant Linstallation
Consignes de sécurité importantes et symboles
Consignes DE Sécurité
Lappareil à la terre
La terre que vous brancherez dans une prise
Installation EN Toute Sécurité
Avertissements Importants Concernant Lutilisation
Utilisation EN Toute Sécurité
Nettoyage EN Toute Sécurité
Deau Vous éviterez ainsi tout risque de fuite
Avertissements Importants Concernant LA Mise AU Rebut
Avant de le nettoyer ou den faire lentretien
Table des matières
Conseils en matière déconomie dénergie
DÉPANNAGE…………………………………………………………………………………………………
Avant Dinstaller LE Réfrigérateur
Choisissez
Déplacer le réfrigérateur
Accessoires ET Outils Nécessaires
Retrait DES Portes DU Réfrigérateur
Outils nécessaires non fournis
Avec la porte ouverte
Intérieur orienté vers le haut
Résinstallation DES Portes DU Réfrigérateur
Démontage DE LA Porte DU Tiroir Flex Zone
Démontage DE LA Porte DU Congélateur
Résinstallation DE LA Porte DU Tiroir Flex Zone
Réinstallation DE LA Porte DU Congélateur
Réglage DU Niveau
Comment ajuster le niveau
Installation DU Circuit DU Distributeur Deau
Apport DE Légers Réglages AUX Portes
Ouvrez le tiroir du congélateur et retirez le bac inférieur
Raccordement du tuyau d’adduction deau au réfrigérateur
Utilisation dun tube en Cuivre Plastique
Bague Poire Écrou de serrage de
Installation
Raccordement de la conduite deau
Installation dune bouteille dans le réfrigérateur
Achat de bouteilles de CO2 60L
Ouvrez le capot de la bouteille
Fin de l’installation
RF31FMES** pour le modèle avec eau pétillante uniquement
Utilisation DU Panneau DE Commande
Alarme
Appuyez
Température, soit ºC et ºF
Distributeur
Il permet d’alterner entre les unités de
Fonction d’éclairage
Désact
Glace
Pdt 3s
Leau
Usure du filtre à eau
Glaçons
Icône
Sparkling Water Production Level
RF31FMED** pour le modèle avec glace/eau uniquement
Dénergie
Il permet de régler le réfrigérateur à la
Bouton, le mode alterne entre glaçons
Le bouton Fridge Réfrigérateur a deux Fridge fonctions
Entre 44 F 7 C et 34 F 1 C
Remplacement DU Filtre À EAU
Afi n déviter les risques de fuite, nutilisez
Ltre deau. Le voyant rouge séteint
Réglage de la température du
Réglage DE LA Température
Congélateur
Alimentation en eau d’osmose inverse Important
Réglage de la température du réfrigérateur
La nouvelle valeur. Celle-ci saffi che sur lécran numérique
Utilisation simultanée du distributeur de glace et deau
Utilisation du levier distributeur de glace
Utilisation du levier distributeur d’eau
Utilisation du levier Distributeur de glace 1
Entretien du bac à glace
Production de glaçons
Faire et à éviter avec la machine à glaçons
Utilisation de la fonction Ice Off Désactivation glace
Si vous partez en vacances…
Phénomène deau trouble
Distribution de leau pétillante
Production deau pétillante
Temps de production de leau pétillante
Écoulement deau
Réglage du niveau de carbonatation
Remplacement dune bouteille
Désactivation de la fonction deau pétillante
Remarques
Pièces ET Caractéristiques
Bouton de sélection de température
Une fois le mode « Deli/Snack » épicerie
Utilisation DU Tiroir Flex Zone
De la fréquence à laquelle la porte est ouverte
Retrait DES Accessoires DU Réfrigérateur
Tablettes en verre trempé
Pour les remettre en place alignez
Bacs à légumes et à fruits
Réinstallation
Tablette rabattable
Tiroir Flex Zone
Tiroir grande capacité
Retrait DES Accessoires DU Congélateur
Utilisation des portes
Tiroir du congélateur
Nettoyage du distributeur de glace/deau
Nettoyage de la partie intérieure
Nettoyage de la partie extérieure
Nettoyage des joints des portes en caoutchouc
Bouteilles de CO2 60L génériques
Installation et utilisation des bouteilles de CO2
Entreposage des bouteilles supplémentaires
Raccordement du tuyau deau
Remarques opérationnelles
Conseils DE Conservation DES Aliments
Aliments Réfrigérateur Congélateur Conseils de conservation
Lez dans le réfrigérateur ou vérifi ez la date limite de
Dépannage
Désagréable
Dégage
Une odeur
Du gel se forme
Partie centrale
Le mode d’économie d’énergie
Deux côtés de la
De la porte du
Exclusions de la garantie
Garantie limitée à lacheteur initial
Obligation du propriétaire initial
TÉL 905-542-3535 FAX Samsung
DA68-02894A-09.indb 2013
DA68-02894A-09.indb 2013
DES Questions OU DES COMMENTAIRES?