ENGLISH


DEUTSCH


Advanced Recording


Weiterführende Funktionen


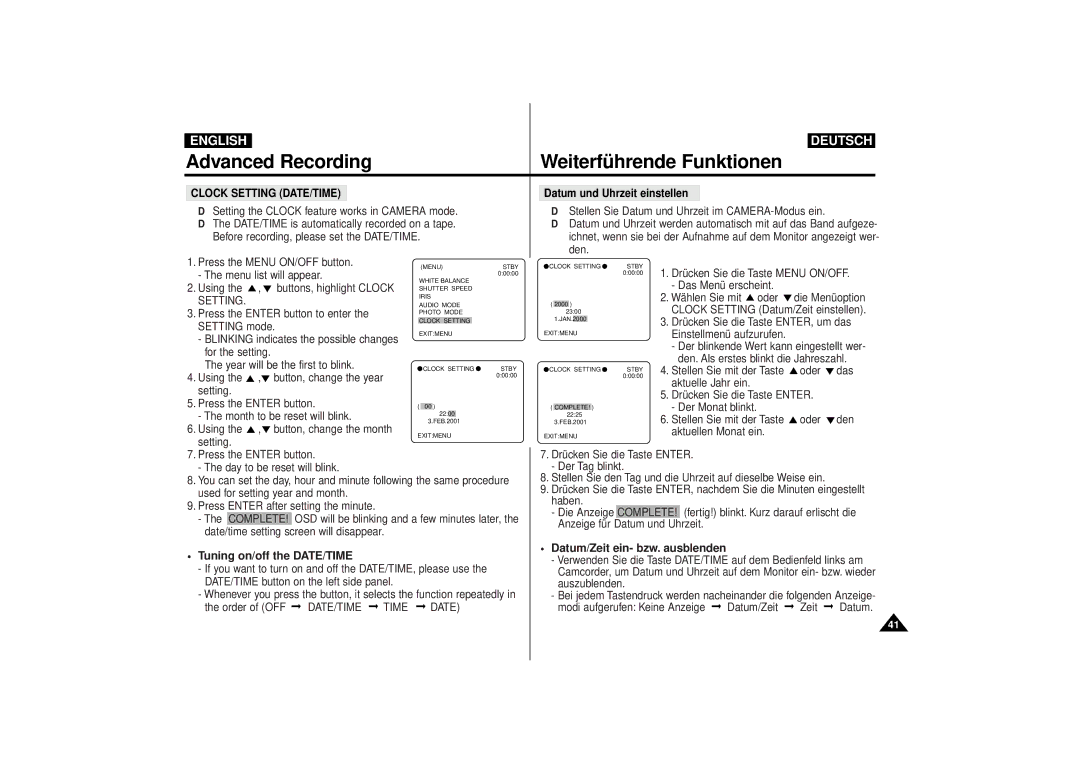
CLOCK SETTING (DATE/TIME)


Datum und Uhrzeit einstellen


Setting the CLOCK feature works in CAMERA mode.


Stellen Sie Datum und Uhrzeit im CAMERA-Modus ein.


The DATE/TIME is automatically recorded on a tape.


Datum und Uhrzeit werden automatisch mit auf das Band aufgeze-


Before recording, please set the DATE/TIME.


ichnet, wenn sie bei der Aufnahme auf dem Monitor angezeigt wer-


1. Press the MENU ON/OFF button.


den.


(MENU)

STBY


CLOCK SETTING

STBY

1. Drücken Sie die Taste MENU ON/OFF.


- The menu list will appear.


0:00:00


0:00:00


WHITE BALANCE


2. Using the

,

buttons, highlight CLOCK


- Das Menü erscheint.


SHUTTER SPEED


SETTING.


IRIS


2. Wählen Sie mit oder

die Menüoption


AUDIO MODE


(

2000

)


3. Press the ENTER button to enter the


PHOTO MODE


23:00


CLOCK SETTING (Datum/Zeit einstellen).


1.JAN.

2000


3. Drücken Sie die Taste ENTER, um das


SETTING mode.


CLOCK SETTING


EXIT:MENU


EXIT:MENU


Einstellmenü aufzurufen.


- BLINKING indicates the possible changes


- Der blinkende Wert kann eingestellt wer-


for the setting.


den. Als erstes blinkt die Jahreszahl.


The year will be the first to blink.


CLOCK SETTING

STBY


CLOCK SETTING

STBY

4. Stellen Sie mit der Taste

oder

das


4. Using the

,

button, change the year


0:00:00


0:00:00


aktuelle Jahr ein.


setting.


5. Drücken Sie die Taste ENTER.


5. Press the ENTER button.


(


)


- Der Monat blinkt.


00


(

COMPLETE!

)


- The month to be reset will blink.


22:

00


22:25


6. Stellen Sie mit der Taste

oder

den


3.FEB.2001


3.FEB.2001


6. Using the

,

button, change the month


EXIT:MENU


EXIT:MENU


aktuellen Monat ein.


setting.


7. Press the ENTER button.


7. Drücken Sie die Taste ENTER.


- The day to be reset will blink.


- Der Tag blinkt.


8. You can set the day, hour and minute following the same procedure


8. Stellen Sie den Tag und die Uhrzeit auf dieselbe Weise ein.


used for setting year and month.


9. Drücken Sie die Taste ENTER, nachdem Sie die Minuten eingestellt


haben.


9. Press ENTER after setting the minute.


- Die Anzeige

COMPLETE!

(fertig!) blinkt. Kurz darauf erlischt die


- The

COMPLETE!

OSD will be blinking and a few minutes later, the


Anzeige für Datum und Uhrzeit.


date/time setting screen will disappear.


• Tuning on/off the DATE/TIME


• Datum/Zeit ein- bzw. ausblenden


- Verwenden Sie die Taste DATE/TIME auf dem Bedienfeld links am


- If you want to turn on and off the DATE/TIME, please use the


Camcorder, um Datum und Uhrzeit auf dem Monitor ein- bzw. wieder


DATE/TIME button on the left side panel.


auszublenden.


- Whenever you press the button, it selects the function repeatedly in


- Bei jedem Tastendruck werden nacheinander die folgenden Anzeige-


the order of (OFF


DATE/TIME


TIME


DATE)


modi aufgerufen: Keine Anzeige


Datum/Zeit


Zeit


Datum.


41

Page 41
Image 41
Samsung VP-D55, VP-D63 manual Tuning on/off the DATE/TIME Datum/Zeit ein- bzw. ausblenden, Clock Setting DATE/TIME, Complete

VP-D63, VP-D55 specifications

The Samsung VP-D55 and VP-D63 are remarkable camcorder models that cater to both amateur and semi-professional videographers, blending innovative technology with user-friendly features. Released during a time when digital video recording was making significant strides, these devices are designed to deliver high-quality performance for various recording needs.

One of the standout features of both the VP-D55 and VP-D63 is their digital video recording capability, which allows users to capture sharp and vibrant video. The camcorders utilize a 1/6-inch CCD sensor, which ensures that footage is clear, even in less-than-ideal lighting conditions. This capability is enhanced by the camcorders' advanced resolution of up to 520 TV lines, resulting in superior image quality.

Both models are equipped with Samsung’s unique lens system, featuring a 34x optical zoom on the VP-D55 and an impressive 42x optical zoom on the VP-D63. This allows videographers to capture distant subjects with remarkable clarity and detail, making these camcorders ideal for various situations, from family gatherings to wildlife filming. The zoom functionality is complemented by digital zoom capabilities, enabling even closer shots without significant loss of image quality.

User convenience is paramount in both models. The VP-D55 and VP-D63 feature intuitive controls and an easy-to-navigate interface, which makes them accessible to beginners while still providing the necessary features for more experienced users. A 2.5-inch TFT LCD display offers a clear view of what’s being recorded, allowing for precise framing and easy playback of recorded footage.

For sound, both camcorders utilize a built-in stereo microphone, creating an immersive audio experience that complements the stunning visuals. Additionally, the VP-D63 includes a microphone input for those who wish to enhance their audio capture capability further.

Another attractive feature is the onboard editing functions, allowing users to create exciting video segments directly from the camcorder without the need for external editing software. The inclusion of various scene modes also permits users to adapt their recording settings to different environments, ensuring optimal results regardless of the situation.

In conclusion, the Samsung VP-D55 and VP-D63 camcorders stand out due to their high-quality video recording, powerful zoom capabilities, easy-to-use interface, and flexible editing options. These features make them excellent choices for anyone looking to capture life's moments in stunning detail and sound.