DV-S100
Dolby Digital
Introduction
Function available with a video CD
Macrovision
Contents
With new discs
Precautions for handling discs How to use the magazine
Installing the magazine
Loading a disc
Installation parts for Changer unit
Accessories
For safe driving
For safe and efficient operation
Playable discs
When the changer is connected directly to Sanyo CD or
Before using the system Power On
Setting up for operation
Power On and Play
Audio CD Operation Screen
Remote control
How to load the batteries
Range of remote control operation
Name & functions of each part
To Stop Play
Switching Off
Pausing Freezing
Stopping Play
During play, press a skip button or
Selecting a Disc
Advancing / Returning to a Chapter or Track
Press a disc select button or
Audio CD
Using the Title Menu
Fast Playback
DVD and Video CD
Using PBC Playback
Using DVD Menus
ZSee step Stopping PBC Playback and Beginning Normal Play
Stopping PBC Playback and Beginning Normal Play
Function operates. zSee To Stop Play
At the upper right of the screen appears
Using Frame Advance Play and Slow Play
Using Frame Advance Play
Using Slow Play
Press the enter button
During play, press the search button
While play information is displayed, use the search button
Time of title, track number, elapsed time of track
Switching the Audio Language
Switching the Audio Output Method
Video CD
Switching the Angle
Switching the Subtitle Language
Program list creation screen appears
ZSee Using Scan Play, Random Play, and Program Play on this
Creating a Program List
ZSee Creating a Program List on this
Lights ZSee page 8, Audio CD Operation Screen
Indicator on the operation screen
Press Input number display shows
Press Input number display shows 2 next to
Using Repeat Play
Video CD, Audio CD
During play, press the repeat button
Using A-B Repeat Play Mode
Displaying a Disc List
Press the A-B repeat button
Press the list button
Press the enter button . The selected disc is played
Displaying a Disc List Displaying Running Time
Press the list button or the return button
Press the time button
Press the time button during play or while paused
Switching the Type of Running Time Display
Press the stop button To stop play Press the setup button
Change the settings
Press the play button . Play begins
DVD menu language setup screen is displayed
Changing the DVD Menu Language
Press the return button or the left cursor button
Audio language setup screen is displayed
Changing the Audio Language
You can change the DVD audio language
Subtitle language setup screen is displayed
Changing the Subtitle Language
Subtitle Language and press the enter button
Enter button
Subtitle language or Off when hiding subtitles and press
Changing the Digital Output
Use the up/down cursor buttons , to select a preferred
Pan & Scan
Use the up/down cursor buttons , to select the audio
Output LPCM/Bitstream and press the enter button
Letter Box
Changing Parental Settings
When using this unit for the first time
Password registration screen is displayed
Number Press the enter button
Password re-entry screen is displayed
Use the number buttons to enter the registered
Password
Changing the parental level
Use the up/down cursor buttons , to select a level
Changing the password
OSD Message setup screen is displayed
Switching Between OSD Message Display and Non-Display
Changing the Player Language
Player Language setup screen is displayed
Position of the built-in anti-vibration boards
Before wiring and installation
Installation and Wiring Precautions
Transport Lock Screws
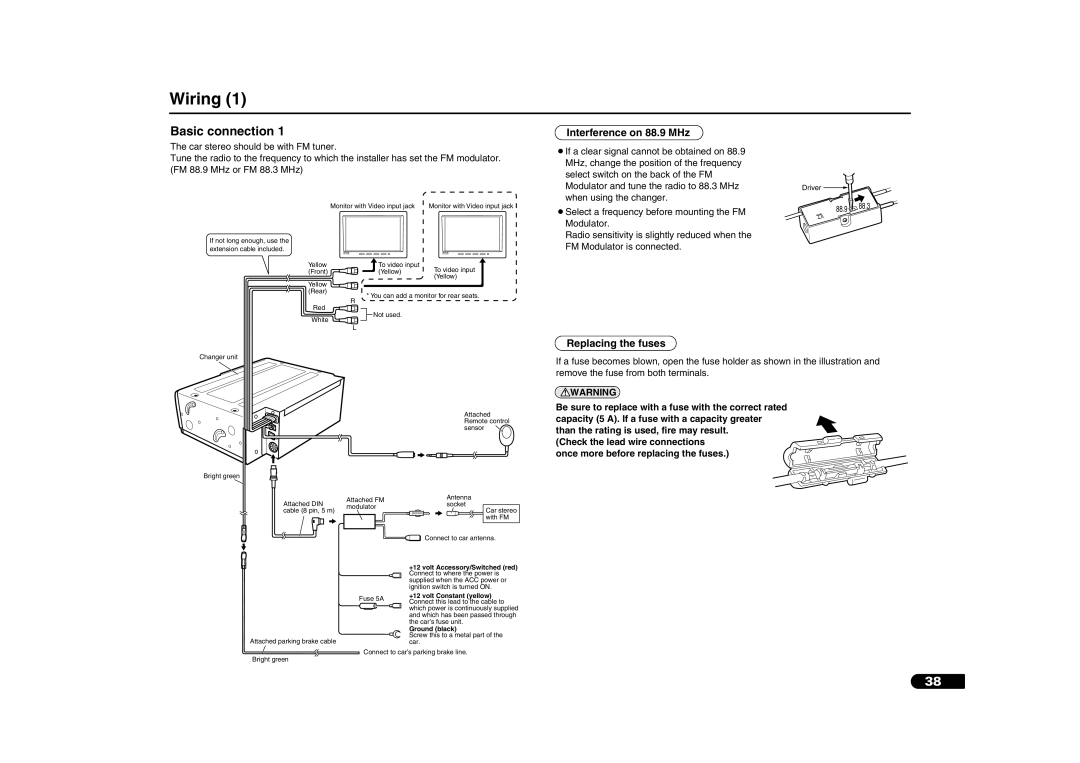
Replacing the fuses
Wiring
Basic connection
Interference on 88.9 MHz
Other connection Example
When your car stereo has RCA line-in terminals
Procedure for installation on carpet Horizontal position
Installation
Built-in anti-vibration
Installation of FM modulator
Message displays
Troubleshooting
Fast forward, fast reverse, frame
¡FM modulator
Specifications
Dimensions W x H x D Approx x 26 x 45 mm Weight Approx g
¡Changer
Page
2RR6P10A06700

![]() WARNING
WARNING![]()
