M1 by Sanyo
Table of Contents
2D. Controlling Your Roaming Experience
2G. Using the Phone’s Calendar and Tools
205
Index
Welcome and thank you for choosing Qwest
Welcome to Qwest
Introduction
Outgoing Incoming Missed Recent Calls Erase History
Find/Add Entry Group Speed Dial #s My Name Card Services
Send Message
Text Picture Mail Instant Msg
Print@Home Settings & Info
Settings
Voicemail
Camera Camcorder Picture Mail My Albums
Bluetooth Calendar File Manager USB Connection
Voice Services
Assigned Media Update Phone More Tools
Sounds
Display
Location Bluetooth
Power Vision
Ready Link
Messaging
Viii
Security
Others
Phone Info
USE Menu
Page
Getting Started
This Section
Setting Up Service
Setting Up Service
Unlocking Your Phone
Getting Started
To unlock your phone, follow these easy steps
Press to turn the phone on Select Unlock left softkey
Holding , bypassing the need for you to enter your passcode
Setting Up Your Voicemail
To set up your voicemail
Sprint Power Vision Password
Account Passwords
Account Password Voicemail Password
Operator Services
Reaching Qwest Wireless Customer Service
Getting Help
Directory Assistance
Using Your Phone
Phone Basics
Phone Basics
Front View of Your Phone
Earpiece lets you hear the caller and automated prompts
Key Functions
Supplied adapter plug
Phone Basics
Viewing the Display Screen
Phone Basics
Indicates your phone is in TTY mode
Indicates the Screen Call Auto setting is on
Indicates the speakerphone mode is set to on
Indicates the wired Car Kit device is set to on
Features of Your Phone
Sprint Power Vision Your phone and service provide access to
Turning Your Phone On
Turning Your Phone On and Off
Turning Your Phone Off
To turn your phone on
Battery Capacity
Using Your Phone’s Battery and Charger
Removing the Battery
Installing the Battery
To install the Li-Ion battery
To remove your battery
Using the Charger
Charging the Battery
To use the travel charger provided with your phone
Plug the travel charger into a wall outlet
Selecting Menu Items
Navigating Through Phone Menus
Displaying Your Phone Number
To return to standby mode
Backing Up Within a Menu
To go to the previous menu
Making and Answering Calls
To make a call using your keypad
Holding Your Phone
Making Calls
Dialing Options
To answer an incoming call with the phone closed
Answering Calls
To answer an incoming call with the phone open
Quiet Ringer to mute the ringer if available
Answer or AnswerSpeaker to answer the call
Answer on Hold to put the call on hold
Ending a Call
Answering a Roam Call With Call Guard Enabled
Missed Call Notification
Calling Emergency Numbers
To exit Emergency mode
Enhanced 911 E911 Information
To select Emergency mode options
Select Speaker Off to use the phone’s earpiece
In-Call Options
End-of-Call Options
Select a label and press
To save a number from standby mode
Saving a Phone Number
Dialing and Saving Phone Numbers With Pauses
Finding a Phone Number
To find a phone number
There are two types of pauses available on your phone
To place a call using Abbreviated Dialing
Using Abbreviated Dialing
To dial or save phone numbers with pauses
Enter the phone number
Plus + Code Dialing
To make a call using Plus Code Dialing
Dialing From the Contacts List
To dial directly from a Contacts entry
To use speed dial
Using Speed Dialing
To change the character input mode
Selecting a Character Input Mode
Entering Text
Recent Messages to enter messages used recently
Abc Abc
To enter a word using T9 Text Input
Entering Characters Using T9 Text Input
Adding a Word to the T9 Database
To accept a word and insert a space, press
Word Choice List to display the word choice list
Customizing the T9 Settings
To customize the T9 Settings
Characters scroll in the following order
Entering Characters Using Alphabet Mode
TTY Use
Controlling Your Phone’s Settings
Phone Setup Options
Controlling Your Phone’s Settings
Sound Settings
Ringer Types
Selecting Ringer Types for Incoming Calls
Selecting Ringer Types for Ready Link Calls
To select a ringer type for voicemail or calendar/alarm
Selecting Ringer Types for Messaging
To select a ringer type for Ready Link calls
Selecting a Tone Length
Selecting a Vibrate Pattern
To select a vibrate pattern
To select a key tone
Setting Up Key Press Echo
Setting a Start-up/Power-off Tone
Using Voice Prompt
Adjusting the Alert Volume Settings
Adjusting the Phone’s Volume Settings
To adjust the ringer volume
Select Settings Sounds Volume Ringer
To adjust the receiver volume
Adjusting the Phone’s Receiver Volume
To enable or disable alert sounds
Alert Notification
Changing the Text Greeting
Display Settings
Silence All
To change the Keypad backlight setting
To change the backlight setting
Changing the Backlight Time Length
Changing the Display Screen Animation
Changing the Screen Saver
Changing the Clock/Calendar Display for Standby Mode
Changing the Display for Incoming Calls
To set this feature
Power Save Mode
Customizing the User Interface
To customize the display themes
Changing the Display for My Buddy
Changing the Phone’s Menu Style
Changing the Display for Area Name
Select Settings Display Others Font Size
Setting Return to Standby Mode
Changing the Text Font Size
To change the text font size
To enable your phone’s Location feature
Location Settings
Sleep Mode
To set message notification
Messaging Settings
Setting Message Notification
To edit a preset message
Managing Preset Messages
To change the language of the preset messages
Select English or Spanish and press
Select Settings Messaging Text Signature
Setting a Callback Number
Adding a Customized Signature
To set the callback number
Setting Drafts Alert
Airplane Mode
Setting the Delivery Receipt
TTY Use
TTY Mode, your phone will display the TTY access icon
To turn TTY Mode on or off
To assign your shortcut key
Phone Setup Options
My Favorites
Display Language
Auto-Answer Mode
Setting Any Key Answer
To activate the Open Flip feature
Setting the Open/Close Flip Option
Select Settings Others Open/Close Flip
To activate the Close Flip feature
Setting the Key Guard
Setting Power On to Alert
To turn Power On to Alert on or off
To turn the Key Guard on or off
Setting Text Entry Options
Setting Navigation Key Shortcuts
To set the navigation key shortcuts
To set your text entry options
To set Abbreviated Dialing
Setting Abbreviated Dialing
Select Settings Others Abbrev. Dial
To set the headset mode
Setting Headset Mode
To set the sound mode
To connect the headset
Setting Your Phone’s Security
Using Your Phone’s Lock Feature
Accessing the Security Menu
Locking Your Phone
Unlocking Your Phone
Locking the Pictures Menu
Calling in Lock Mode
Changing the Lock Code
To activate lock services
Lock Services
Select Voice Calls, Power Vision, or Ready Link
Restricting Calls
To add or replace a special number
Using Special Numbers
Select Others Special #s
Select a field for your entry Enter the number and press
To erase phone content
Erasing Phone Content
Resetting Favorites
Resetting the Browser
To reset the browser
To reset favorites
Resetting Your Picture Mail Account
Resetting Your Phone
To reset your phone
To reset your Picture Mail account
To reset default settings
Resetting Default Settings
Select OK left softkey to enable Vision service
To disable Sprint Power Vision services
To enable Sprint Power Vision services
Controlling Your Roaming Experience
Roaming on Other Digital Networks
Understanding Roaming
Checking for Voicemail Messages While Roaming
To check your voicemail while roaming
Set Mode
Setting Your Phone’s Roam Mode
To set your phone’s roam mode
Select Settings Others Roaming Set Mode
Select Settings Others Roaming Call Guard
Using Call Guard
To turn Call Guard on or off
To place roaming calls with Call Guard on
To use data services when Data Roam Guard is active
Using Data Roam Guard
To set your Data Roam Guard notification
Select an option and press
Making the most of your Call History
Managing Call History
Viewing History
To view a Call History entry
Erase to erase the entry
Call History Options
To save a phone number from Call History
Making a Call From Call History
To place a call from Call History
Erasing Call History
Prepending a Phone Number From Call History
To prepend a phone number from Call History
To erase Call History
Using Contacts
Using Contacts
Select Contacts Find/Add Entry Add Contact
Adding a New Contacts Entry
To add a new entry
To assign a Contact to a group
Assigning a Group Entry
Select Contacts Group
To edit a group entry
To find Contacts entries by name
Finding Contacts Entries
Finding Names
Finding Group Entries
Finding Speed Dial Numbers
Select Contacts Speed Dial #s
To find entries designated as part of a group
Contacts Entry Options
To edit an entry’s phone number
To add a phone number to an entry
Display a Contacts entry. See Finding Contacts Entries on
To assign a speed dial number
Assigning Speed Dial Numbers
Select Contacts Speed Dial #s
Select an available speed dial location and press
Assigning an Image to a Contacts Entry
Editing a Contacts Entry
To make changes to an entry
To assign an image for an entry
To select a ringer type for an entry
Selecting a Ringer Type for an Entry
To make an entry public
Secret Contacts Entries
To make an entry secret
101
Using the Phone’s Calendar and Tools
Displaying Your Calendar
Using Your Phone’s Calendar
Changing the Calendar Settings
To add an event
Adding an Event to the Calendar
Select Tools Calendar
103
Event Alerts
To silence the alarm
Event Alert Menu
Viewing Day’s Events
105
Event List Options
Erasing a Day’s Events
Going to a Specified Date
To use the Calendar menu to get to a specified date
Select Tools Calendar Options right softkey Go to Date
Purging All Events
Purging Events
To delete all scheduled events
107
To add a call alarm to the calendar
Adding a Call Alarm to the Calendar
Adding a To Do List Item to the Schedule
Adding To Do List Items
To add an item to your To Do List
To add a To Do List item to the schedule
Using the Alarm Clock
Using Your Phone’s Tools
To use the alarm clock
Select Tools More Tools Alarm Clock
To start the stopwatch
Using the Stopwatch
To record a lap time while the stopwatch is running
To display the stopwatch options
To use the countdown timer
Using the Countdown Timer
World Clock
To view the time in different locations
To update your phone through the Tools menu
Using the Calculator
Updating Your Phone
To use the calculator
To connect your phone to your PC
Connecting Your Phone to Your PC
Select Tools USB Connection Mass Storage
To remove the connection
To access file manager
Accessing File Manager
File Manager
File Manager Icon Indication
Opening Files in the File Manager
Using File Manager Options
To open files in the file manager
Select Tools File Manager
Viewing Memory in File Manager
Sorting the Folder Contents
Personal Information Management
119
Using Your Phone’s Voice Services
Programming Voice Dial Tags
Using Voice-Activated Dialing
Making a Call Using Voice-Activated Dialing
Erasing All Voice Dial Tags
Reviewing Voice Dial Tags
To review voice dial tags
To erase all voice dial tags
Following is a list of available ASR commands
Using Automatic Speech Recognition
Activating Automatic Speech Recognition
To activate Automatic Speech Recognition
When you are finished, press
Making a Voice Call by Using ASR
To make a voice call by speaking a name
123
To find a contact in the Contacts list
Finding Contacts List Entries
To make a call by speaking a phone number
Making International Calls by Using ASR
Making a Call Using a Voice Tag
To make a call by using a voice tag
To make international calls by using ASR
To program Digit Training
Using Digit Training
Say Digit Training
To activate Digit Training
To access the menu by using ASR
Opening the Menu by Using ASR
To deactivate Digit Training
127
Say Call, Group or Dial Number
Making a Ready Link Call by Using ASR
To make a Ready Link Call by using ASR
Recording Voice Memos
Using the Voice Recorder
To record a voice memo
To end the recording of your voice memo
To record a voice memo with the phone closed
Reviewing Voice Memos
To play the voice memos you have recorded
To review the voice memos with the phone closed
Voice Memo Options
Setting the Recording Guard
To set the recording guard
To display the voice memo options
Recording Call Memos
Erasing Voice Memos
To erase an individual voice memo
To erase all voice memos
Erasing Call Memos
Reviewing Call Memos
To start Screen Call when you have incoming calls
Setting Up Screen Call
Activating Screen Call
Selecting an Announcement for Screen Call
Recording a Customized Announcement
Recording Your Name for a Prerecorded Announcement
To record your name
To record an announcement
Erasing an Announcement
Reviewing an Announcement
To review an announcement
To erase an announcement
137
Using the Built-in Camera
To take a picture with the phone open
Using the Built-in Camera
Taking Pictures
139
Delete to delete the picture you just took
To take a picture with the phone closed
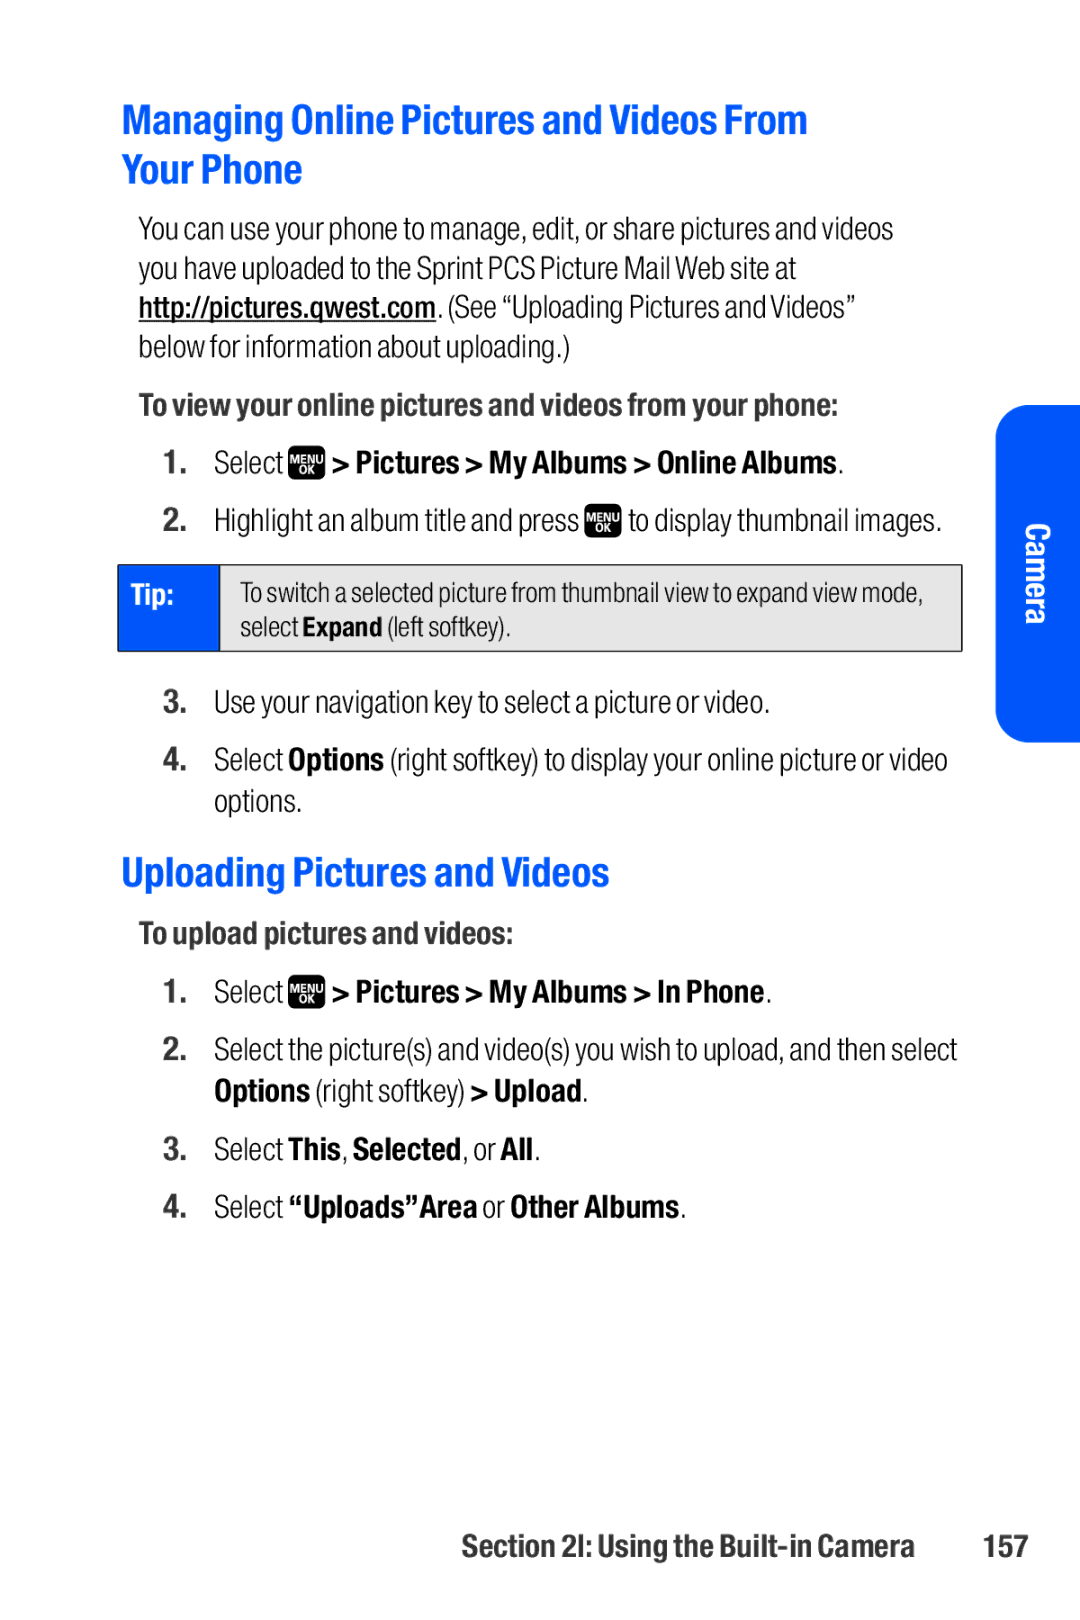
Select Pictures My Albums Online Albums
To create your Sprint PCS Picture Mail password
141
Camera Mode Options
Setting the Self-Timer
Setting the Flash
To activate the self-timer
To cancel the self-timer after it has started
143
Taking Multiple Shots
To take multiple shots
Using the Zoom
Setting Autofocus
To set autofocus
To use the zoom
Selecting Camera Settings
Using the Settings & Info Menu
To select your camera settings
To access the settings and info menu
Details
Camera Icon Indication
Function
147
Recording Videos
To record a video
To take a video with the phone closed
Video Mode Options
To select your camcorder settings
Selecting Camcorder Settings
Rich-120min
Skins to select your favorite frame
Video Icon Indication
Storing Pictures and Videos
In Phone see
Online Albums see
Phone Folder
Slideshow to view your pictures in slideshow mode
Phone Folder Options
Delete to delete pictures and videos
Use your navigation key to view and scroll
Assigned Media Folder
To save a picture or video to the Assigned Media folder
Sending Pictures and Videos From the In Phone Folder
Sending Sprint PCS Picture Mail
To send pictures from the In Phone folder
153
Using the Built-in Camera
Select Next left softkey
To send pictures and videos from the Messaging menu
Select In Phone or Online Albums
155
Managing Sprint PCS Picture Mail
Using the Sprint PCS Picture Mail Web Site
To access the Sprint PCS Picture Mail Web site
Uploading Pictures and Videos
Managing Online Pictures and Videos From Your Phone
To upload pictures and videos
Select UploadsArea or Other Albums
Select Save to.. and press
Accessing Online Picture and Video Options From Your Phone
Downloading Your Online Pictures and Videos
Videos
To access your Online Albums options from your phone
Media files
Album List to display the album list
To print pictures directly from your phone
Set the printer settings using your navigation key
161
Error
Using Ready Link
Using Ready Link
To enable or disable Ready Link mode
Setting Ready Link Mode
Getting Started With Ready Link
163
Speak by pressing and holding
Preparing Your Phone for Ready Link Service
Ready Link Call Alerts
Displaying the Ready Link List
Side of your phone to access the Ready Link List
Selecting a Contacts List
165
Making a Ready Link Call One-to-One Call
Continue holding as you speak. When you have finished
To place a Ready Link call by selecting a contact
Press and hold to take the floor and speak
Making a Ready Link Call Group Call
When the call is finished, press
To place a Ready Link Group call
Highlight a group member, and press and hold
To place a Ready Link call by entering a number
Making a Ready Link Call by Entering a Number
To call the last Missed Ready Link call
Missed Call Notification for Ready Link Calls
To erase the Missed Call log
To display the Missed Ready Link Call log
To receive a Ready Link call
When the conversation is finished, press
Receiving a Ready Link Call
171
Ready Link Options
To copy an entry from the Ready Link List
Adding and Editing Ready Link Contacts
Finding an Entry in the Ready Link List
Saving a Ready Link Number
To save the number
To find a Ready Link entry
You can store a total of 200 entries in the Personal Lists
Adding a New Contact to Your Personal List
To add a new Ready Link contact
Select Go to Personal List Add Contact
175
To add a new Ready Link group entry
Select Go to Personal Grps. Add Group
Editing a Group in Your Personal Group List
Editing a Contact in Your Personal List
To edit a Personal List contact
To edit a group name
Erasing an Entry in Your Personal Lists
Erasing Ready Link List Entries
To erase a contact or a group
Select Yes
Updating Ready Link Lists
Select Settings Ready Link List Update
Erasing a Ready Link List
Updating the Personal List
Restarting the Ready Link Service
Managing Ready Link Settings
Setting Ringer Types for Ready Link Calls
Setting Ready Link Guard
Setting Ringer Volume for Ready Link Calls
To select a ringer volume for Ready Link calls
To adjust the floor tone volume
Setting Vibrate Pattern for Ready Link Calls
To select a vibrate pattern for Ready Link calls
To set alerts for Ready Link calls
Setting the Floor Display of the Ready Link Calls
Setting the Speakerphone for Ready Link Calls
Setting the Default View of the Ready Link List
Playing a Video or Audio Clip Multimedia FAQs
Using the Built-In Media Player
Your Multimedia Channel Options
183
Your Multimedia Channel Options
Using the Built-in Media Player
185
Accessing Your Media Player’s Channel Listings
To access your media player and channel listings
To select and play a media clip in the Channel Listing
Playing a Video or Audio Clip
Select Media Player Channel Listing
To select and play a media clip in the Media Listing
187
Media Folder Options
To create a playlist
Playlists
Select Media Player Playlist
To add files to a playlist
To delete a playlist
To remove files from a playlist
Select Options right softkey Delete
Options available under the playlist menu may include
Key Operation While Playing Media Clips
To launch a Music or Media player
191
Multimedia FAQs
Are the videos that I’m viewing live videos?
Tip
193
Using Bluetooth
Using Bluetooth
Bluetooth Status Indicators
Turning Bluetooth On and Off
To turn Bluetooth on
To turn Bluetooth off
Bluetooth Settings My Device Name
Using the Bluetooth Settings Menu
To access the Bluetooth Settings menu
To set a Bluetooth name for your phone
Bluetooth Settings Voice Priority
Bluetooth Settings Visibility
Select Settings Bluetooth Visibility
To set the voice priority
Bluetooth Settings My Device Information
Bluetooth Profiles
Setting Auto-Accept
To display your phone’s device information
Movie media are not supported
199
To pair your phone with another Bluetooth device
Pairing Bluetooth Devices
Paired Devices
Waiting for Request
To use the trusted devices options
Using the Trusted Devices Options
From the trusted devices list, select a device
201
To print data via Bluetooth
Printing Data via Bluetooth
203
Sending Data via Bluetooth
To send data via Bluetooth
204
Qwest Service Features
Qwest Service Features The Basics
Features
207
Using Voicemail
Setting Up Your Voicemail
New Voicemail Message Alerts
Voicemail Notification
To call your voicemail
To display your Missed Log
Using Another Phone to Access Messages
Using One-Touch Message Access
Retrieving Your Voicemail Messages
Select Messaging Voicemail
Voicemail Button Guide
Using Expert Mode
To turn Expert Mode on or off
Callback
Setting Up Group Distribution Lists
Voicemail-to-Voicemail Message
211
Voicemail-to-Voicemail Receipt Request
Voicemail-to-Voicemail Message Reply
Voicemail-to-Voicemail Message Forwarding
Voicemail Menu Key
Clearing the Message Icon
Extended Absence Greeting
To clear the icon from the display screen
Qwest Service Features The Basics
Composing SMS Text Messages
Using SMS Text Messaging
To compose an SMS Text message
Email to enter the recipient’s email address
To read an SMS Text message
Accessing SMS Text Messages
To reply to an SMS Text message
Review your reply and select Send left softkey
To send preset messages into the text box
Using Preset Messages
To edit preset messages
To reset preset messages
To switch back to the first caller
Using Caller ID
Responding to Call Waiting
To respond to an incoming call while you’re on a call
219
Making a Three-Way Call
To make a Three-Way Call
To deactivate Call Forwarding
Using Call Forwarding
To activate Call Forwarding
221
Sprint PCS Vision
Getting Started With Sprint PCS Vision
Sprint PCS Vision Applications
Messaging Send and receive emails and chat on your phone
Sprint PCS Vision
Finding Your User Name
Your User Name
Updating Your User Name
While connecting, the following will appear on the screen
Sprint Power Vision Home
Connecting...Please wait
Launching a Data Connection
To change your Net Guard settings
Data Connection Status and Indicators
Net Guard
225
To use softkeys
Navigating the Web
Softkeys
Selecting
Scrolling
Going Back
Going Home
Accessing Email Providers
Accessing Messaging
To access email providers from your phone
Message Types
To access instant messaging clients from your phone
Accessing Instant Messaging
Select Messaging Instant Msg
Instant Messaging
Accessing the My Content Menus
Downloading Content
To access the download menus
To access the download menus from the Web browser
To download a selected item
Downloading an Item
Select an option to continue
231
Exploring the Web
Using the Browser Menu
Opening the Browser Menu
To open the browser menu
233
To access a bookmark
Accessing a Bookmark
Creating a Bookmark
To create a bookmark
Reloading a Web
Deleting a Bookmark
Going to a Specific Web Site
To adjust the browser sound volume
Adjusting the Browser Sound Volume
Restarting the Web Browser
To restart the Web browser
237
Sprint Power Vision
Sprint Power Vision
Using Sprint Power Vision
Enabling Sprint Power Vision
To access the Sprint Music Store
Accessing the Sprint Music Store
Exploring the Sprint Music StoreSM
Purchasing and Downloading Music
Once the song has been downloaded to your phone
Accessing the Music Player
Playing Music From the Sprint Music Store
To back up your downloaded music files
Backing Up Your Downloaded Music Files
Use your PC to navigate to the phone’s Music folder
Http//musicstore.qwest.com
Accessing On Demand Information
Initializing Your On Demand Service
To initialize your phone’s On Demand service
To access News information using On Demand
243
To manually retrieve On Demand updates
Updating On Demand Information
Previewing On Demand in Themes
Using Themes
Downloading Themes
To download an available theme to your phone
To apply a downloaded theme
Applying Themes
Select an available theme and press
245
246
Safety and Warranty Information
Important Safety Information
General Precautions
249
General Precautions
Maintaining Safe Use of and Access to Your Phone
251
Restricting Children’s Access to Your Phone
Turning Off Your Phone in Dangerous Areas
Box. Your M1 has an M4 rating
UsingYour Phone WithaHearing AidDevice
Select Settings Display Backlight
Caring for the Battery
Protecting Your Battery
Getting the Best Hearing Device Experience With Your Phone
Disposal of Lithium Ion Li-Ion Batteries
Radiofrequency RF Energy
Knowing Radiofrequency Safety
Understanding How Your Phone Operates
Body-Worn Operation
Cellular Cdma mode Part
Specific Absorption Rates SAR for Wireless Phones
PCS mode Part
FCC Radiofrequency Emission
257
FCC Notice
Phone Guide Proprietary Notice
Owner’s Record
259
Manufacturer’s Warranty
Warranty
Manufacturer’s Warranty
Manufacturer’s Limited Warranty
261
This warranty is valid only in the United States
Copyright 2007 InnoPath Software.All rights reserved
Index
Index
Index
From the Contacts List 36 In Lock Mode
Index
Yahoo! Messenger