AL-1644
AL-1633
Page
Contents
Misfeed in the SPF only on the SPF model
Troubleshooting
Air conditioner or
Important Points When Selecting AN Installation Site
Do not install your machine in areas that are
Changes, e.g., near an
Trademark acknowledgements
Environmental Information
Using the Manual
Online Manual on the accessory CD-ROM
Software Setup Guide separate manual
Model AL-1644 AL-1633 Appearance
Conventions Used in this Manual
SPF Differences Between Models
This manual covers the following models
Main Features
Part Names and Functions
Document feeder tray
Fusing unit release levers
Fusing unit paper guide Open to remove misfed paper
Parallel port
Operation Panel
Auto Image key Auto % / indicator
Original Size Enter key Enter / Original Size indicators
Paper Size indicators
SPF indicator only on the SPF model
Unpacking
Checking Packed Components and Accessories
Gently lift and pull out the paper tray until it stops
Install the TD cartridge
For installation of the TD cartridge, see the next
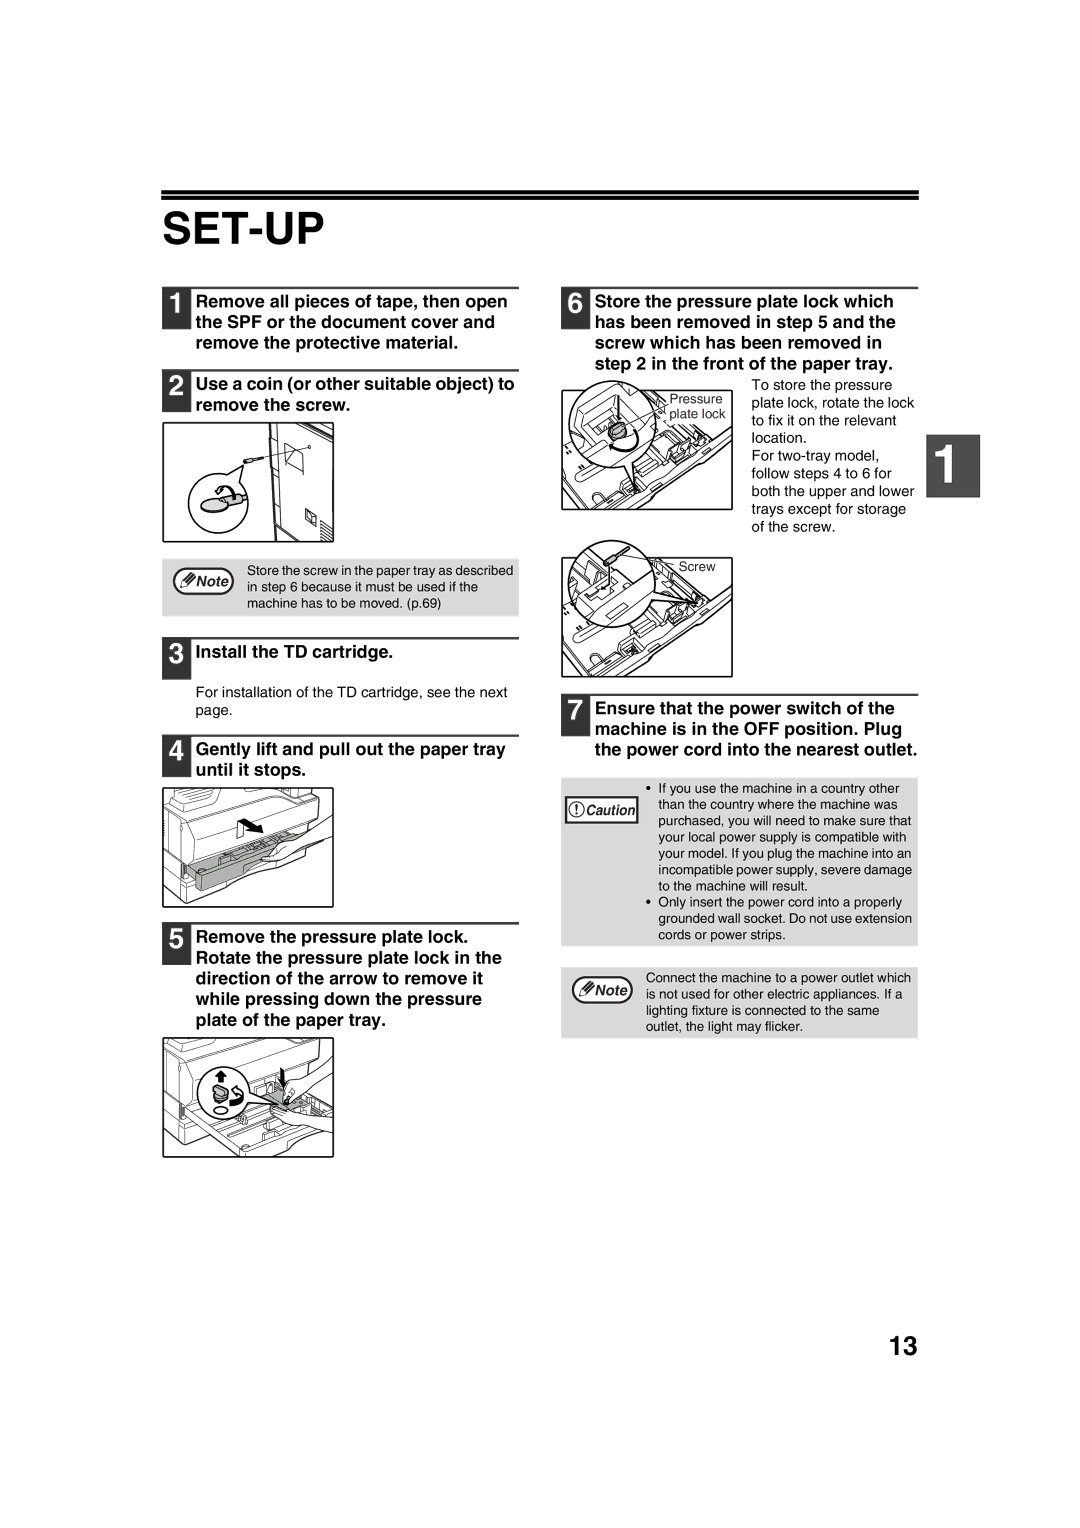
SET-UP
Installing the TD Cartridge
TD cartridge replacement required indicator will go out
Close the front cover
Power Save Modes
Power on and OFF
Power on
Power OFF
Special papers
Paper tray type Paper type Size Weight Capacity
Loading Paper
Paper
Fan the paper
Loading Paper
Loading the paper tray
Locks in place
Set the paper guides to the copy paper width
Important points when inserting paper in the bypass tray
Loading the bypass tray
Unfold the bypass tray
Envelopes
Changing a TRAY’S Paper Size Setting
Press the Start key and then press the Paper Size Enter key
Important points when using the printer mode
Normal Copying
Copying from the document glass
Open the document cover/SPF, and place the original
Copying from the SPF only on the SPF model
Set the originals face up in the document feeder tray
Set the number of copies
Auto paper select mode Two-tray model only
Original types
Auto tray switching Two-tray model only
Making a Copy Darker or Lighter
Selecting the Tray
Original position Selectable ratios
Setting the Number of Copies
REDUCTION/ENLAREGMENT/ZOOM
Automatic Ratio Selection
Press the Auto Image key Auto %
Selecting a preset ratio
Fine adjustment of the ratio
Manual Ratio Selection
Press the Copy ratio display key
XY Zoom copying
Down the Copy ratio display key
TWO-SIDED Copying Using the Bypass Tray
Copy original a
Place original B as shown below
Dual page Copying
Interrupting a Copy RUN
Press the Interrupt key to interrupt the copy run
Replace the previous originals and press the Start key
Click the Print button or the OK button to begin printing
Using the Printer Mode
Basic Procedure for Printing
Make sure that paper is loaded in the tray
When Use close paper size is disabled
Using the Scanner Mode
Scanning Using the Keys on the Machine
Pausing a print job
Scanning
Scanning from Your Computer
Scan Menu keys and the Button Manager scan menu
Press a Scan Menu key to begin
Scanner During scan preview
Operation in COPY, PRINTER, and Scanner Modes
During copying
Printer During printing
Adjusting the Automatic Exposure Level
Save mode, make sure
Enabling Toner Save Mode
When enabling toner
Photo indicator stops blinking and lights steadily
User Programs
Customising Settings
Short beep
Explanation
300dpi
Minimum
Base settings
Selecting a Setting for a User Program
Factory default settings
Settings for Auditing Mode
Auditing Mode
Auditing Mode Settings
For the setting codes, see Auditing Mode SETTINGS. p.41
Selecting Auditing Mode Settings
Account number deletion
Auditing mode
Account number entry
Account number change
Copying when Auditing mode is enabled
Resetting account
Troubleshooting
MACHINE/COPYING Problems
Paper misfeed Too much paper is loaded in the tray
Problem Cause and solution Misfeed occurs
Paper is not loaded properly
Pieces of paper inside machine
Original smudged or blotchy
Any other indicators are lit
Power Save indicator is
Power Save indicator is only lit Lit
Printing and Scanning Problems
Uneven
Printed image is dirty
Runs off the paper
Poor scanning quality
You have not specified a suitable resolution
Brightness and contrast settings are not suitable
Original is smudged or blotchy
If you need to remove the software, follow these steps
Removing the software
Click the start button, and then click Control Panel
Click Add or Remove Programs
Indicators and Display Messages
Misfeed Removal
Remove the misfed original
AL-1644 AL-1633
Misfeed in the Bypass Tray
Misfeed indicator will go out
Misfeed in the paper feed area
Misfeed in the Machine
Misfeed in the fusing area
Allow easier removal
Misfed paper during
Misfeed in the transport area
Close the side cover
Be careful not to tear the misfed paper during removal
Misfeed in the Upper Paper Tray
Close the upper paper tray
Push the upper paper tray in completely
Grasp the handle to open the lower side cover
Open the lower side cover
Close the lower paper tray Remove the misfed paper
Close the lower side cover
Replacing the TD Cartridge
Replacing the Drum Cartridge
Drum cartridge replacement required Indicator will go out
Total copy count
Checking the Total Output Count
Checking the Total Output Count
Total output count
Hold down the Clear key for more than 5 seconds
Checking the Toner Level and Drum Cartridge Life
Toner Level
Press the Light key to return to the normal display
Routine Maintenance
Cleaning the Document Glass and SPF/ Document Cover
Cleaning the Bypass Tray Paper Feed Roller
Cleaning the Transfer Charger
Supply list
Storage of Supplies
Supply Part Numbers
Proper Storage
Accessories p.12
When moving this machine, follow the procedure below
Moving Instructions
Specifications
Printer Function
SPF only on the SPF model Specifications
Scanner Function
Software License
Page
Index
Symbols
Normal copying
TD cartridge replacement required
Tray Select key 11, 19, 21, 23 Troubleshooting
Printing and scanning problems
Machine settings
Problem occurs
Indicators, lit and blinking
Memo
Memo
Class Laser Product Laser Klasse
Page
2004E