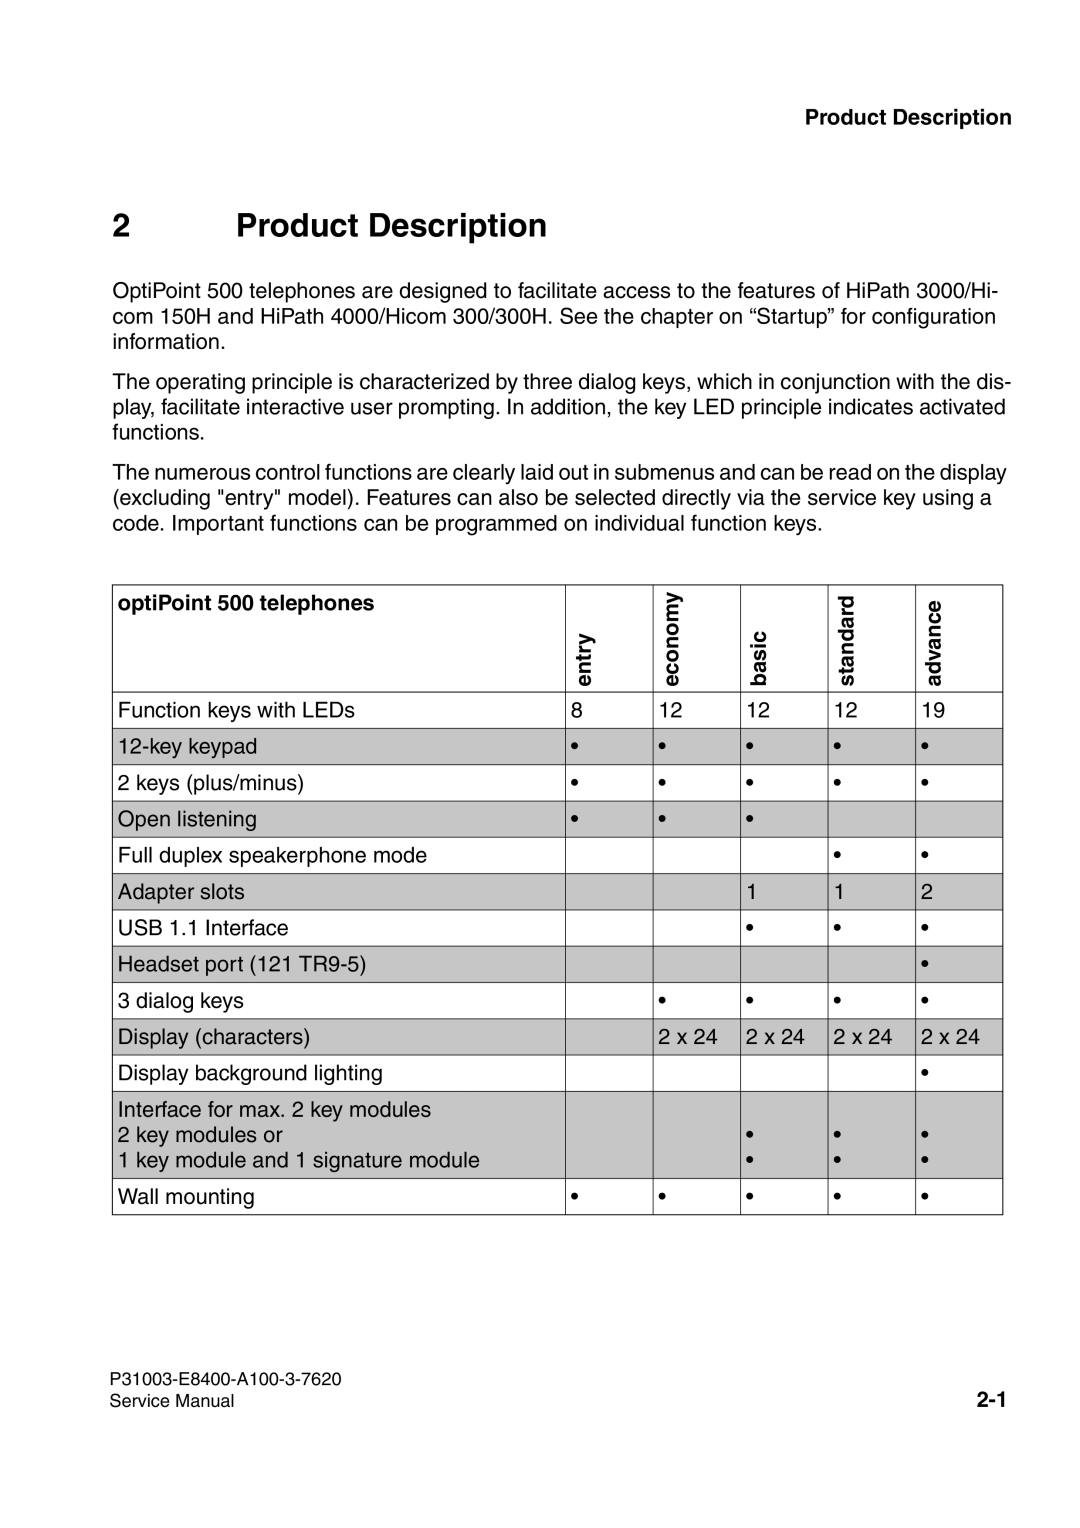
P31003-E8400-A100-3-7620
Key Modules, Adapters, Accessories Service Providers
optiPoint System-Specific Telephones
1PP31003-E8400-A100-3-7620
Contents
1 General Service Information
3 Startup
9 Ordering Information
8 Troubleshooting
P31003-E8400-A100-3-7620
Figures
P31003-E8400-A100-3-7620
Tables
P31003-E8400-A100-3-7620
General Service Information
1 General Service Information
1.1 Service Concept
1.2 Safety Information
Helpful suggestions
1.3 Safety Symbols
General Service Information
4 Electrostatically sensitive devices Using Personal Data
General Service Information
Guidelines for Using Data
Conscious action helps maintain data protection and data security
Safety Symbols
General Service Information
economy
2 Product Description
Product Description
optiPoint 500 telephones
Product Description
2.1 optiPoint 500 Features at Hicom/HiPath
Features when Connecting to Hicom and HiPath
Additional Features when Connecting optiPoint 500 to HiPath
2.2 Configuration Notes
Product Description
Modules Add-On Components and Adapters
Connectivity
2.3 Telephones 2.3.1 optiPoint 500 entry
Product Description
Controls
Connectivity
2.3.2 optiPoint 500 economy
Product Description
Controls
Connectivity
2.3.3 optiPoint 500 basic
Product Description
Controls
Controls
2.3.4 optiPoint 500 standard
Special Features
Product Description
Controls
2.3.5 optiPoint 500 advance
Special Features
Product Description
2.4 Module Options
Configuration Notes
Product Description
2.4.1 optiPoint 500 key module
Product Description
2-10
2-11
2.4.2 Busy Lamp Field BLF
2.4.2.1 Power Supply
Product Description
Module Options Figure 2-6 Power supply to BLF
Product Description
2-12
Product Description
2.4.2.2 Connection to the Terminal
2-13
Product Description
Interface Description MW8/8 RJ45
2-14
2-15
2.4.3 optiPoint 500 signature module HiPath 4000 only
Product Description
I2C Bus Memory Cards
optiset E External Speaker
2.5 Accessories 2.5.1 External Speaker/Desk Microphone
Product Description
Desk Microphone
Headset
2.5.2 optiPoint Headsets
Connecting the Headset to an 121TR9-5 Interface
Product Description
Name
2.5.3 Local Power Supply Unit
Primary/Client Configuration see Section 5.5 on page
Product Description
Product Description
2.5.4 Accessory Pack
2.5.5 Online Key Labeling Tool
2.5.6 Wall Mounting
Product Description
2.6 Technical Data 2.6.1 Asset ID
2.6.2 Environmental Conditions
Ambient temperature
Product Description
2.6.3 Ranges
2.6.4 UP0/E Interface
2.6.5 USB 1.1 Interface
Technical Data
Product Description
2-22
3.3 Keypad and Control Panel
3.2 Setting Up the Telephone
3 Startup
3.1 Unpacking the Box
Keypad Polling
3.4 Date and Time Indicator
Date and Time Indicator
Startup
3.5 Ports on the Underside of the Telephone
Startup
Ports on the Underside of the Telephone
Code
3.6 Telephone Tests
Accessing the Telephone Test
Startup
optiPoint 500 telephone
Startup
Test Function Not Working
HiPath 4000/Hicom 300H
Because the optiPoint 500 advance has more function keys 4 + 15 than all optiset E tele- phones max. 4 + 8, the system generates an optiset E advance plus/comfort with optiset E key module for the optiPoint 500 advance. This combination is also recognized by HiPath 3000 Manager E/Hicom Assistant E Office
Startup
3.7 Block Diagrams
Figure 3-3 optiPoint 500 entry, economy block diagram
Startup
Startup
Figure 3-4 optiPoint 500 basic, standard and advance block diagram
Private Network Termination Units
4 Private Network Termination Units
HiPath
Hicom
4.4 Distance Adapter UCON S and M at Hicom 300/300 E and HiPath
4.1 PNT Private Network Termination
4.2 PNT E Private Network Termination
4.3 PNT Q Private Network Termination
5 Option Adapters and Ports
Option Adapters and Ports
Comparison of optiset E Adapters and optiPoint Option Adapters
Option Adapters and Ports Configuration Notes
5.1 Adapter Slots
Option Adapters and Ports
Adapter Slots
It is intended for use with the following systems
5.2 optiPoint 500 acoustic adapter
Option Adapters and Ports
You can connect the following to this adapter
RJ45
Option Adapters and Ports
Y cable MW8/8
Floating contact MW6/6 Headset MW8/8
Pin assignment Floating contact MW6/6
5.2.1 Electrical Requirements of the Headset
Option Adapters and Ports optiPoint 500 acoustic adapter
Pin assignment Headset MW 8/8
5.2.2 Floating Contacts
Option Adapters and Ports
Contact Load
RJ11
5.3 optiPoint 500 Analog Adapters
Option Adapters and Ports
optiPoint 500 Analog Adapters
The adapter does not support the following functions
Option Adapters and Ports
Analog Interface
Standard analog interface for analog telephones cordless telephones
Functions
5.4 optiPoint 500 ISDN Adapter
Option Adapters and Ports
RJ45
Functional Description
5.5 optiPoint 500 Phone Adapter Host/Client
Option Adapters and Ports
RJ11
Interface Description
5.6 optiPoint 500 recorder adapter
Option Adapters and Ports
Interfaces
5-13
Option Adapters and Ports optiPoint 500 recorder adapter
Recorder port MW 6/4
Electrical Requirements
Host
Option Adapters and Ports
Connection Example
Client
Phone
5.7 Port Overview
Option Adapters and Ports
5-15
Signature
Option Adapters and Ports
5-16
Akustik
6 CallBridge
6.1 CallBridge TU
CallBridge
CallBridge
6.2 CallBridge for Data
7 IP Adapter
IP Adapter Administration
IP Adapter
IPadapter
7.1 optiPoint IPadapter Installation
optiPoint
optiPoint
IP Adapter
7.2 Connection to the Terminal
optiPoint
7.3 Connection to the System
IP Adapter
Hicom
Structural overview
7.4 Administration Via the Web Browser
Administration Via the Web Browser
IP Adapter
if the connection to the LAN is cleared down
Fault signaling
Error example
IP Adapter
IP Adapter
optiPoint IPadapter Tel
via Administrator Login if necessary
Leads to Administration page
optiPoint IPadapter administrator login
The optiPoint IPadapter web server allows the administrator to
MAC address
Administration
IP Adapter
General information
BIOS contains the initialization software and factory test
IP Adapter
7-10
IP Adapter
8. Click “IP address and routing” and enter the following addresses
7-11
IP Adapter
If more than 24 characters are input, the following message appears
7-12
7-13
Reset
Return to Administrator settings
IP Adapter
IP Adapter
Default
Options are y No transfer y Upload configuration
y Download configuration y Download application y Upload history
IP Adapter
Default
Cause of fault
Fault description
7-16
The submitted data contained an error Invalid new password
IP Adapter
Load download from fileserver application
7-17
Load download from fileserver configuration
Save upload to fileserver configuration
IP Adapter
7-18
Save upload to fileserver configuration
IP Adapter
History file
Restart terminal
Return to Administration
IP Adapter
7-19
Invoke tests
Diagnostics
IP Adapter
7-20
IP Adapter
Change administrator password
Current admin password New password Confirm new password
Reset
7-22
7.5 Administration via optiPoint
Fault signaling
IP Adapter
Ping to Partner failed
Ping to Gateway failed
Figure 7-6 Error codes for configuration settings
IP Adapter
7-24
To perform administration via the telephone, proceed as follows
IP Adapter
7-25
Password
Password
Password Abort?
Password
DHCP?
TC Login password?
IP Adapter
7-27
Example “DHCP Input”
enable?
disable?
IP Adapter
Page
phone-side?
IP Adapter
Example Mode Input
Operation mode
7-31
7.6 Configuration Examples
Configuring the IPadapter at Hicom
IP Adapter
optiPoint side
HG 1500 cannot be configured via the WEB interface
Figure 7-7 WEB access to the IPadapter
IP Adapter
IP Adapter
3. Click Administration. The administrator password must be entered
The IP address, default gateway, etc. are set here
Figure 7-8 WEB page administration
IP Adapter
4. Enter the following addresses
7-34
7-35
Configuration in HG 1500 and Office
Settings in Assistant Office
IP Adapter
Configuring the IPadapter at Hicom
IP Adapter
7-36
IP Adapter
3. Click Administration. The administrator password must be entered
The IP address, default gateway, etc. are set here
Figure 7-12 WEB page administration
Partner IP address the IPadapter IP ad- dress in this case phone-side
IP address, subnet mask, IP partner address and default gateway
IP Adapter
4. Enter the following addresses
7-39
Configuring the optiPoint IPadapter on the optiset E
IP Adapter
optiset E
Configuration Examples
IP Adapter
7-40
Troubleshooting
8 Troubleshooting
8.2 Reboot
8.1 Test Loops 3 and
Reboot
Troubleshooting
Name
9 Ordering Information
9.1 Products and Spare Parts
Ordering Information
Part Number
Ordering Information
Name
Color
Color
9.1.2 Accessories, Spare Parts, Miscellaneous
Ordering Information
Name
Ordering Information
Accessory pack for advance
Accessory pack for BLF
Accessory pack for general optiPoint
Reference number
9.2 Documentation
Ordering Information
Name
Company Address
9.3 Order Addresses
Ordering Information
Product
Company Address
9.4 After-Sales Service and Repair
Ordering Information
Product
Subject
9.5 Intranet Addresses
Ordering Information
Intranet Addresses
Ordering Information
Intranet Addresses
9-10
Abbreviations
Abbreviation
Definition
Definition
Abbreviation
Index