Manuals
/
SMC Networks
/
Computer Equipment
/
Network Router
SMC Networks
SMC7404BRA EU
manual
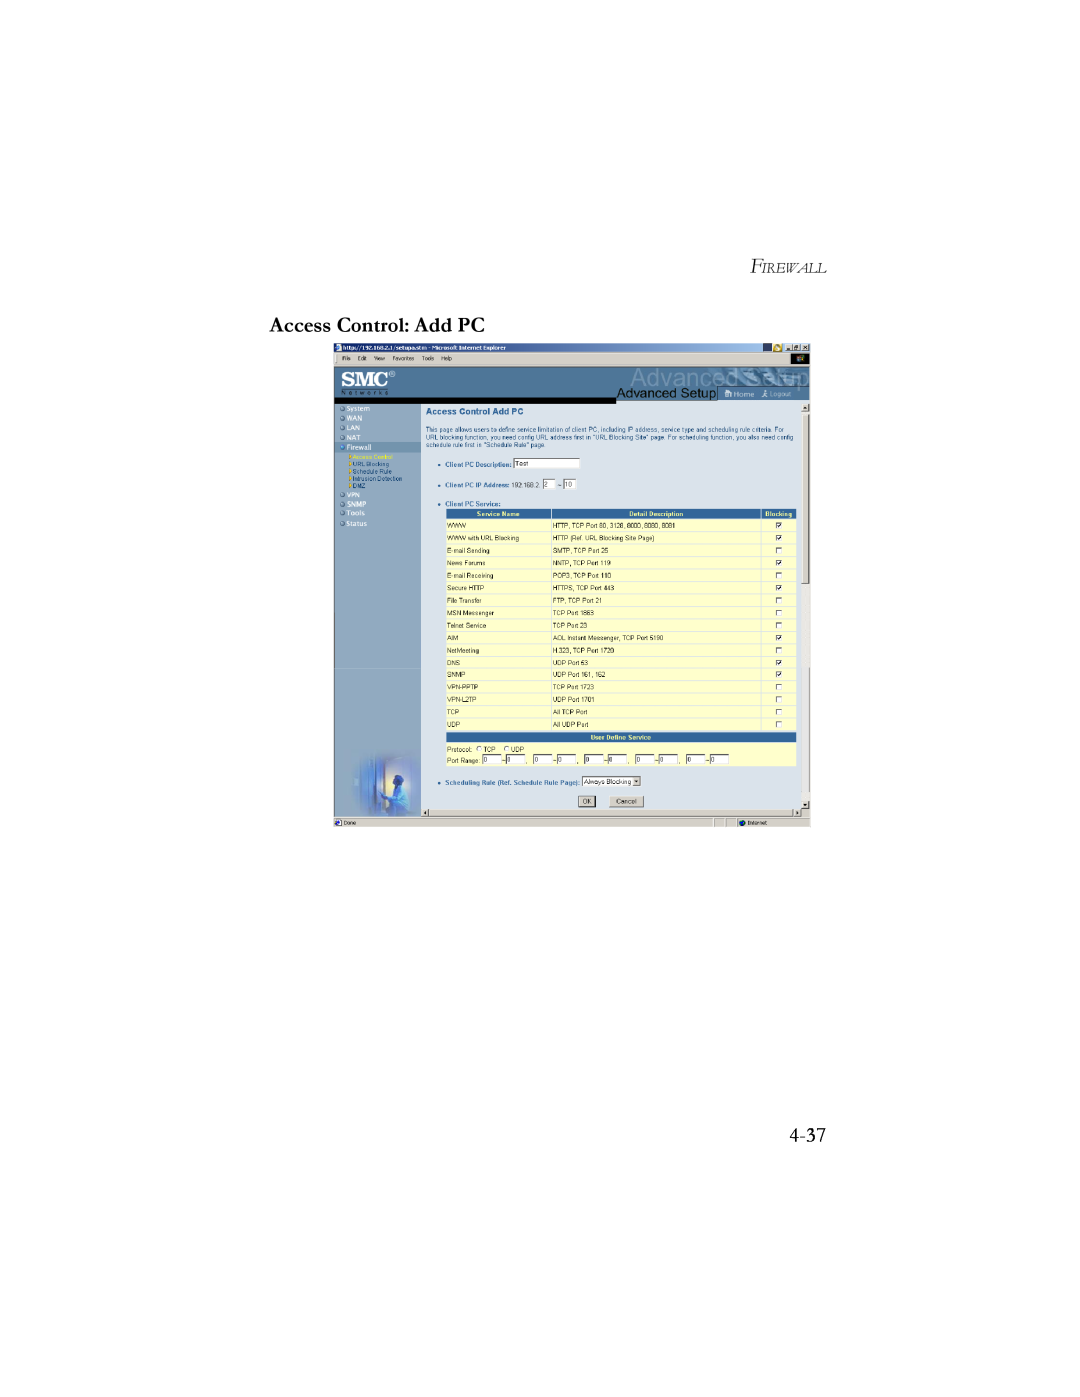
Access Control Add PC, 4-37, Firewall
Models:
SMC7404BRA EU
1
62
130
130
Download
130 pages
9.51 Kb
59
60
61
62
63
64
65
66
Troubleshooting
Specifications
Install
Signal Name
Password
Wired LAN
Warranty
Phone Line Configuration
Reset
Access Control
Page 62
Image 62
F
IREWALL
Access Control: Add PC
4-37
Page 61
Page 63
Page 62
Image 62
Page 61
Page 63
Contents
Broadband Router with built-in ADSL Modem
User Guide
Page
From SMC’s line of award-winning connectivity solutions December
Part No 750.9701, UK Pub No 150000035400A
FCC - Part
COMPLIANCES
FCC - Class B
COMPLIANCES
Industry Canada - Class B
Australia AS/NZS 3548 1995 - Class B
EC Conformance Declaration - Class B
COMPLIANCES
3 Configuring Client PCs
TABLE OF CONTENTS
2 Installation
4 Configuring the Barricade
5 Configuring Client TCP/IP
TABLE OF CONTENTS
6 Configuring Printer Services
TABLE OF CONTENTS
About the Barricade
Features and Benefits
CHAPTER INTRODUCTION
VPN pass-through IPSec-ESP Tunnel mode, L2TP, PPTP
Internet Access
Applications
Wired LAN
Shared IP Address
Virtual Private Network VPN
DMZ Host Support
Security
CHAPTER INSTALLATION
Package Contents
System Requirements
Hardware Description
Description
Condition
LEDs
Verify Status
Status
Connect the System
Figure 2-1. Installing With a Splitter
Phone Line Configuration
Installing a Full-rate Connection
Connect the ADSL Line
Attach to Your Network Using Ethernet Cabling
Installing a Splitterless Connection
Figure 2-2. Installing Without a Splitter
Connect the Power Adapter
TCP/IP Configuration
CHAPTER 3 CONFIGURING CLIENT PCS
CONFIGURING CLIENT PCS
CHAPTER CONFIGURING THE BARRICADE
Navigating the Web Browser Interface
Making Configuration Changes
Setup Wizard
Time Zone
Internet Sharing
Parameter Setting
Parameter
Finish
PPPoE & PPPoA
Description
Gateway usually your ISP will supply this address
network, it will forward the packets to the Default
SETUP WIZARD
Multiple Protocol over ATM Mode
4-10
4-11
4-12
4-13
Advanced Setup
ADVANCED SETUP
Menu
The following table briefly describes the “Advanced Setup” menu items
4-14
4-15
Making Configuration Changes
MAKING CONFIGURATION CHANGES
System Settings
4-16
4-17
Password Settings
SYSTEM SETTINGS
Remote Management
4-18
4-19
PPPoE PPP over Ethernet
4-20
4-21
identifies the data channel within that virtual path
1483 Bridging Bridging is a standardized layer 2 technology
then it is automatically forwarded to the default router i.e
4-22
4-23
4-24
4-25
4-26
Address Mapping
4-27
Virtual Server
4-28
The more common TCP service ports include
4-29
4-30
Routing System
Static Route
4-31
Authentication Required
4-32
Parameter Description
Routing Table
4-33
Firewall
4-34
FIREWALL
Access Control
4-35
The following items are on the “Access Control” screen
4-36
Access Control Add PC
4-37
URL Blocking
4-38
4-39
You may filter Internet access for local clients based on rules
Schedule Rule
1. Click “Add Schedule Rule.”
3. Click “OK” and then click “APPLY” to save your settings
4-40
Intrusion Detection
4-41
WAN port. When the SPI feature is turned on
Enable SPI and
limits the access of the incoming traffic at the
The Intrusion Detection feature of the Barricade
4-43
Stateful Packet
If an IPX RIP request packet is not replied to by
state structure remains active. When the timeout
4-44
the router, it will stay in the input queue and not
The length of time for which an H.323 session
Parameter Defaults Description
4-45
Maximum number of allowed incomplete TCP
4-46
Community
SNMP
SNMP
4-47
4-48
A community string password specified for trap
Trap
management. Enter a word, something other than
4-49
ADSL
ADSL
Status
4-50
Interleaved Path FEC Correction
Maximum fluctuation in the output power
4-51
4-52
4-53
Tools
Configuration Tools
Firmware Upgrade
4-54
Reset
4-55
Status
4-56
STATUS
4-57
The following items are included on this screen
4-58
Windows 95/98/Me
CHAPTER 5 CONFIGURING CLIENT TCP/IP
2. In “Control Panel” double-click the “Network” icon
TCP/IP Configuration Setting
WINDOWS 95/98/ME
Disable HTTP Proxy
Internet Explorer
Obtain IP Settings from Your ADSL Router
Netscape
Windows NT
WINDOWS NT
11. Windows may copy some
You need to verify that the “HTTP Proxy” feature of your Web browser is disabled. This is so that your browser can view the Barricade’s HTML configuration pages. Determine which browser you use and refer to “Internet Explorer” on page 5-4 or “Netscape” on page
5-10
4. Type “EXIT” and press ENTER to close the “Command Prompt” window
Your computer is now configured to connect to the Barricade
3. The connection status screen will open. Click “Properties.”
Windows
5-11
WINDOWS
5-12
4. Double-click “Internet Protocol TCP/IP.”
5-13
5-14
1. Click “start/Control Panel.”
Windows XP
5-15
2. In “Control Panel” click “Network and Internet Connections.”
5-16
5. Double-click “Internet Protocol TCP/IP.”
5-17
Type “EXIT” and press ENTER to close the “Command Prompt” window
5-18
5-19
Configuring Your Macintosh Computer
CONFIGURING YOUR MACINTOSH COMPUTER
3. If “Using DHCP Server” is already selected in the “Configure” field, your computer is already configured for DHCP. Close the TCP/IP dialog box, and skip to “Disable HTTP Proxy” on page 5-21.”
5-20
5-21
5-22
3. Select “Direct Connection to the Internet” and click “OK.”
5-23
5-24
Skip this section if you are using Unix
CHAPTER CONFIGURING PRINTER SERVICES
Install the Printer Port Monitor
INSTALL THE PRINTER PORT MONITOR
CONFIGURING PRINTER SERVICES
Configure the Print Server
Configure the Network Printer in Windows 95/98/Me/2000
4. Select the monitored port. The default port name is “SMC100.” Click the “Configure Port” button
Configure the Network Printer in Windows NT
Configure the Network Printer in Unix Systems
CONFIGURE THE PRINT SERVER
APPENDIX A TROUBLESHOOTING
Page
Page
TROUBLESHOOTING
APPENDIX B CABLES
Ethernet Cable
RJ-45 Port Ethernet Connection
Pin Assignments
Straight-Through Wiring
Crossover Wiring
ADSL Cable Connection
Figure B-3. RJ-11 Pinouts
Signal Name
Not used
CABLES
APPENDIX C SPECIFICATIONS
Page
LIMITED WARRANTY
SMCs Limited Warranty Statement
LIMITED WARRANTY
Contact SMC
Full Installation Manual
Firmware and Drivers
Statement of Conditions
Top
Page
Image
Contents