LocationFreeTV
Owner’s Record
FCC Radiation Exposure Statement
Recycling Lithium ION Rechargeable Batteries
Table of Contents
Web
Basics Operations
Mail
Album
Functions and Settings
Entering Characters
Others
139
What is a LocationFreeTV?
Tips
Monitor
Identifying Parts and Controls
For the LF-X1 Right side
Top
Left side
Rear
For the LF-X5 Right side
Capture button 1
Base Station
Front Rear
Checking the Package Contents
Page
Basic Basic Setting
Basic Installing and Connecting
Basic Guide to On-screen Icons
Advance Selecting a Connection Type for the Monitor
Advance Watching A/V via Home-Wired LAN
Advance Making Use of NetAV
Attaching the Base Station Stand
Connecting to the antenna cable
Connecting to a TV Antenna
Connecting to an External TV Tuner STB
Connecting to the video input terminal
Connecting Other Devices
Watching video on a connected device
Using a VCR and TV
Turning On Power
Connecting the Power Cord to the Base Station
For the LF-X1
Inserting the Battery
Removing the battery
For the LF-X5
Connecting the Power Cord to the Monitor
Slide Power on top of the monitor to turn it on
Turning on the power
Press Power on the front of the base
Turning off the monitor power
Battery charging time
Charging the Battery
Battery Life
Approximate life of a fully charged battery
Make the monitor upright using the stand on the bottom
Using the Monitor Handle LF-X1 Only
Adjusting the Monitor Stand
Carrying Positioning Monitor
Adjusting the Viewing Angle
Auto Program for the Built-in
Setting Up TV
Channels
Tuner
Select an Internal TV tuner, and then select Back
When you are finished…
For CABLE, select on or OFF, then select Auto Program
TV channel you selected appears
Auto Program for External TV Tuner
Using the On- screen Remote Control
Setting Up and Connecting the IR Blaster
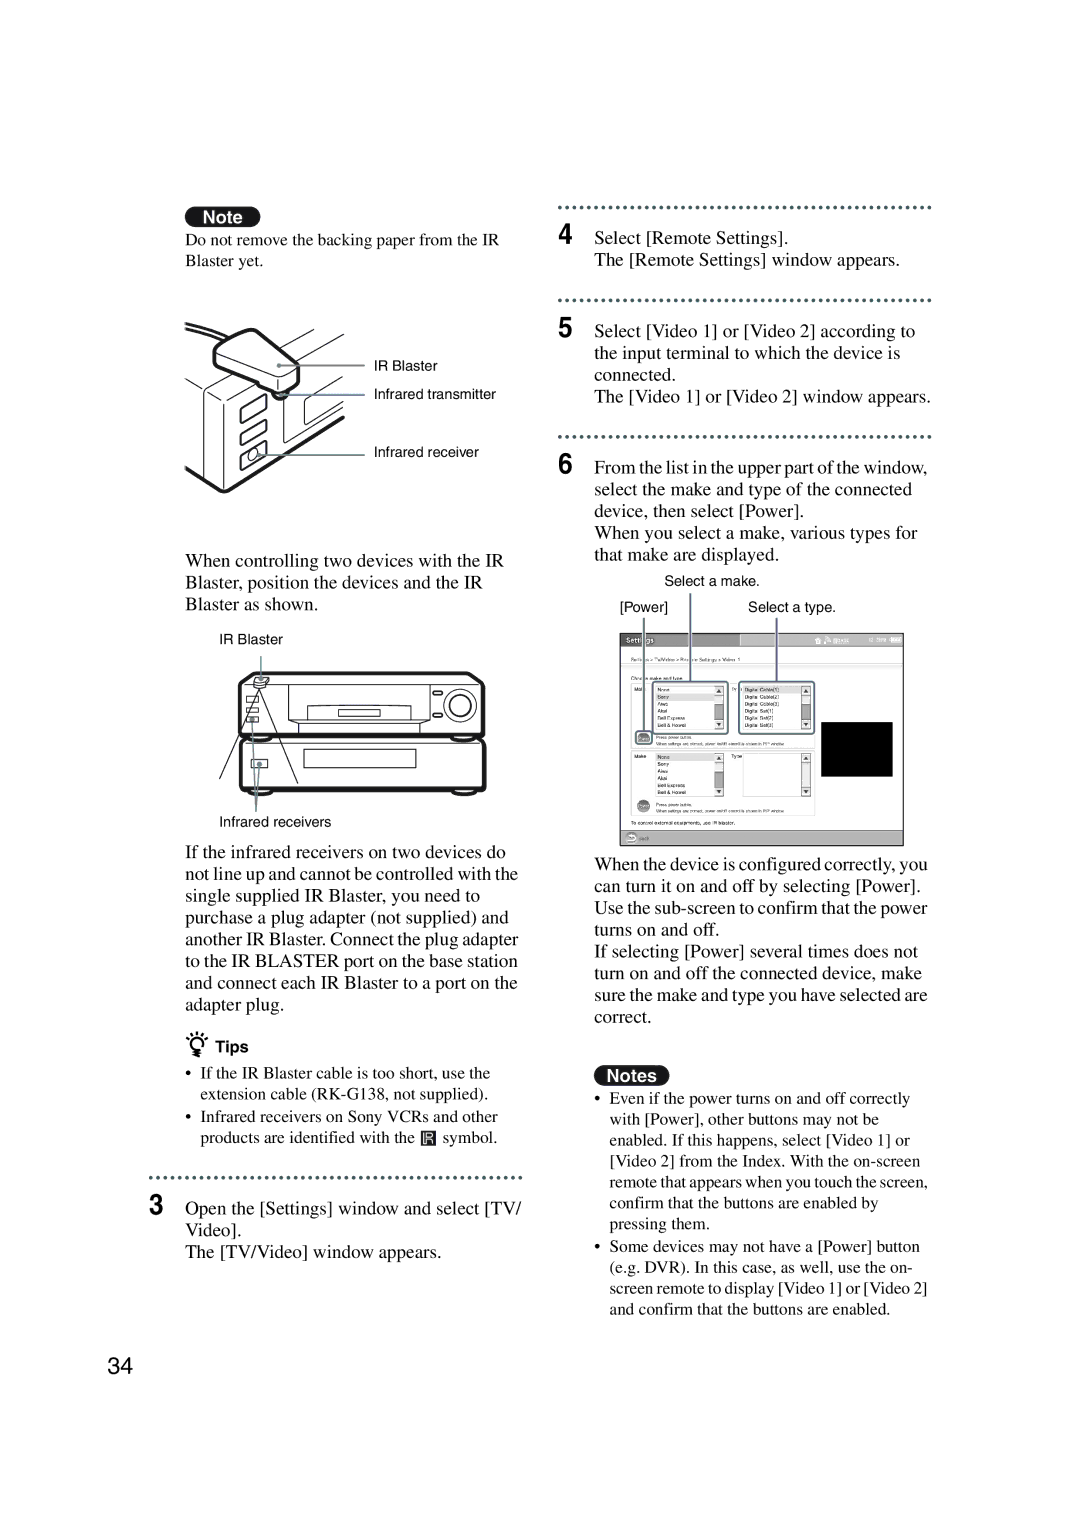
Do not remove the backing paper from the IR Blaster yet
Select the type of the on-screen remote
Setting up multiple external devices
Connecting two devices to a single input terminal
Control
Page
Connecting to Internet
Necessary Equipment
Connecting to a cable or DSL modem
Connection Examples
What is a router?
Connecting several devices to a modem with a router
Configuring router settings
Connecting via LAN Dhcp
Before Configuring Network Settings
Select Back Internet Connection window reappears
Setting
Connecting via LAN Assigning an IP Address Manually
Connecting Via LAN PPPoE
Select LAN DHCP/Manual IP address
Select OK This sets the configuration for LAN PPPoE
Access ID*1
Internet connection password*2
DNS1*3 and DNS2*4 parameters
To send and receive mail, you must configure
Setting Up Mail
LocationFreeTV to access your mail account
Password *2
E-mail window reappears Select Settings, then select Exit
Guide to On-screen Icons
Basic Guide to On-screen Icons
Page
Wireless Connection at Home
Select Back Connection mode is changed
Wired LAN Connection at Home
Wired LAN Connection On
Setting Up to Use Public Wireless Access
Wireless Connection On
Following is an example of how to establish a
Alias
Authentication scheme
Encryption
Security settings of the LocationFreeTV
About Wireless
Security
Page
Enable Wired LAN
Advance Watching A/V via Home-Wired LAN
Connecting the monitor
Connecting via Home-Wired
Base station Address
What’s NetAV
Connecting to the Internet using the NetAV function
Line types not supported by NetAV
Making the base station accessible by NetAV
Setting Up NetAV
Start up the NetAV server on the base station
Registering Other Monitors
Configuring the monitor to connect using NetAV
Setting the Dynamic DNS client on the base station
Port number for the NetAV
Configuring base station settings
Setting up for additional monitors
Setting up to connect to the base station via the Internet
Configuring additional monitor settings
Registering other monitors to the base station
When Connecting via Wired LAN
Connecting with NetAV
For the LF-X1 For the LF-X5
Changing TV channels
Establishing the NetAV connection
Quitting NetAV
Changing the TV picture size
Select a speed
Basics Operations
Index window appears
Corresponding screen appears
Select a function LF-X5 has no Monitor Video In option
Watching TV and Video
Changing channels with the on- screen remote control
LF-X1 LF-X5
Changing channels with the stylus
Parts and controls on the TV/Video screen
Using the TV/Video Screen
Settings button Displays the Settings window
For the LF-X1
Selecting a Secondary Audio Program SAP
Optimizing Picture Quality
Using the Sub- Screen LF-X1 only
Press Capture when a scene appears that you want to save
Capturing Images
Using the Wide Screen Mode LF-X5 only
Page
Web
Viewing Web Pages Basics
Using the Web Window
Parts and controls on the Web window
Viewing Web Pages Useful Functions
Using the Fav. List
After viewing a web page that requires user authentication
Adding a web page to the Fav. list
Select Add
Viewing a web page in the Fav. list
Renaming a web page in the Fav. list
Selected web page begins downloading
Deleting web pages from the Fav. list
Saving a Web Page Save
Copying web pages to or from an external memory card
Enter a new title in the Title field and select OK
Copying saved web pages to or from an external memory card
Viewing a saved web
Renaming a saved web
Deleting saved web pages
Searching for Text on a Web
Capturing a Web Page Album
Web
Copying and Pasting Text
To stop searching, select Exit
On the Web Settings
Configuring Other
Default
Enable Java Applet
Enable JavaScript
Enable Flash
Erase Saved Passwords
Page
Mail
Using the Mail Window
Using Mail Basics
Inbox and Outbox Windows
Sending mail that you have
Reply, Resend, or Edit
Reply Displays the window for Replying to mail 1 Resend
Already sent
Compose Mail window
Composing Mail
Composing and Sending Mail
From the Outbox
Attaching a Picture or Movie
Selected picture is displayed in the Compose E-mail window
Attaching multiple pictures
Verifying attached pictures
Removing attached pictures
Attaching multiple drawings
Attaching a Drawing
Saving a drawing in the Photo Album
Reading Mail
Content of the mail is displayed
Reading, Replying to, and Forwarding Mail
Select Save Drawing is saved in the album
Following links in mail
Displaying mail in full-screen mode
Deleting mail
Enlarging an attached picture
Forwarding Mail
Replying to Mail
Replying to multiple recipients
Adding addresses to the address book
Using Mail Useful Functions
Using the Address Book
Enter the mail address of the recipient, and select Send
Entering addresses directly in the Address Book
Selecting a recipient from Address Book
Mail window shown in reappears
Editing the address book
Moving Mail to Memory Stick or CompactFlash Card
Renaming a folder
Auto-checking for New Mail LF-X1 Only
Configuring Other Mail Settings
Select Settings Settings window reappears Select Exit
Searching for Mail
Setting an E-mail Protection Password
100
101
Page
Album
Using the Album Window
104
105
Viewing Images in the Album
Displaying the Album
Open the Index window, and select Album
106
Viewing Enlarged Pictures
Stretching a small picture to full- screen LF-X1 only
Displaying selected pictures in a selected order
Viewing a Slide Show
107
Changing the slide show screen- change interval
Saving a drawing in progress
Drawing on Screen
108
Starting from scratch
109
Using the Drawing Palette
Pen panel
Stamp panel
Watching Movies
110
To use stamps
111
Sending a Picture by Mail
Compose E-mail window appears
112
Compose and send the mail 1
Information window appears
Displaying Picture Information
113
Select OK Picture List window reappears
Page
Entering Characters
Entering Characters
116
117
Using the On-screen Keyboard
Alphabetic keyboard
Symbol keyboard
118
Using an External Keyboard LF-X1 only
119
Page
Memory Stick LF-X1 CompactFlash LF-X5
Inserting a Memory Stick
Supported Media Types
122
Removing the Memory Stick
123
Memory Stick Media
About data
124
Using a CompactFlash Card LF-X5 Only
Inserting a CompactFlash card
125
Using a Memory Stick Duo
Removing a CompactFlash Card
Initializing a Memory Stick CompactFlash Card
126
Functions and Settings
128
Basic Settings
Power Save Timer
Backlight shuts off and the screen goes dark
129
Deleting Unwanted Channels
Restoring a Deleted Channel Manually
Channels this product can receive
130
While checking the wireless signal
Changing Wireless Channel Manually
Adjust the necessary items Select Manual
Quality, select the optimum wireless Channel
Using another wireless device nearby
Using the Base Station as a Wireless Access Point
What Is Wireless LAN?
132
Setting up the LocationFreeTV
Setting Up a Wireless LAN
133
Setting up your computer
134
Initializing Internet Connection/Wireless
Resetting Factory Defaults
Resetting All Settings
Initializing the Base Station
Initializing Mail Settings
136
137
Settings window is restored Select Back
Checking Available Memory
Increasing available memory
Page
Others
Status indicators
Status Indicators
140
141
Troubleshooting
General
External Keyboard LF-X1 only
142
TV and video
143
No picture
144
TV/video
Poor picture
145
Web
146
147
Mail
148
Public Wireless Access
Album
149
NetAV
Registered monitors
150
Others
Specifications
151
152
AC power adapter
BP-LX1A Battery
AC-LX1M for the monitor
153
Optional Accesories
154
For the LF-X5 System
155
BP-LX5A Battery
BP-LX5B Battery
AC-LX5M for the monitor
Requirements 50/60 Hz Battery 2,200 mAh
Monitor Approx lbs oz g Including the battery BP
156
Index
157
158
Trademarks
159