MZ-B10
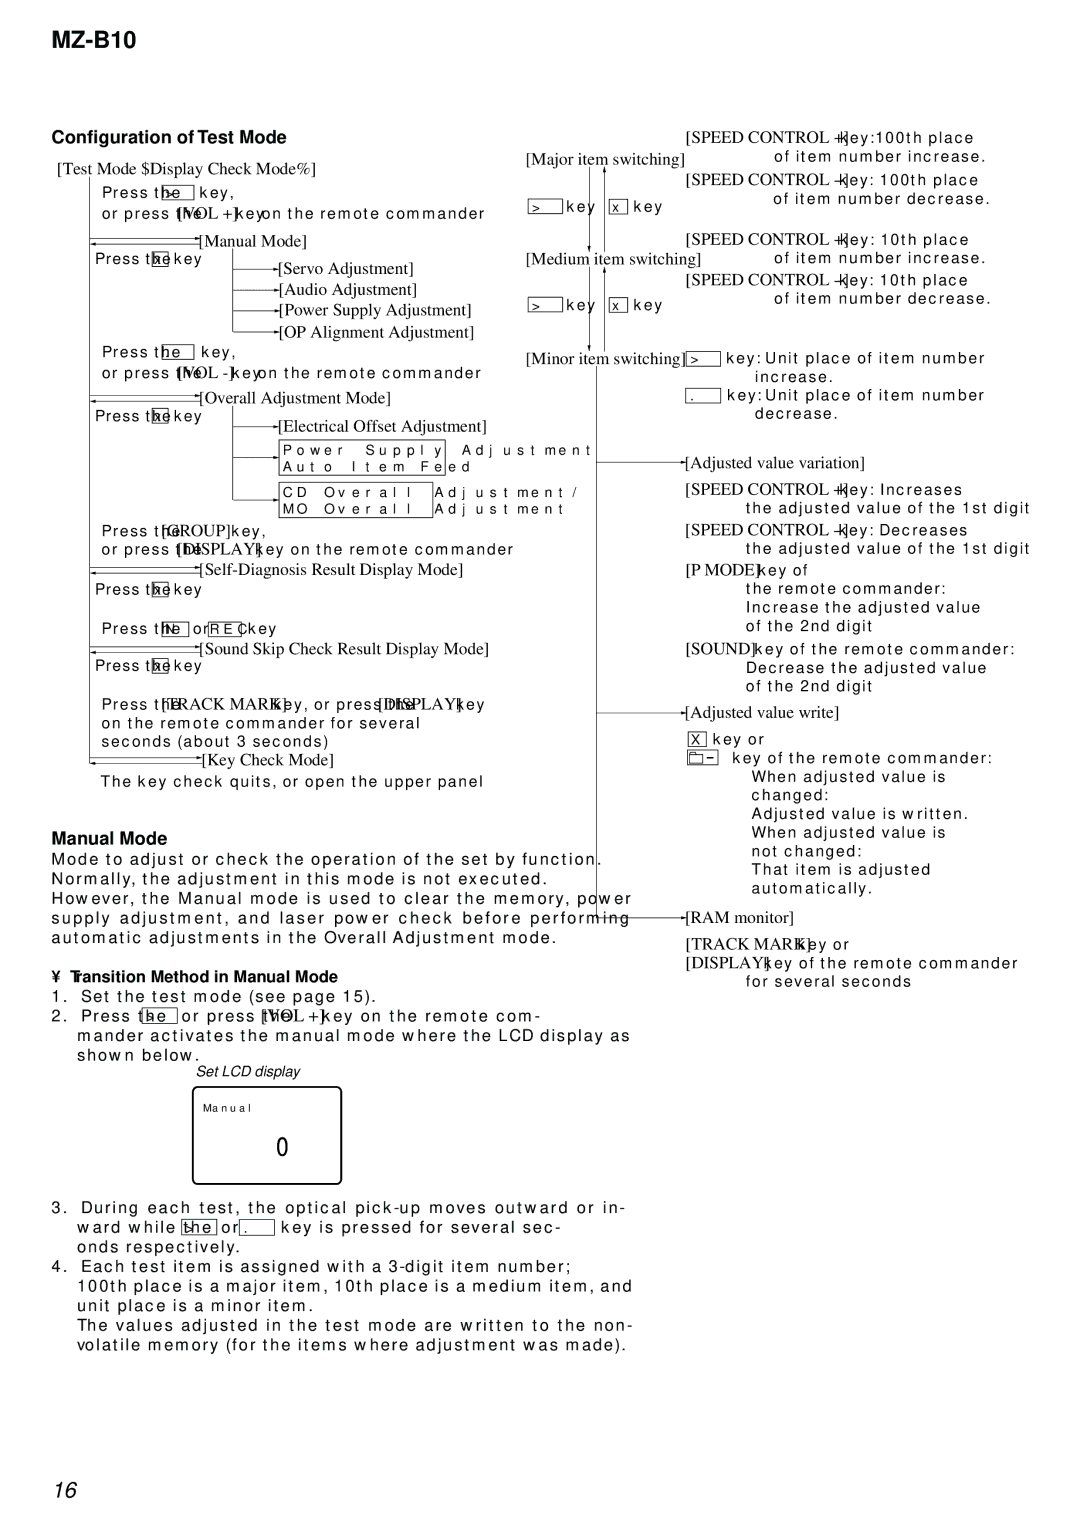
Configuration of Test Mode
[Test Mode $Display Check Mode%]
Press the > key,
or press the [VOL +] key on the remote commander
![]() [Manual Mode]
[Manual Mode]
Press the x key
 [Servo Adjustment]
|
|
|
|
| [SPEED CONTROL +] key:100th place |
[Major item switching] | of item number increase. | ||||
|
|
|
|
| [SPEED CONTROL |
|
| key |
| x key | of item number decrease. |
| > |
| |||
|
|
| |||
|
|
|
|
| [SPEED CONTROL +] key: 10th place |
[Medium | item switching] | of item number increase. | |||
![]() [Audio Adjustment]
[Audio Adjustment]
![]() [Power Supply Adjustment]
[Power Supply Adjustment]
![]() [OP Alignment Adjustment]
[OP Alignment Adjustment]
Press the . key,
or press the [VOL
![]() [Overall Adjustment Mode]
[Overall Adjustment Mode]
Press the x key
 [Electrical Offset Adjustment]
>key x key
[Minor item switching]
[SPEED CONTROL
>key: Unit place of item number
increase.
.key: Unit place of item number decrease.
Power Supply Adjustment
Auto Item Feed
CD Overall Adjustment/
MO Overall Adjustment
Press the [GROUP] key,
or press the [DISPLAY] key on the remote commander
![]() [Self-Diagnosis
[Self-Diagnosis
Press the x key
Press the N or REC key
 [Sound Skip Check Result Display Mode]
Press the x key
Press the [TRACK MARK] key, or press the [DISPLAY] key on the remote commander for several
seconds (about 3 seconds)
![]()
![]() [Key Check Mode]
[Key Check Mode]
The key check quits, or open the upper panel
Manual Mode
Mode to adjust or check the operation of the set by function. Normally, the adjustment in this mode is not executed. However, the Manual mode is used to clear the memory, power supply adjustment, and laser power check before performing automatic adjustments in the Overall Adjustment mode.
• Transition Method in Manual Mode
1.Set the test mode (see page 15).
2.Press the > or press the[VOL +] key on the remote com- mander activates the manual mode where the LCD display as
shown below.
Set LCD display
M a n u a l
0 00
3.During each test, the optical
4.Each test item is assigned with a
100th place is a major item, 10th place is a medium item, and unit place is a minor item.
The values adjusted in the test mode are written to the non- volatile memory (for the items where adjustment was made).
 [Adjusted value variation]
[SPEED CONTROL +] key: Increases the adjusted value of the 1st digit
[SPEED CONTROL
[P MODE] key of
the remote commander: Increase the adjusted value of the 2nd digit
[SOUND] key of the remote commander: Decrease the adjusted value
of the 2nd digit
 [Adjusted value write]
Xkey or
![]()
![]()
![]()
![]() key of the remote commander: When adjusted value is changed:
key of the remote commander: When adjusted value is changed:
Adjusted value is written. When adjusted value is not changed:
That item is adjusted automatically.
 [RAM monitor]
[TRACK MARK] key or
[DISPLAY] key of the remote commander for several seconds
16
